With the evolution of authentication techniques, days are gone when you had to remember a password or a PIN. The fingerprint login feature has made signing in so easy that you can sign in to your system in the blink of an eye.
After our recent article about fingerprints not working on Mobile, a lot of you’ve requested the fixes on Windows and Mac as well. You can also apply some of the preliminary fixes mentioned there in the case of laptops. But there is a lot more to cover.
As always, we’ve done all the hard work for you and listed all of the troubleshooting methods if your fingerprint isn’t working on your laptop.
Why Is My Fingerprint Not Working on a Laptop?
- Defective fingerprint reader
- Outdated device drivers
- Corrupted system files
- Improper settings
- Windows Update problems
How to Fix Fingerprint Not Working on a Laptop
Before moving to the fixes section, the first thing you must make sure of is to clean your fingers and fingerprint sensors. It is the immediate solution when your fingerprint is not working properly.
Likewise, Fingerprint sensors can sometimes be unresponsive or malfunctioning. Windows may even show different error messages related to the sensor, like Windows 10 fingerprint login not working, stopped working, unavailable, or missing. As we already discussed, there can be several reasons for the failure.
Whatever be the reasons, I have listed twelve fixes here to help you sort out this problem. Let’s dive straight into them.
Update Your Fingerprint Sensor’s Driver
The first thing you can do is to update your fingerprint sensor’s driver. Device drivers are the software that coordinates your device’s working with the operating system. Manufacturers release the newer versions of drivers with time, and older versions can be causing the issue.
Likewise, in case the drivers are corrupted, updating might help. Follow these steps to update your fingerprint sensor’s driver:
- Press the Windows+R key simultaneously to open the Run dialog box.
- Type
devmgmt.mscin the dialog box and press Enter key to open Device Manager. - Look for the menu that says Biometric devices and expand it.
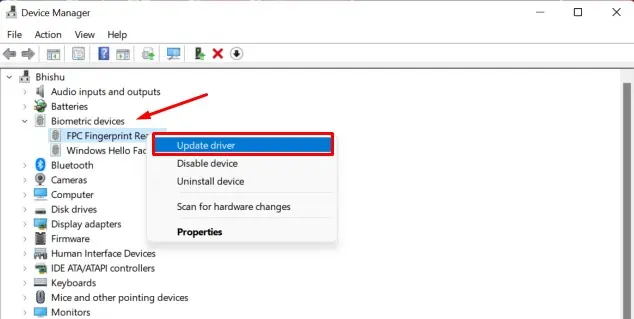
- Right-click on your fingerprint sensor’s name and select the Update driver option.

- In the next window, select the Search automatically for drivers option. If you have drivers with you, proceed with the Browse my computer for drivers option.
After completing these steps, it will install updated drivers for your fingerprint sensor.
Reinstall the Fingerprint Driver
If updating does not work, you shall perform a clean installation of the fingerprint driver. It will fix any bugs and make it work again. To reinstall the fingerprint software, you must uninstall the device and restart your PC. Follow these steps:
- Open Device Manager.
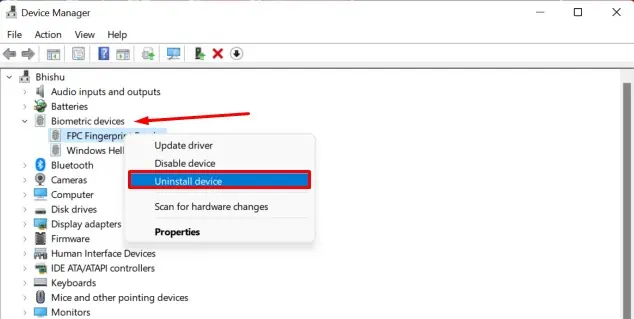
- Under Biometric devices, right-click on your fingerprint sensor device and select the Uninstall device option.

- Confirm the uninstallation on the next pop-up window.
- Restart your PC.
If you have a separate software installed for your biometric device, you must also reinstall it. To reinstall it, follow these steps:
- Open Control Panel > Programs > Programs and Features
- Look for your biometrics software there. Right-click over it and click on the Uninstall option.
- After successful uninstallation, again reinstall the software.
Re-add the Fingerprint
There are two cases why you need to re-add the fingerprint. Either the fingerprint data stored in the system is corrupted, or you got some injury or bruises on your fingers. In both cases, the sensor can not recognize your fingerprint. So it would be best if you re-add the fingerprint. Follow these steps:
- Press the Windows+I key to open Settings
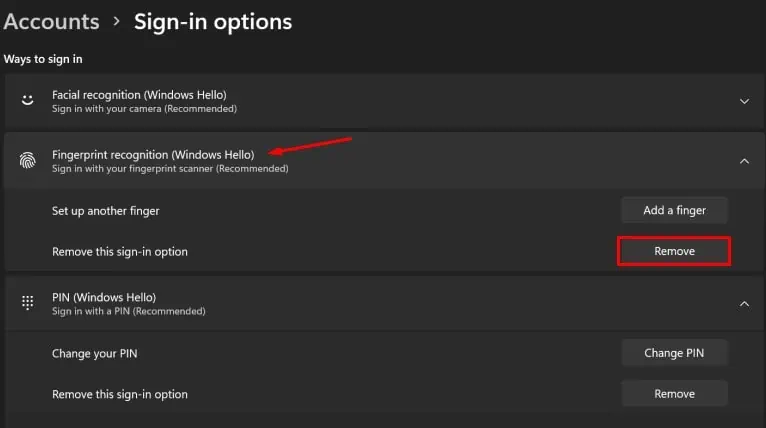
- Navigate to Accounts > Sign-in options
- Click on Windows Hello Fingerprint and click the Remove button.

- Once removed, click the Set up button to set the new fingerprint.
Follow the on-screen instructions, and it will add a new fingerprint to your device.
Tip: You can add more than one finger so that another finger can help you sign in when your one finger is probably injured or dirty.
Enable Biometrics From Group Policy Editor
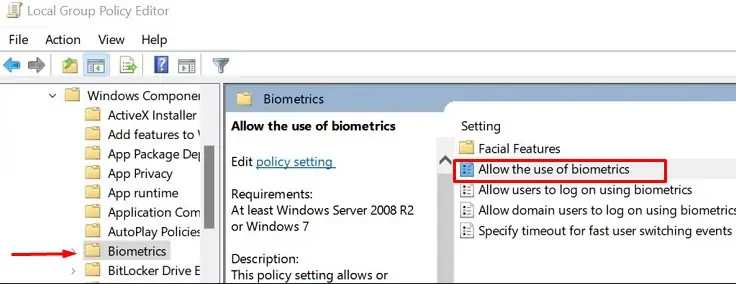
The local group policy editor allows setting policies in your system. You need to check if biometrics is disabled in the Group policy and enable it if so. Follow these steps:
- Type
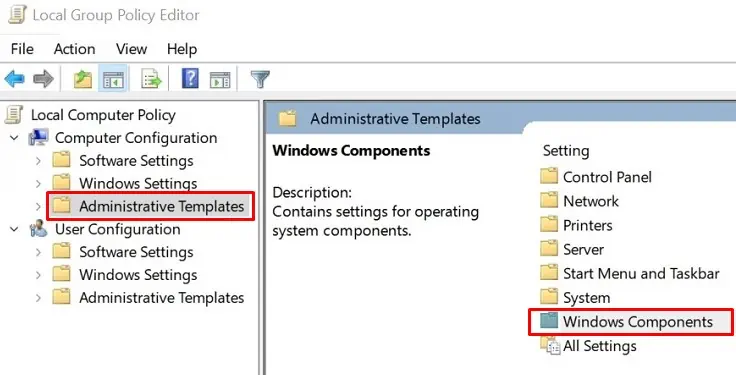
gpedit.mscin the Windows search box to open the local group policy editor. - Navigate to the
Computer Configuration > Administrative Templates > Windows Components
- On the right pane, select and open the Biometrics folder.
- Double-click on the Allow the use of Biometrics option.

- Check the Enabled option and save changes.

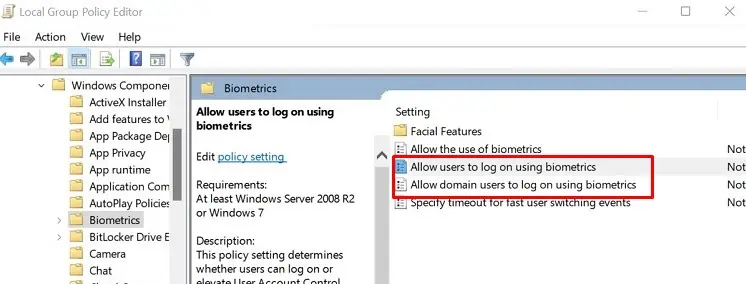
- Also enable the Allow users to log on using biometrics and Allow domain users to log on using biometrics options in the same way.

Restart your computer to see if the fingerprint has started working.
Turn Off the Fast Startup Feature
Fast Startup is a feature in Windows that speeds up your boot time. However, not every device and program is compatible with it. It can also interfere with the proper functioning of your fingerprint sensor. You can turn off the fast startup feature to see if it solves the problem. Follow these steps:
- Press the Windows+I key to open the Settings app.
- Navigate to System > Power & sleep > Additional power settings
- Click on Choose what the power buttons do from the left section.
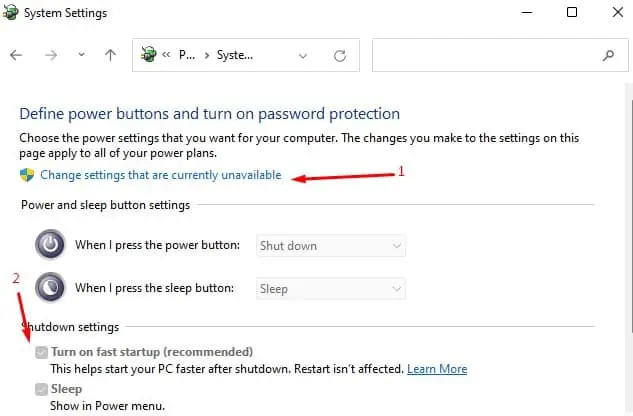
- In the System Settings window, click on Change settings that are currently unavailable.
- Uncheck the Turn on fast Startup (recommended) option and save changes.

Restart your PC and check if it solved the issue. If not, you can again turn on the fast Startup and go with the other fixes discussed below.
Repair the Corrupted System Files
If any system files associated with the fingerprint reader are corrupted, you can not sign in to your computer using the Windows Hello Fingerprint feature.
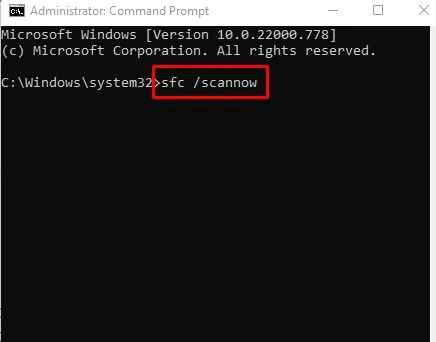
Windows provides an in-built utility tool called sfc /scannow to repair any corrupted files and reinstate them with the working version. Follow these steps to repair the corrupted system files:
- Press the Windows+R key simultaneously to open the Run dialog box. Type cmd in the search box and press Enter key.
- In the command prompt window, type the command
sfc /scannowand press Enter key.
The command will run the system scan to find any corrupted files and restore them to the working versions.
Restart the Credentials Manager Service
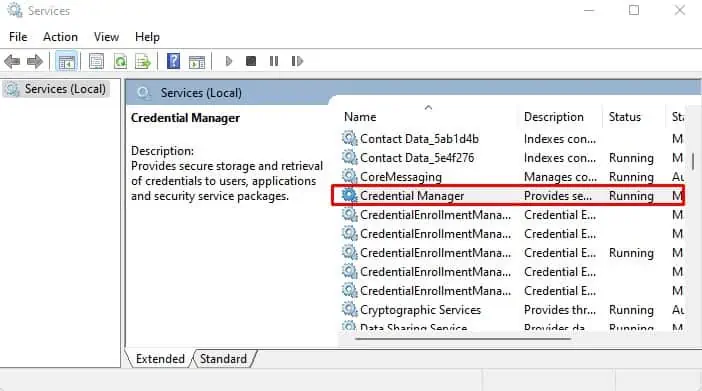
The credential manager service is a control panel feature in Windows that helps manage credentials. Various credentials like username, password as well as fingerprints that you use in the system are managed by this service.
You can restart this service to check if the fingerprint reader is up again. Follow these steps:
- Type
services.mscin the Windows search box to open the Services application. - Scroll down to see the Credentials manager. Double click on it to open its Properties window.

- Under Service status, click the Stop button. It will stop the service. Then click the Start button to restart the service.

- Save the changes.
Check to see if your fingerprint is working now.
Use a Different Fingerprint Reader
If you do not have an in-built fingerprint reader attached to your PC, you are most probably using an external fingerprint reader. There is no guarantee that it is compatible with your system. If that’s the case, try using a different fingerprint reader and see if it works.
Change Power Management Settings
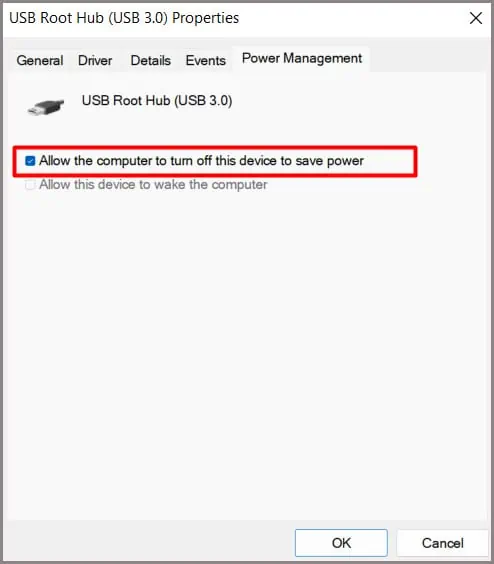
This method is for external fingerprint readers. They are connected to your USB ports. If power settings for USB ports are set to save the power, it will cause an issue. Follow these steps to change the power settings:
- Press the Windows+R key simultaneously to open the Run dialog box.
- Type
devmgmt.mscin the search box to open the Device Manager. - Search for the option that says Universal Serial Bus controllers. Expand it.
- Right-click on the USB Root Hub option and click on the Properties option. (There may be more than one USB Root Hub. You need to do the same for each)
- Under the Power Management tab, uncheck the Allow the computer to turn off this device to save power option and save changes.

Restart the computer to see if the fingerprint starts working.
Enable Biometric Device From the Bios
Normally, the biometric device is enabled by default once it is installed. But sometimes, it may be disabled from the BIOS. You need to manually enter the BIOS and enable it in such a case. Follow these steps to enable a biometric device from BIOS:
- Turn ON your computer, and as soon as the computer starts to boot, press the required key to enter the BIOS. (It is normally a DEL or F2 key).
- Navigate to the System configuration tab and look for the Biometric device option.
- If there is an option, enable it.
- Save the BIOS settings and restart the computer.
It is totally fine if you don’t see the Biometric device option. Not every manufacturer got this option.
Tweak the Registry Settings
Registry Editor lets you make changes in the configuration of hardware resources and applications installed in your system. Making minor changes in the registry settings helps your fingerprint sensor keep working again.
Also, playing with the registry editor can result badly if not done properly. So, backup your registry to be on the safe side before following these steps to tweak the settings:
- Type
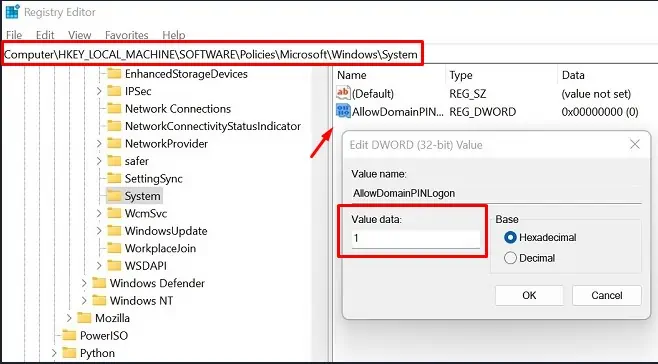
regedit.mscin the Windows search box to open the Registry editor. - Navigate to
HKEY_LOCAL_MACHINE\SOFTWARE\Policies\Microsoft\Windows\System - In the empty area of the right pane, right-click and select New → DWORD (32-bit) Value
- Create a new entry named AllowDomainPINLogon. Double-click on it and set its value to 1.

- Save the changes and restart your computer.
Check to see if the fingerprint works.
Install or Uninstall the Latest Windows Update
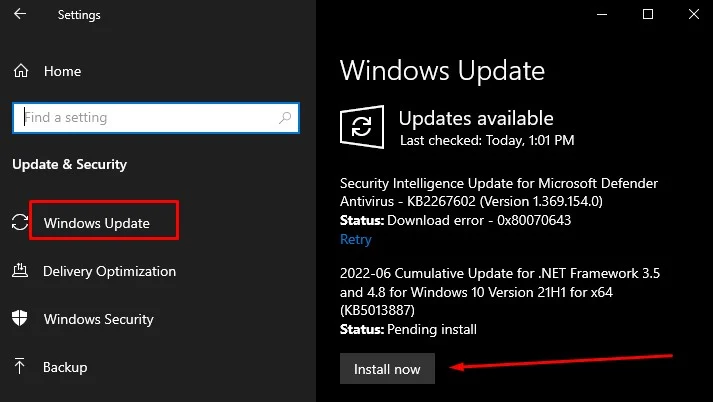
With every new Windows update release, it is possible that the fingerprint stops working. So you can update the PC to see if it solves the problem. And if you face further issues after installing the updates, you can always roll back the updates in no time.
- First, You need to check for updates by going to Settings > Update & Security > Windows Update.
- Download and install if any updates are available.

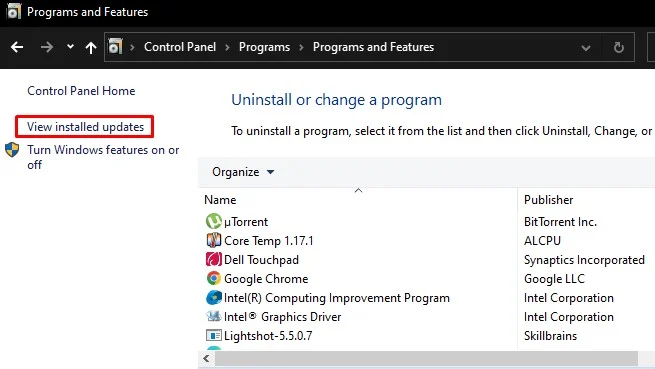
On the contrary, you need to delete the updates if the fingerprint sensor started acting up after the update . It could be because of the upgrades that contain bugs and glitches. Follow these steps to remove the Windows updates:
- Navigate to Control Panel > Programs > Programs and Features > View installed updates

- See for the most current system updates that you installed. Right-click on it and select the Uninstall button.


