Secure boot is a security feature on your PC that checks the digital signature of each driver, operating system (OS), and even boot software like EFI applications. Only if they are valid can you boot into your OS.
This way you prevent external threats that load during the boot loading process from harming your system. Secure boot is also essential if you want to install Windows 11 on your PC.
You need to navigate the BIOS to enable or disable secure boot. However, the process to do so differs significantly depending on your motherboard. So, we have created this article to help you set this feature on an ASUS motherboard system.
How to Disable Secure Boot
Secure boot is a great feature to protect your system from threats. However, if you are dual booting a non-Microsoft Operating System, such as Linux, it won’t support all Microsoft security keys. Due to this reason, you won’t be able to boot the other OS properly.
So, you may want to disable the Secure Boot feature in such a scenario. Here are the necessary steps to do so:
- Restart or Power up your PC.
- During startup, immediately press the F2 or Del key depending on which your BIOS key is to get to BIOS. You may need to press it multiple times to get the timing right.
- On UEFI mode, press F7 to enter Advanced Mode. You don’t need this step for Legacy mode.

- Go to Security > Secure Boot. Select Secure Boot Control and set it to Disabled.
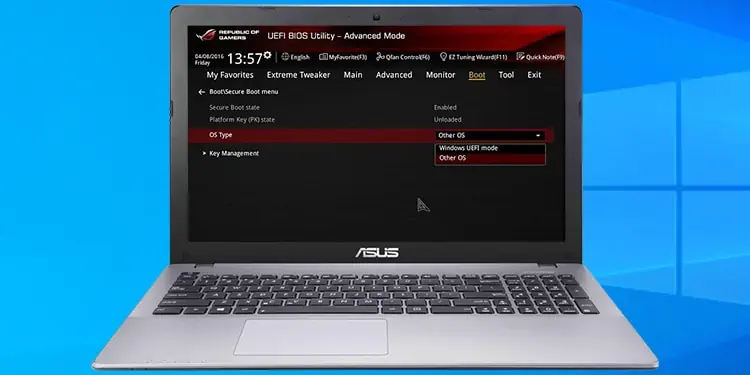
- If the option doesn’t exist, go to Boot > Secure Boot. Pick OS Type and set it to Other OS.
- Press F10 and select Yes to save and exit.


You can also disable Secure Boot by deleting the platform key. However, this removes the key altogether and prevents you from enabling the feature next time. So you need to create its backup first if you use this method. Here’s what you need to do:
- Insert a working FAT32 USB flash drive into your PC and get to the Secure Boot configuration.
- Go to Key Management and select Save Secure Boot Keys > OK > OK.
- Then, select the PK Management option and then Delete Key > OK.
- Press F10 and pick Yes to save the changes and exit the BIOS.

How to Enable Secure Boot
You can enable secure boot in a similar manner to disabling it. And you can only do so from your BIOS. In this section, we have also included how you can convert your partition style to GPT and change BIOS mode to UEFI.
You don’t really need these processes if you simply want to enable secure boot. However, if you want to enable secure boot for installing Windows 11 or upgrading to this software, you definitely need to execute these steps. Also, secure boot works better even in previous Windows versions if you have a GPT partition and a UEFI BIOS mode.
Regardless, if you only need to enable secure boot to protect your system, you can skip them.
Convert Partition to GPT
The GUID Partition Table is the more advanced and efficient partition standard compared to the old Master Boot Record. Most modern systems are made to use the GPT partition, while some still retain support for MBR.
If we talk about older Windows OS, Windows earlier than Vista requires MBR partition, Windows 7 and Vista only support GPT on 64-bit after you enable a few settings. The later Windows system up to Windows 10 support both partition styles. However, GPT is a necessity for Windows 11.
First, you need to check if you have a GPT or an MBR partition. To do so,
- On an active Windows session, open Run by pressing Win + R.
- Enter
diskmgmt.mscto open Disk Management. - Right-click on your disk (with the OS or where you want to install Windows 11) and select Properties.
- Go to the Volumes tab and look at Partition style.


If it shows GUID Partition Table (GPT), you can move on to the next step. However, if it shows Master Boot Record (MBR),
- Boot into Advanced Startup options. You can do so by pressing Shift while clicking on the Restart power option.
- On the Advanced Startup options, go to Troubleshoot > Advanced options > Command Prompt.
- Enter the command
mbr2gpt /convert - If you have more than one disk, you need to use the following commands:
diskpartlist disk(note the disk number for the disk you wish to convert)exitmbr2gpt /convert /disk:0(Here, replace 0 with the above disk number)


Change BIOS Mode to UEFI
Most modern devices enable UEFI mode by default. However, it may be disabled in your case. If you are converting your partition to GPT, you definitely want to set your BIOS mode to UEFI. Here’s how you can do so on an ASUS motherboard:
- Restart or Power up your PC.
- During startup, immediately press the F2 or Del key depending on which your BIOS key is to get to BIOS. You may need to press it multiple times to get the timing right.
- If your PC is on UEFI mode (shows a more visual interface), you can go directly to the next step.
- Otherwise, go to Boot > Launch CSM and set it to Disabled.
- If you don’t get the Launch CSM option or it’s grayed out, go to Compatibility Support Module.
- Select Launch CSM and set it to Disabled.
- Press F10 and select Yes to save and exit.

Enable Secure Boot
Finally, here are the steps to enable Secure Boot on the ASUS system. You can usually reverse the steps for disabling this feature. However, there are a few additional things you need to do, which we have explained in detail down below:
- Get to your BIOS.
- Press F7 to enter Advanced Mode. If you are on Legacy Mode, continue as it is.
- Go to Security > Secure Boot. Then, select Secure Boot Control and set it to Enabled.
- If the option doesn’t exist, go to Boot > Secure Boot. Pick OS Type and set it to Windows UEFI Mode.
- Go to Key Management.
- Make sure all the keys, signatures, and timestamps are set to Factory or Default. You need to select each and click Update > Yes > OK to do so.
- If you don’t get the Update option, you have two choices,
- If you want to restore the keys you deleted earlier,
- Select Cancel for the Set New Key.
- Insert the USB drive where you backed up the keys and restart the PC.
- Go through the steps above to get to Key management.
- Then select PK Management and the Set New Key > OK.
- For Load the default PK page, choose No.
- On the Select a File System page, select the USB drive you inserted and click OK.
- Choose PK > OK > Authenticated Variable > OK > Yes > OK.
- If you can’t restore the keys or want to set the default keys, select OK for the Set New Key.
- Press F10 and select Yes to save and exit.


