
While connecting an Android phone to your computer for ADB(Android Debug Bridge) debugging or other development purposes, you may encounter the “ADB Device not Found” error. This indicates that the connection between the android device and computer hasn’t been established.
Any part that hinders sound attachment between Android and the host PC can cause this issue, ranging from defective ports to unconfigured debugging settings.
In this article, we will discuss methods to resolve problems causing Windows not to list the ADB devices.
Why Doesn’t Windows List ADB Devices?
ADB(Android Debug Bridge) is a command line tool that lets you operate over any android device connected via USB. The utility tool installed on the host PC arranges a server on it that can be controlled through commands or applications like Android Studio. Such an ADB server on the host computer establishes a connection with the android daemon if configured properly.
The Android daemon, which is an independent background process running on your android device, will let you update and execute shell scripts for android OS through the ‘ADB server to daemon’ connection channel.
As mentioned in the intro, malfunctioning of anything that is able to impact the connection channel can cause this issue, the physical portion being a damaged cable or port. Some other reasons include:
- Unsuitable USB Mode.
- Disabled USB Debugging.
- Corrupted USB Drivers.
- Unresponsive ADB server.
How to Fix “ADB Device Not Found” Problem on Windows?
Before moving on to the fixes, ensure that you are using a cable that supports USB debugging. The original out-of-the-box cable of android phones does let you establish such a connection. However, you can try using other USB cables to avoid cable defects. Also, consider giving a try to different USB ports while connecting.
Then, if the issue persists, you can attempt the listed solutions:
Set ADB Path as an Environment Variable
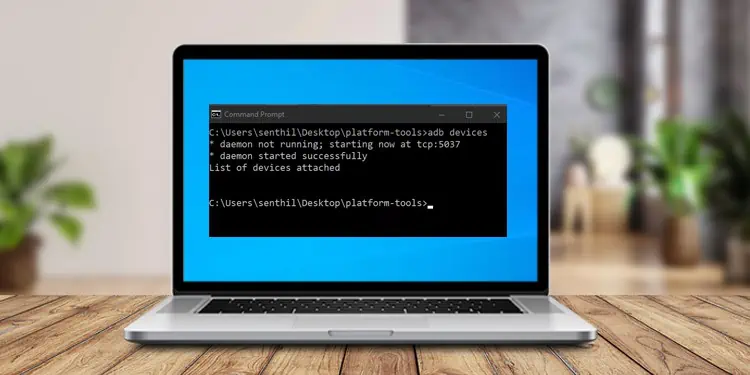
First of all, you should make sure that the devices are actually not being recognized or the command prompt isn’t executing the command. Try running the ADB devices command. It would either return ‘List of devices attached’ or ‘ADB is not recognized as an internal or external command.’ We will discuss the latter in this section.

To run the ADB command line on your command prompt, you might have already downloaded the SDK Platform-Tools from Google’s website. But, merely downloading it won’t help in actually executing the commands. The path for the ADB folder needs to be set as an environment variable of the system so that the command prompt can directly search its path upon the code’s execution.
Follow the steps mentioned below to set the SDK platform-tools folder as a path environment variable:
- Locate and open the ADB folder.
- Right-click on the platform-tools folder and select Copy as path.

- Now, Press Windows + R, type
sysdm.cpl, and hit Enter. - Go to the Advanced tab and click on the Environment Variables…
- Select the Path row and hit on the Edit button.
- Click on the New button, paste the platform-tools folder path and then click OK.
- Again, go with the OK button twice.
- Now, run the
adb devicescommand after restarting the command prompt. If it returns a List of devices attached, then you are all good to go.


But if it shows that ‘ADB is not recognized as an internal or external command,’ then repeat the steps again, being cautious while copying and pasting the actual folder path of the ADB server.
Enable USB Debugging on Android
Since ADB is for debugging purposes, the android device used must permit doing it through USB. To authorize it, you will have to turn on USB Debugging on your android. This setting lies under Developer options, which is hidden for normal users. Go along the given steps to enable Developer options and, eventually, USB debugging on your device:
- Open the Settings app on your android phone.
- Navigate to Build number/version, which generally lies under system information or about phone sub-menu.
- Tap more than 7 times constantly on the Build number till it pops ‘you are a developer or a similar message.
- Now, locate Developer options within Settings.
- Scroll to find USB debugging, and toggle on the button.
- Now, after connecting your android devices, click on the Allow prompt for Android Debugging.


If Developer options is already enabled on your phone, turn it off with the toggle button and then follow the above steps to re-enable it.
Switch USB Modes/Preferences
Devices connected to the PC through USB can prioritize how they want to use the connected channel. On most devices, the USB connection works as a charging channel by default. But, the ADB requires a bridge that supports debugging. If USB mode for debugging isn’t chosen, ADB won’t list the device.
You will have to choose ADB suitable USB mode to fix the issue. Proceed with the following steps to swap your USB preference:
- Connect your phone to your computer via cable.
- Tap on the notification of the android system for USB Preferences.
- It would open settings for the USB Preferences sub-menu. Choose MTP(Media Transfer Protocol), PTP(Picture Transfer Protocol), or MIDI(Musical Instrument Digital Interface), whichever suits your phone.


The suitable USB mode needed for ADB may differ as per the device and Android version. Try using different modes until you figure out the preferred one.
Note: MTP may list as ‘File Transfer’ on many android devices.
Toggle With the Settings
Besides the USB preferences, some other android settings can affect the ADB connection for it. The particular setting we are talking about is Stay Awake which falls under Developer options. You can find it out and toggle the button to revert its state.
- Follow these steps up to step no 4.
- Toggle the Stay awake button

The issue resolves on some devices when the feature is turned on, but for others, it may be the opposite. Try to set whatever fits your device.
Moreover, you can try to cancel the previous permissions for USB debugging if you have previously attached the computer. It will help in resetting the previous configurations of the connection. Open Developer Options as the above section, then follow:
- Scroll to Revoke USB debugging authorizations and tap on it.
- Hit the OK on the prompt.

Now, detach your device from the PC and reconnect it. Then allow USB debugging permission on the prompt appearing on the ADB device after selecting the preferred USB mode.
Restart the ADB Server
ADB command line works by running a server in the background on the hosted PC, which bridges with the android daemon. If that server becomes unresponsive due to some, ADB won’t be able to connect and recognize any android devices. To fix that, you can try to restart the ADB server in the host machine.
Follow the steps mentioned below:
- Press Windows + R, type
cmd, and hit Enter. - Run the following commands consecutively:
adb kill-serveradb start-server
- Now, run the
adb devicescommand and check if the devices are being listed.


Manually Update USB Driver
You are connecting your android to the PC using a USB. The connection will work if proper drivers are installed for the device. If not, the discussed issue will occur. After attaching your android, Windows should install the required driver. But, sometimes, the drivers installed by Windows cause problems.
In such a scenario, you can change your existing USB driver with the authentic Google USB Driver. Download the zip file from the website, extract it and remember the folder location. Then, continue with the listed steps:
- Press Windows + R keys, type
devmgmt.msc, and hit Enter. - Click on the View menu on the top, and choose Show hidden devices.
- Locate the USB driver, which may be under sub-menus like Portable device, Android device, Other devices, Unknown devices, or Universal Serial Bus devices/controllers.
- Expand each and check for your android name. A yellow exclamation mark or greyed out means issues within the driver.
- Right-click on such USB driver, and choose Update driver.
- Go with Browse my computer for drivers and click the Browse… button.
- Navigate and select the Google USB driver folder and then click on OK.
- Click on the Next button and go along with the on-screen prompts.


