
Your laptop charger is one of the crucial components that makes any laptop functional. Even though you have enough power stored in your battery, high-intensity processing is severely limited just on battery power without a functioning charger.
Usually, when your laptop stops charging, it is due to one of three things. First, the fault is due to a damaged battery. Second, some issues with the charging cable. And finally, some driver issues.
This article further explains some common causes why your Dell Laptop is not charging, along with a guide on determining core problems and fixing them. So, without further delay, let us get right into it.
Is My Dell Laptop Charging?
One easy way to determine whether a Dell laptop is charging is by checking the LED light. Most Dell laptops come with a charger with an LED light. This LED light is located either on the adapter or the charging connector. It turns on whenever you plug the charging port into a power source.
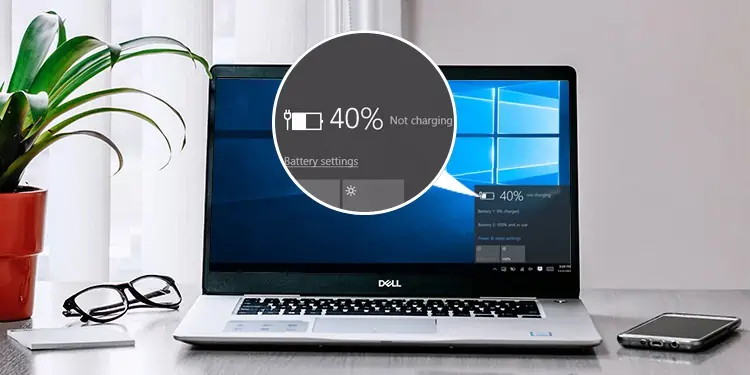
Another indication is located on the Tray icon. The battery logo on the tray menu should have a 2-pin plug icon. If you only see the battery icon (without 2-pin), or if the LED does not light up, your battery is most likely not charging.
Why Is My Dell Laptop Not Charging?
- Faulty charger adapter
- Damaged charging port
- Dying laptop battery
- Outdated battery driver
- Overheated Battery
- Faulty connector
How to Fix a Dell Laptop that Does Not Charge?
Before we jump into the fixes, you need to know where the issue lies. Further below in the article, we have mentioned specific ways to determine whether the problem is with the battery, the charger, or the driver. And once you determine the issue, we have provided recommended solutions to fix the problem.
Discharge the Capacitor
The Capacitors on your laptop stores charge. Sometimes, a fully charged capacitor located on your laptop’s motherboard may be the reason behind a system that does not charge. To fix this, you need to discharge the capacitor. However, to do this, you need to remove the battery first.
Removing the battery is fairly simple for older laptops as batteries are easily accessible without removing the back plate. However, if you have a battery inside the laptop’s casing, you first need to remove the battery from the laptop.
Once you have successfully removed the battery, follow the steps mentioned below to discharge the capacitors.
- Remove any power source going into your Dell Laptop.
- Press and hold the Power button for 30 to 60 seconds to discharge the capacitors.

- Once done, reconnect the battery back and re-insert the back panel.
- Turn on the PC. If the PC turns on, the battery is fine.
- Now plug the charger back into the laptop and see if the laptop charges. You might need to replace the charging cable if it does not charge.

Check the Laptop Battery
Once you have discharged the capacitor and the laptop still does not charge, you can try detecting whether the charger or the battery is causing the issue. To check this, you must turn on the laptop without a battery.
- First, remove the power cable if it is connected to the laptop.
- Remove the battery from the laptop.
- Discharge the capacitor by pressing the power button for one minute.
- Now, plug the charger into your laptop without inserting the battery.

If the laptop turns on, the issue is most likely with the laptop battery. Replacing the battery with a new one should fix the charging problem.
Check Battery Status From BIOS
Another method you can use to check whether the issue is with the hardware or its driver is by using BIOS. BIOS, or the Basic Input Output System, has access to all the details about the hardware connected to the motherboard. And in Dell laptops, you can also check the battery status using the BIOS.
- Press the F2 key repeatedly during startup to enter the BIOS on most Dell laptops. If F2 does not work, the BIOS key could be any of the Function or Delete keys.
- Once in BIOS, Go to Settings > General > Battery Information.

Now on the right panel, you can see the battery and the charger details. Health should indicate Excellent/OK, and the AC adapter should give you the wattage currently supplied to the laptop. If the BIOS shows any error in the battery’s health, the problem is with the battery.
Update Battery Driver
The battery driver manages the power supply to the system. Besides this, the driver is also responsible for displaying the battery indication icon located on the tray menu. Any issues with it may indicate a problem with the battery driver.
To fix this, try updating the driver.
- Press the Windows + X key and select Device Manager.
- Expand Batteries. You should see two entries, Microsoft AC adapter, and Microsoft ACPI-Compliant Control Method Battery.
- Right-click on Microsoft AC Adapter and click on Update driver.
- Once the update process is complete, update the second item on the list as well.

Run Dell Diagnostic Utility
Most Dell laptop’s BIOS, provides their user with a diagnostic options. The diagnostic tool runs a series of test to determine the any problem with hardware components connected to the laptop.
- Press F12 key repeatedly during startup to enter One time boot menu.
- Here, under Other Options, select Diagnostic. The diagnostic process will now begin.
- To diagnose specific component, press Esc key and click on the right arrow icon on the bottom right of the screen.
- Click on the play icon. The laptop will now run series of test to determine issues with laptops component. The laptop will make certain sounds if the diagnostic tool finds any problem.
- Once the process completes, you can view the results in the results tab.


Run Battery Troubleshooter
The battery or the power troubleshooter scans your laptop for configurations that may be causing large power usage. These configurations include settings inside power and sleep settings. This may also fix the problems that is stopping the laptop from charging.
- Press the Windows + I key to open Settings.
- Go to System > Troubleshooter > Other Troubleshooter.
- Now, run the Power Troubleshooter.
- Wait for the process to complete. Once the process completes, the troubleshooter window will provide you with a report.


Clean the Charging Port
If you have had a look at the ports on your laptop, you may have seen that they are full of dust, especially if you have been using them for a long time. These dust particles may obstruct the flow of electricity from the charging cable to the charging port.

Try cleaning the charging port on your laptop and the charging cable using compressed air. Don’t push dust further inside the laptop when using a can of compressed air. To ensure that this does not happen, you can use a pair of plastic tweezers first to remove excess dust particles.
Once you remove dense dust particles, use a short burst of air at an angle so that dust comes out of the port.
Use Wall Outlet

One simple but common mistake users make is plugging the charger on a multi-plug adapter that does not work. This might seem like a silly mistake, but situations like this are bound to happen.
So if your laptop is not charging, try checking if the charger is getting power first.