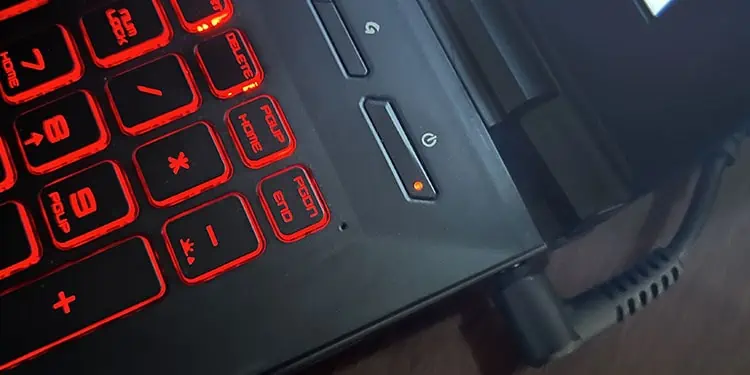
The power button on an MSI laptop lights up white or blue if the device is using the integrated GPU (iGPU) and orange or red when it’s using the dedicated GPU (dGPU). So, if the LED is always orange, it naturally indicates that your system keeps using the NVIDIA dGPU continuously even when it’s not supposed to.
The dGPU uses more power, so you’ll also notice a severe reduction in your battery life in such cases. And as you may have guessed, the only way to resolve this issue is by configuring your system to shift to the integrated Intel GPU when NVIDIA is not required.
Check Processes Using Dedicated GPU
The first thing you should do is check whether any apps are using the Dedicated GPU. To do so,
- Right-click on your Desktop and select NVIDIA Control Panel to open this program.
- Go to the Desktop option on the menu bar and select Display GPU activity Icon in Notification Area.

- Click on the GPU activity icon on the system tray to see which applications are using the NVIDIA GPU.

To have the apps use the Integrated Intel GPU instead,
- Open Run by pressing Win + R.
- Type
ms-settings:display-advancedgraphicsand press Enter to open Advanced Graphics Display Settings. - If the app is on the list, click on it.
- Then, select Options, check the Integrated GPU, and click Save.
- If it is not on the list, you need to add it first,
- Set the drop-down box under Add an app to Desktop app or Microsoft Store app as necessary.
- Click Browse.
- If it’s an MS Store app, it will show a list of all relevant apps and you can click on one to add it. If not, you need to browse through your File Explorer, select its executable file and click Add.
- Then, follow the above steps to change its preferred GPU.
- You can also change this setting from within the Manage 3D Settings tab inside the NVIDIA Control Panel.


Close Unnecessary Apps Using the Dedicated GPU
In case you don’t need to run the apps using the dGPU, you can close them. If they are running while not being active on your system, you need to close them from the Task Manager.
- Open the Task Manager by pressing Ctrl + Shift + Esc.
- Search for the program on the Processes tab and select it. Then, click End Task.

If these apps are on the Startup list, they will automatically open on every login. To disable them,
- Go to the Startup tab on the Task Manager.
- Select the application and click Disable.

You can also uninstall these programs if you don’t need them.
- Press Win + R to open Run.
- Type
appwiz.cpland press Enter to open Programs and Features. - Select the app and click Uninstall.
- Confirm if prompted and follow the on-screen instructions.

Enable Hybrid Graphics Mode
Sometimes, the power button can glow orange even when your apps are not using the dGPU. This means your system keeps using this GPU and doesn’t switch to the iGPU at all. So, even normal apps like Windows Explorer use the dGPU.
If your laptop has a MUX switch that helps easily switch between the integrated GPU and the dedicated GPU, you can enable Optimus or Hybrid mode. In this mode, your system will automatically start using the iGPU when not running any apps that require the dGPU.
- If you don’t have MSI Dragon Center, download the application. Some devices will need MSI Center instead.
- Open it and go to General Settings inside the Features or the Home tab.
- Set GPU Switch to MSHybrid Graphics Mode.

Also, overclocking the GPU through applications like MSI Afterburner may force the usage of the dedicated GPU. You should always disable overclocking when you are not running games or intensive apps. To do so, close the app, disable it on startup and then restart your PC.
Re-install Dedicated Graphics Driver
Corrupt graphics drivers can also force the system to keep using the dedicated GPU. In such cases, you need to uninstall the dedicated driver and install the latest version. It’s best to use the Display Driver Uninstaller (DDU) to remove the driver as it also deletes the residual files and registry entries.
- Download NVIDIA drivers from MSI (as it also contains the NVIDIA audio drivers).
- Download the DDU from its GitHub page. Then, disconnect your internet connection.
- Extract the file and run Display Driver Uninstaller inside the DDU folder.
- If the Launch option window shows up, set the drop-down box to Safe Mode and click Reboot to Safe Mode. Then, your PC will restart, boot in safe mode, and open the DDU.
- Otherwise, the DDU will open in normal mode. Then,
- If the Options menu doesn’t pop up, click on Options from the menubar.
- Here, check Enable Safe Mode dialog and select Close.
- Exit the DDU and open it again. This time the Launch option window should open and you can open the app in safe mode.
- After opening DDU in safe mode, click on Options from the menu again.
- Check all the recommended options, all NVIDIA Specific Options, and the following:
- Create a system restore point
- Remove Vulkan Runtime
- Uncheck the AMD and Intel Specific Options and click Close.
- Set the drop-down boxes to GPU and NVIDIA from the top.
- Hit Clean and restart.
- After restarting, install the NVIDIA drivers you downloaded earlier and only then connect to the internet.


Clean Install Windows
If you can’t resolve the issue using all the above methods, you need to clean install Windows. While it may seem excessive to do so considering you can still use your laptop with no issues, having the discrete GPU continuously enabled seriously affects battery backup. You should also install the drivers after clean installing Windows in the following order while restarting every time to be safe:
- Chipset drivers
- Intel GPU drivers
- NVIDIA drivers
- Other drivers