Tech News Today
  • News
  • How To
  • Buyer’s Guide
  • Hardware
    • PC Builds
    • Computer Cases
    • Motherboards
    • Peripherals
    • RAM
  • Gaming
  • Software
  • More
    • Mobile
    • Gadgets
    • Laptops
    • Reviews
Facebook Twitter Instagram
Tech News Today
  • News
  • How To
  • Buyer’s Guide
  • Hardware
    • PC Builds
    • Computer Cases
    • Motherboards
    • Peripherals
    • RAM
  • Gaming
  • Software
  • More
    • Mobile
    • Gadgets
    • Laptops
    • Reviews
Tech News Today
Home»Windows»How To Uninstall Apps On Windows 11

How To Uninstall Apps On Windows 11

AnupBy AnupMay 25, 2022
how to uninstall apps on windows 11

Windows 11 comes packaged with a bunch of default apps, and you’ve probably installed quite a few yourself as well. Apps come and go, so if one has served its purpose or there’s a better app available, most users will want to uninstall the application.

The problem with this is that despite being uninstalled, apps will often leave behind residual data which occupies space and clutters your PC. Of course, there’s also the matter of simply being efficient when uninstalling programs.

So, in this article, we’ve discussed how to uninstall apps on Windows 11, the right way.

Table of Contents

  • Ways to Uninstall Apps on Windows 11
    • Using the Uninstaller
    • From the Start Menu
    • Using the Control Panel
    • Via the Settings App
    • From the Command-Line
    • Third-Party Uninstaller
  • Related Questions
    • Why Can’t I Uninstall an App on Windows 11? How to Delete an App That Won’t Uninstall?
    • How Do I Completely Remove an App from Windows?

Ways to Uninstall Apps on Windows 11

We’ve listed various methods to uninstall apps on Windows 11 below. You can choose your preferred approach as the end result will be the same.

Using the Uninstaller

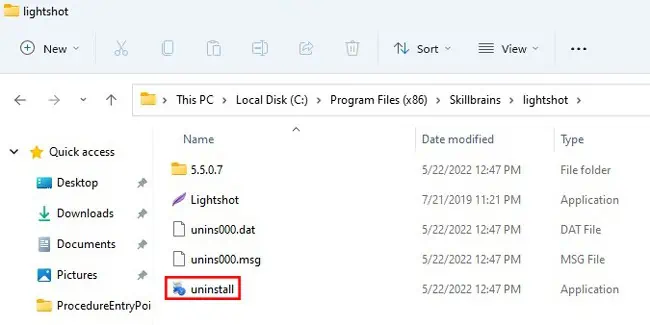
Developers usually include an uninstall.exe file along with everything else that is extracted when you install an application. The purpose of this uninstaller file is to, you guessed it, uninstall the application. Here are the steps to run the uninstaller:

  1. Press Win + E to open File Explorer.
  2. Navigate to the application’s installation directory. The default location will usually be C:\Program Files or C:\Program Files (x86), but this may differ if you changed it during the installation.
  3. Launch the uninstall.exe file and follow the on-screen instructions.
    uninstall_exe

From the Start Menu

You can customize the start menu, easily access your installed applications, as well as remove the ones you don’t want with the click of a button. Here’s how to uninstall apps on Windows 11 via the Start Menu:

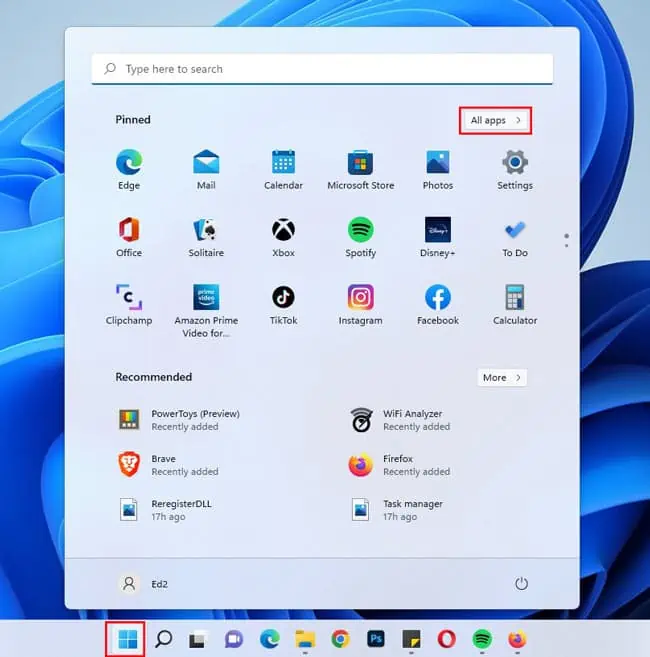
  1. Press the Windows key or click on the Windows logo to bring up the start menu.
  2. Press the All Apps button from the top-right and locate the program you want to remove.
    windows-11-start-menu
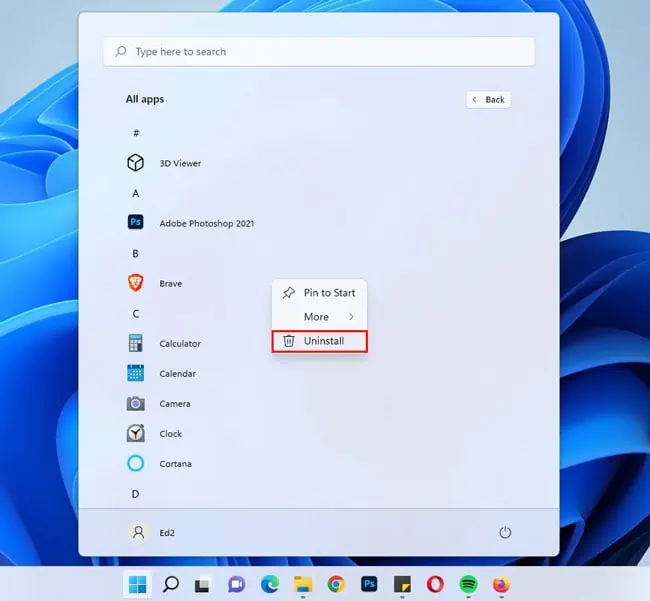
  3. Right-click the application, select Uninstall, and follow the on-screen instructions.
    windows-11-all-apps-uninstall

Using the Control Panel

The Control Panel is mainly used to check and modify system settings. One of its many features is to remove or modify programs, and here’s how you can do the same:

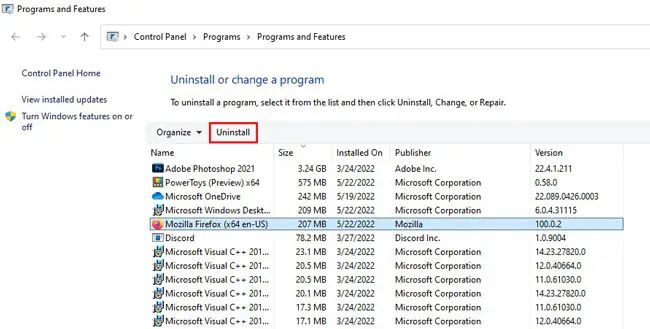
  1. Press Win + R, type appwiz.cpl, and press Enter.
  2. Select the program you want to remove and click on Uninstall.
    uninstall-app-programs-and-features
  3. Accept any confirmation prompts and follow the on-screen instructions.

Via the Settings App

The Settings app has received a lot of improvements in Windows 11, and the UI has changed. But one thing that has remained consistent with Windows 10 is that you can still remove unwanted apps and features. Here are the steps to do so:

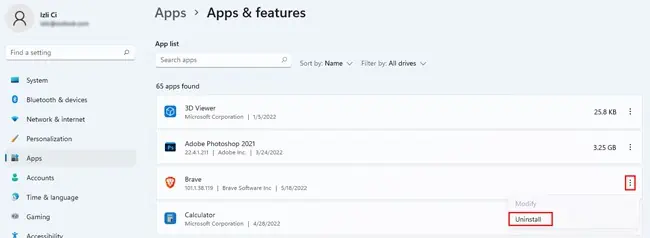
  1. Press Win + I and go to Apps > Apps and Features.
  2. Tap the triple-dot button next to the application and select Uninstall.
    uninstall-app-programs-and-features
  3. Accept any confirmation prompts and follow the on-screen instructions.

From the Command-Line

We recommend using the methods listed above as they will easily get the job done. But if you’d prefer to take the CLI approach anyway, there are a couple of ways to go about it.

Using Remove-AppxPackage Cmdlet

We’ve instructed how to use this cmdlet for its core function below. But if you’d like to preserve the application data after uninstalling it, or you’re trying to uninstall an app on a specific user account only, or some other advanced task, you should refer to Microsoft’s documentation.  

With that said, here’s how to uninstall apps on Windows 11 using this cmdlet:

  1. Press Win + R, type powershell, and press CTRL + Shift + Enter.
  2. Execute the following command:
    Get-AppxPackage | ft name, PackageFullName -AutoSize
    get-appxpackage
  3. Locate the application you’re trying to remove from the list and note down the PackageFullName.
  4. In PowerShell, type the following command:
    Remove-AppxPackage -Package “packagename”
  5. Replace packagename with the value of PackageFullName from Step 3, and press Enter to execute the command.
    remove-appxpackage

Using WMIC Utility

You can also use the WMIC utility, but this method only allows you to remove programs that are registered in WMI, so your options will likely be limited. Regardless, here’s how to uninstall apps on Windows 11 via WMIC:

  1. Press Win + R, type cmd, and press CTRL + Shift + Enter.
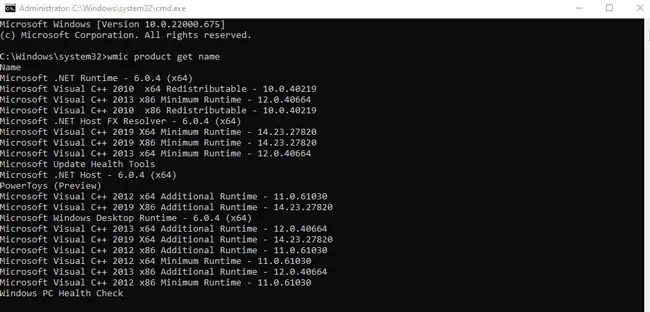
  2. Type wmic product get name and press Enter.
    wmic-product-get-name
  3. After you execute the command, it may take a minute or two for the output to show up depending on how many apps are installed.
  4. Note the program name from this list.
  5. Type the following command:
    product where name="program name" call uninstall
  6. Replace program name with the value from step 4 and press Enter to execute the command.
    wmic product where name call uninstall
  7. Press Y if asked for a confirmation prompt.

Third-Party Uninstaller

You might have a hard time when uninstalling certain applications. Even after uninstalling an application, residual data will sometimes be left behind in the registry. And finally, there’s also the matter of convenience.

We recommend uninstalling apps using the methods listed in our guide, but in the cases mentioned directly above, a third-party uninstaller tool can be a good option. Some reputable ones currently available include Revo Uninstaller and CCleaner.

Related Questions

Why Can’t I Uninstall an App on Windows 11? How to Delete an App That Won’t Uninstall?

Microsoft doesn’t allow removing certain core apps (Photos app, for instance) using conventional means. In such cases, you can use the command-line methods that we’ve detailed in the guide above to uninstall the app.

Users can also face this issue due to a background service interfering with the uninstallation. You can resolve this by performing a clean boot with the following steps:

  1. Press Win + R, type msconfig, and press Enter.
  2. In the services tab, enable the Hide all Microsoft Services option.
    hide-all-microsoft-services
  3. Click on Disable All and press OK.
  4. Your system will only run Microsoft services the next time it reboots, so you should be able to uninstall the app without any issues now.
  5. Once you’re done, you can revert the settings back to default by repeating Steps 1 – 2 and enabling the services.

Finally, Microsoft’s Program Install and Uninstall Troubleshooter is also worth checking if you’re still facing the issue.

How Do I Completely Remove an App from Windows?

Often, even after removing an application, it will still be present in the Control Panel or the Settings app. This is because the registry keys for that application are still present in your system. We recommend backing up your registry and following the steps listed below to resolve this issue:

  1. Press Win + R, type regedit, and press Enter.
  2. Navigate to: Computer\HKEY_LOCAL_MACHINE\Software\Microsoft\Windows\CurrentVersion\Uninstall
  3. Select a key and check the Display Name and Install Location. Using these, you should be able to identify the program you’re trying to remove.
    uninstallstring-registry
  4. Once you’ve identified it, right-click the relevant Registry Key and press Delete.
  5. If you delete the wrong key, you can use the backup you made earlier to restore it.

Next, you should clear the temporary files with the following steps:

  1. Press Win + R, type cleanmgr, and press Enter.
  2. Select the system drive (C: by default) and press OK.
  3. Check Temporary files, and optionally, any other type of files you want to remove and press OK.
    disk-cleanup-utility
how-to
Anup

I used to be a travel writer. Then I took an arrow in the knee.

Related Posts

change drive letter windows 10 11

How To Change A Drive Letter On Windows 10 Or 11

June 8, 2022
disable touch screen windows 11

How to Disable the Touchscreen on Windows 11?

June 8, 2022
enable virtualization windows 11

How to Enable Virtualization on Windows 11

June 7, 2022
how-to-open-file-location-on-windows-11-1

How to Open File Location on Windows 11

June 7, 2022
hibernate windows 11

How to Enable Hibernate in Windows 11?

June 7, 2022
powershell vs cmd

PowerShell VS CMD – What’s The Difference

June 7, 2022
Add A Comment

Leave A Reply Cancel Reply

Latest Posts
fighting-games

11 Best Fighting Games on Steam

June 8, 2022
what-is-the-blue-circle-on-my-samsung

What Is the Blue Circle on My Samsung

June 8, 2022
should-i-use-wd-discovery

What Is WD Discovery? Should I Use It?

June 8, 2022
You may also like
how-to-clear-other-storage-on-iphone

How to Clear Other Storage on iPhone?

June 8, 2022
change drive letter windows 10 11

How To Change A Drive Letter On Windows 10 Or 11

June 8, 2022
how to reset imac without password

How to Reset iMac Without Password

June 8, 2022
Recommended
Cookie Clicker Garden Guide

Cookie Clicker Garden Guide to Unlocking Every Seed

September 26, 2021
monitor no signal

Computer Turns On But Monitor Says No Signal (9 Ways To Fix)

October 25, 2021
Facebook Twitter Pinterest
  • Home
  • About Us
  • Privacy Policy
  • Affiliate Disclosure
© 2022 TechNewsToday.

Type above and press Enter to search. Press Esc to cancel.