Your Samsung touchpad can stop working due to improper touchpad configuration or driver issues. But it can also happen because of hardware faults like a loose connection or a damaged device.
In some cases, the touchpad may not work at all. And in other scenarios, it will behave in an unusual way. Whatever the situation, we have you all covered in this guide.
Whenever you encounter this issue, first, remove all peripherals on the laptop and restart it. If it doesn’t help at all, follow the possible solutions below. You may need to use an external mouse or navigate the GUI using the keyboard.
Enable Touchpad
It is possible to enable/disable the touchpad on a Samsung laptop by pressing the F5 or Fn + F5 key. You may have pressed the hotkey by mistake, so press it again and check if your touchpad starts working.
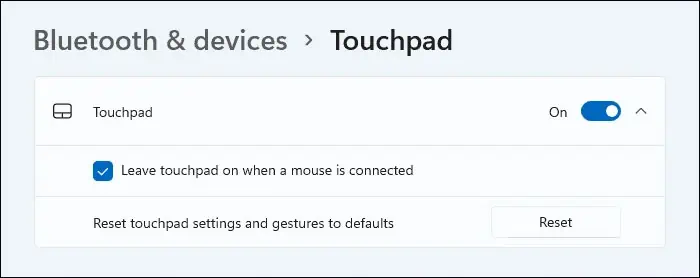
You can also toggle your touchpad status from your Settings.
- Open Settings by pressing Win + I.
- Go to Bluetooth & Devices > Touchpad.
- Toggle on the switch under Touchpad and click on it to expand the option.
- Check Leave touchpad on when a mouse is connected.
- You can also select Reset to restore the touchpad settings if it is not behaving as it should.

If the touchpad device is enabled, we recommend checking the Device Manager and seeing if its driver is enabled as well.
- Press Win + R to open Run.
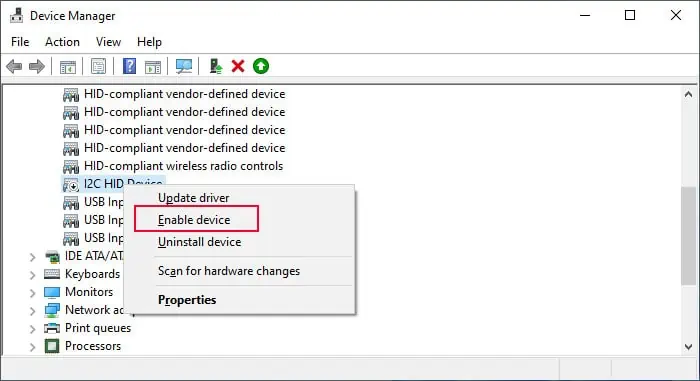
- Expand Human Interface Devices.
- Check the status of the I2C device. If it is disabled (downward arrow icon), right-click on it and select Enable device. On the other hand, you can also disable and then enable it if the driver is on. Then, click Action > Scan for hardware changes.

- If the I2C device shows a yellow exclamation icon, it is experiencing some errors. You can double-click on the device to access its Properties and check the corresponding error code and message. The error should point you to the exact nature of the problem.
- If the I2C device does not show at all, select Action > Scan for hardware changes from the menu bar. If it still does not show up, you likely have a hardware issue.
Update Windows OS
Corrupt drivers or issues with essential system components can also cause this error. It’s best to have the latest versions of the operating system to prevent such issues.
Nowadays, all drivers also come together as optional updates. So, you can install any potential touchpad driver update at the same time to resolve any bugs or conflicts in the previous version.
- Open Run.
- Type
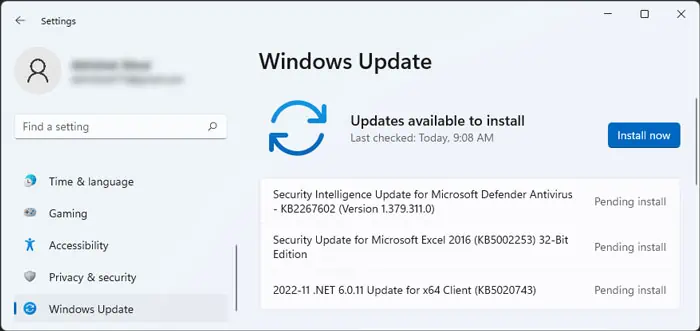
ms-settings:windowsupdateto open Update Settings. - Click on Install now if there are any pending updates. Restart your PC as necessary for the updates.

- If you don’t have any pending updates or after installing the said updates, go to Update Settings and click on Check for updates.
- Install all new updates by clicking Install now.
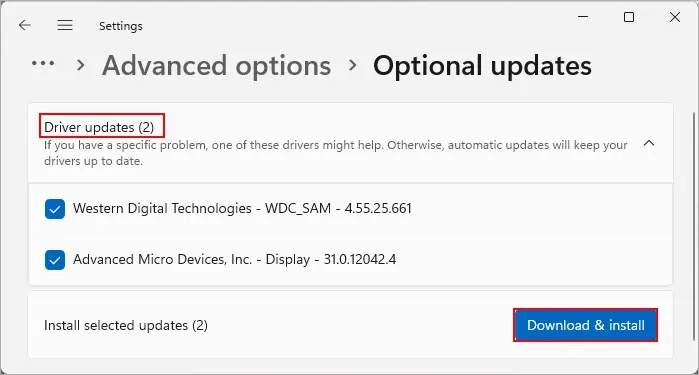
- Then, on the Update Settings, go to Advanced options > Optional updates.
- Expand all available categories including Driver updates. Check all options and click Download and install.

You can also use Samsung Update to perform all such updates.
Reinstall Touchpad Driver
If you have the latest touchpad driver and other software components, you can also try reinstalling the driver to take care of any bugs within.
- Open the Device Manager.
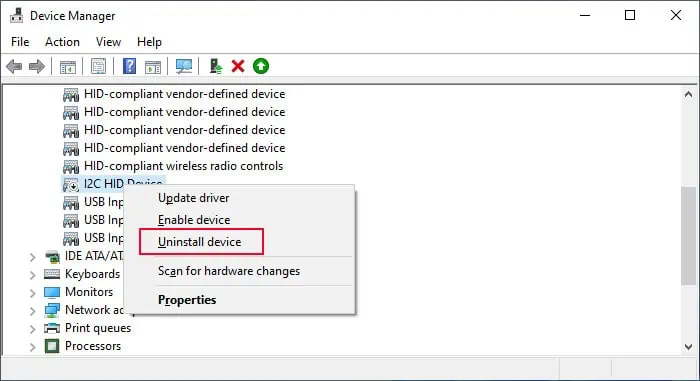
- Expand Human Interface Devices and right-click on your I2C device.
- Select Uninstall device > Uninstall.

- Click on Action from the menu and select Scan for hardware changes to reinstall the device.
- Restart your PC in case the device doesn’t show up yet.
Reset Windows OS
You can also try restoring your operating system to the factory settings to resolve any potential system corruption causing this issue. It will erase all your applications but it’s not much of a problem since you can install them later anyways. Also, you can determine if the problem is software-related or not by resetting your system.
- Open Run.
- Type
systemreset -factoryresetand press Enter to start the factory restore. - Select Keep my files and follow the on-screen instructions.

Troubleshoot Hardware Issues
If the software fixes were not useful, it points to faulty hardware or connections. In such cases, you need to disassemble your Samsung laptop and diagnose the physical touchpad device.
- Remove all the screws on the bottom case using a screwdriver. There may be additional screws under the rubber feet, so remove those as well.
- Pry out the bottom panel on all sides using a prying tool.
- Unscrew the internal battery and disconnect it from the motherboard. If any circuit components are exposed, make sure not to touch them with your hands. Always use tools such as spudgers and plastic precision tweezers to remove the cables, tapes, and cables.
- The touchpad should be exposed after you remove the internal battery. Here, look for the ribbon cable connection.
- The cable is held together on the connector with a plastic clip. You need to use a spudger to pull up the clip and unlock the ribbon cable.
- Then pull it out by holding on to the ribbon cap.
- If there are any tapes holding the touchpad module, peel out the tape carefully such that you can stick them back again.
- The trackpad module is attached to some plastic arms on the case using double-sided tape or some other adhesive substance. So use the prying tools to unstick and detach the module.
- Open the laptop a little bit to create space to drop the touchpad module by pushing it downwards.
- After taking out the touchpad, clean it, especially at the edges and the corners, using rubbing alcohol and a microfiber cloth.
- Then, clean the touchpad holder or housing on the laptop in the same way.
- If there’s any sticky gunk on the housing, you can use a spudger or a screwdriver to scrape them off with the flat end.
- After that, wipe it again with the cloth.
- Insert the touchpad on its housing properly by making sure the ribbon cable and its connector are on the same side.
- Stick the device to the adhesive on the arms by pressing from both sides. Then, stick the tape you peeled off earlier as well.
- Insert the ribbon cable fully into the connector and pull down the clip to lock it in place.
- Reconnect the internal battery and reassemble the laptop by reversing all the above procedures.
If the touchpad still doesn’t work, you need to replace the device. You can use the same steps as above to replace it.
