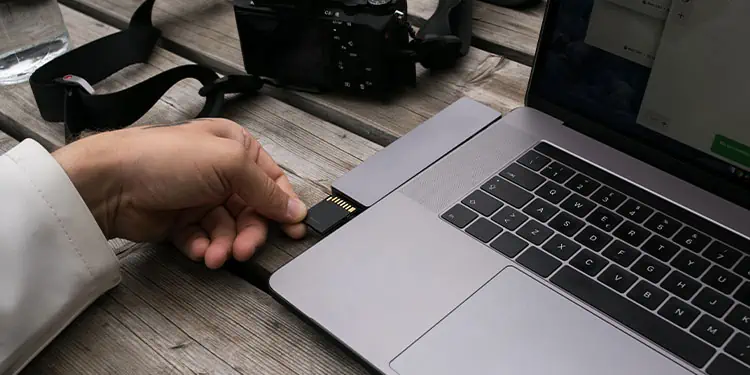
The Write Protection on the SD Card restricts users from writing or modifying any existing content in it. While attempting to copy files to the SD card, users can receive a prompt with the message “The disk is write-protected ”. If you try to format the SD card, a similar message may appear, preventing you from erasing the files.
Sd cards generally come with a slider that lets you lock or write-protect the files in it. If you can’t unlock the card using the slider, there are other ways we have discussed in this article that you can use to remove the protection mechanism.
How to Remove Write Protection on Micro SD Card
Make sure the SD card’s slider is unlocked before you begin. The full-sized SD cards have a slider that locks the write permissions on the storage device. To verify that the SD card is not locked, make sure the slider is at the top. If it appears to be locked, gently move the slider to the top.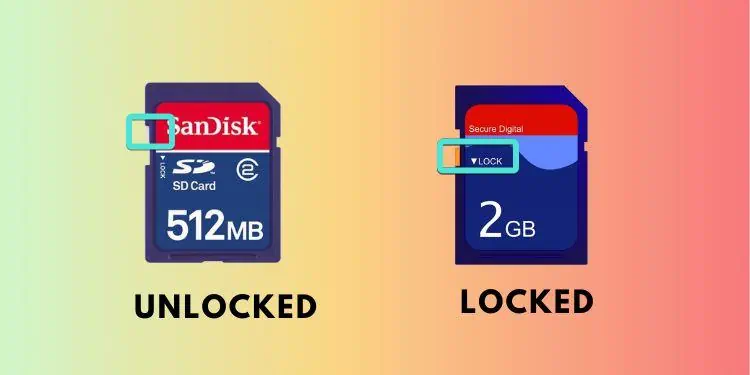
Remove Write Protection from File Explorer
On Windows, you can edit the access permissions of an SD card through the file explorer. For a device with multiple users, you can also assign different permission for multiple users.
- Connect the SD card to the computer.
- Go the File explorer.
- Locate the SD Card in the list of drives and right-click on it.
- Select Properties.
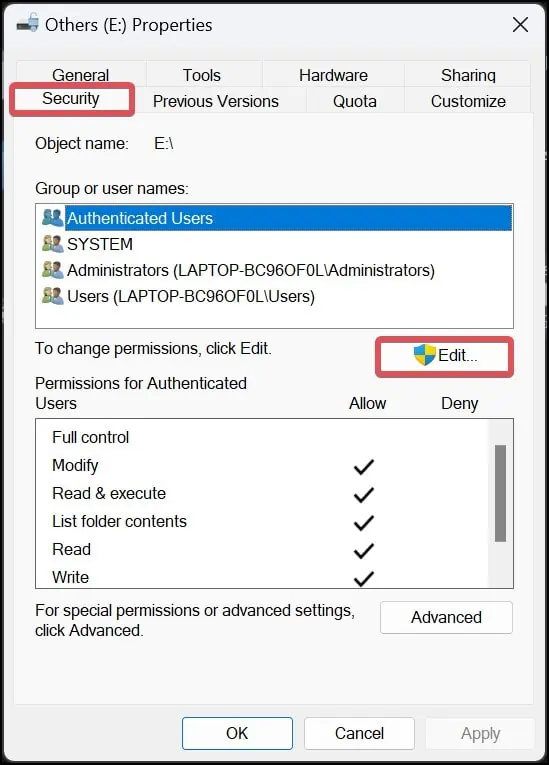
- Go to the Security tab.
- Click on Edit to change the Permissions.

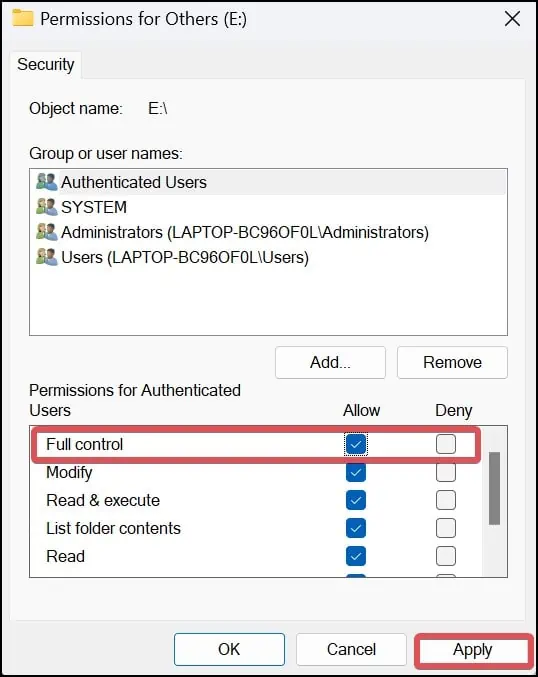
- Under the Permissions for Everyone, check the Allow sections for Full control.
- Click on Apply to save Changes. This will grant you full access to the SD card by eliminating the write protection on it.

Note: This method will only work for the SD cards with the NTFS file system.
Change Attributes Using CMD
If you have insufficient write permissions or the memory is attributed as read-only, you will fail to write over the card. In such cases, you will only be allowed to view the files on the card.
You can change the attributes of the Card and assign write permissions to it using the command prompt.
- Press Windows X and open the Windows terminal (Admin).
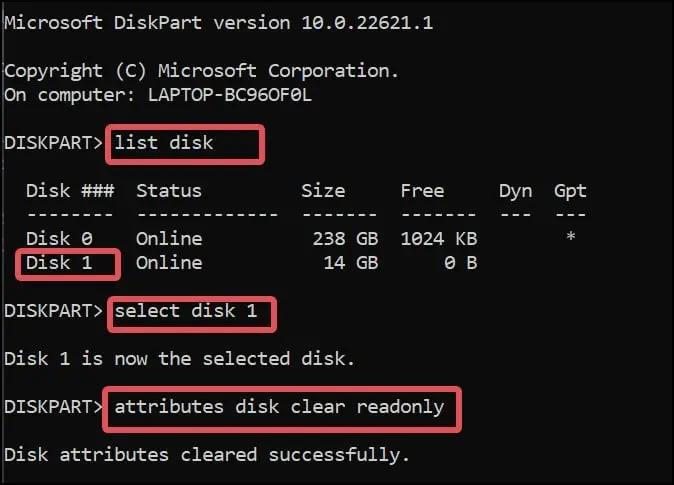
- On the command prompt window, type
diskpartand hit enter.
- Now, execute
list diskcommand to see all the storage devices on your computer. You will get information about all the storage devices on your computer with their name, size, and other details. - Locate the SD card from the list.
- Now, type
select disk Xand hit enter. Note that in place of X, enter the number of the SD card volume you located earlier. - At last, enter the command
Attributes disk clear readonly.
- This will remove the write protection from the SD card. Disconnect the SD card when the process gets completed. Finally, plug it back into the device and check if it solves the problem.
Modify Registry
Modifying the Registry lets users make root and administrative-level changes. If you have failed to make changes to the attributes earlier from the Command prompt, you can do it manually using the registry editor. However, it is advised that you perform this with caution, as altering the registry could permanently damage the SD card and the system.
- Press Windows Key + R, type
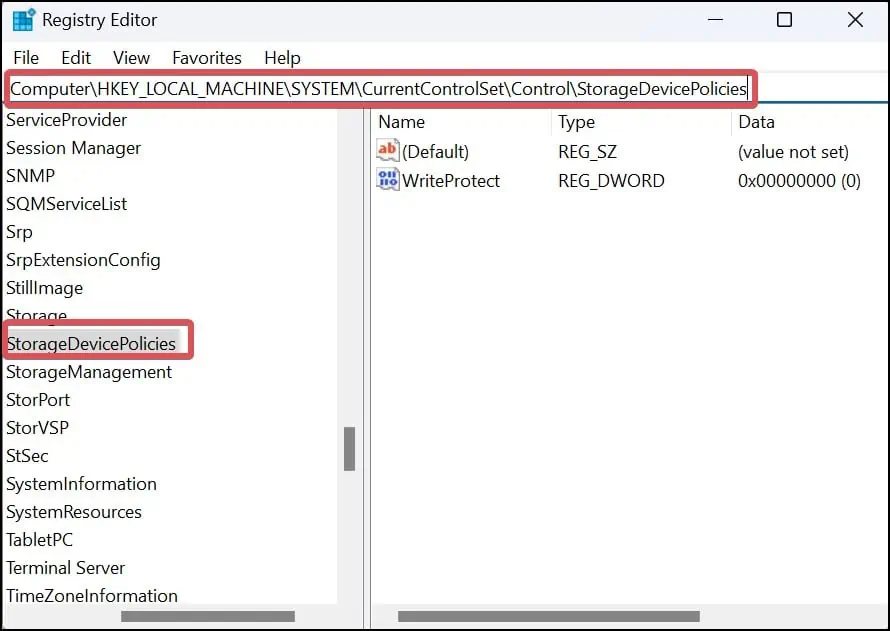
regedit, and hit enter. - Now, Navigate to this registry directory.
HKEY_LOCAL_MACHINE\SYSTEM\CurrentControlSet\Control - Find the folder StorageDevicePolicies folder and open it.

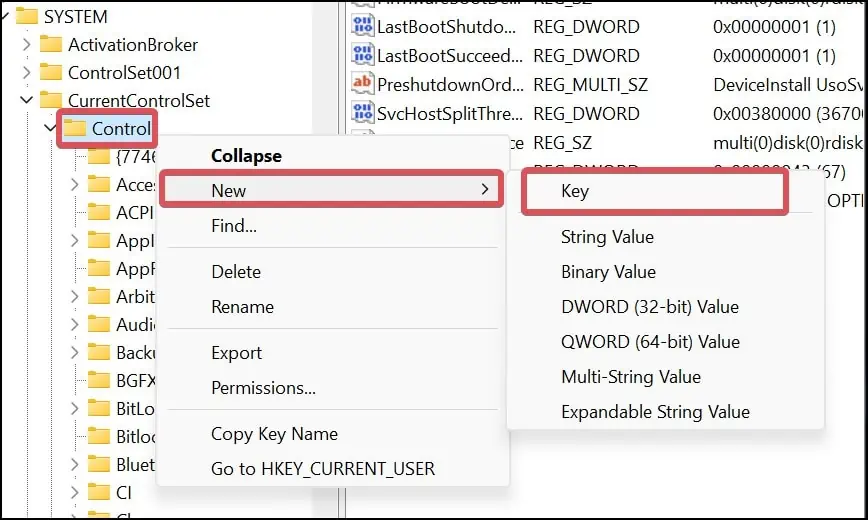
- If you see no folder under such a name, right-click on the Control Folder.
- Go to New > Key.

- Now, name the New key as StorageDevicePolicies.
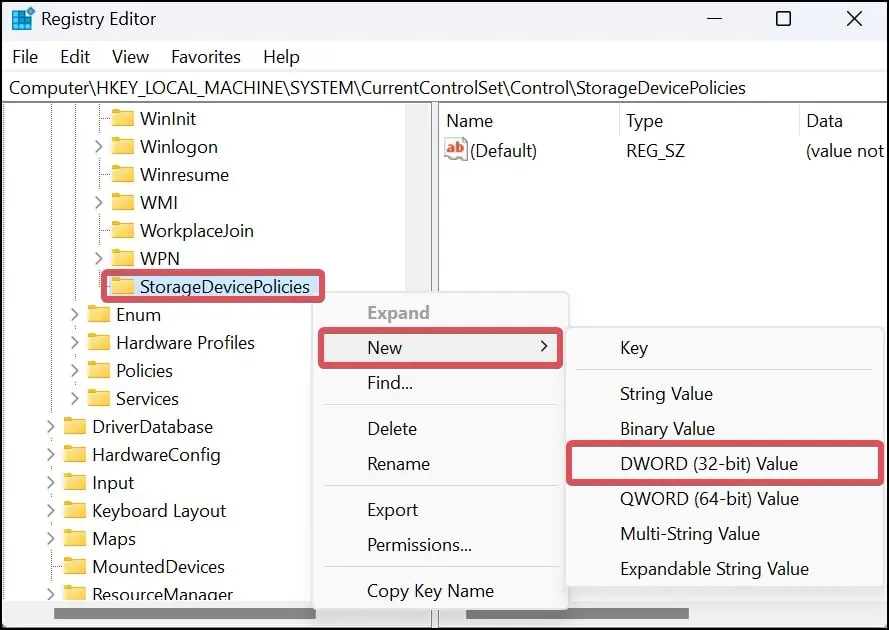
- Right-click on the newly created folder. Go to New> DWORD (32-bit) value.

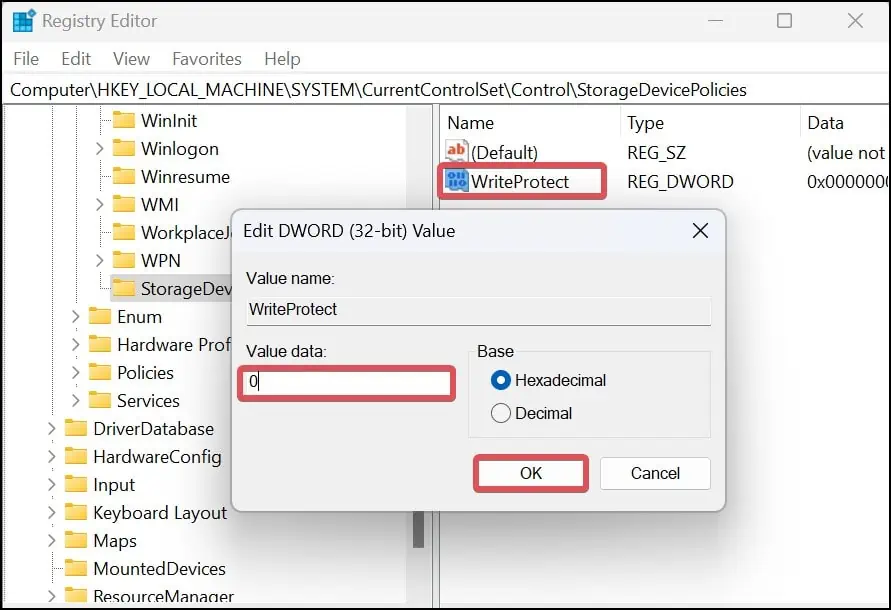
- Name the DWORD value as WriteProtect.
- Open the WriteProtect file and assign it a value of 0 and click on OK to save changes.

- Restart the device and see if the write protection from the SD card has been removed.
Perform Disk Check
Sometimes the diskpart utility may fail to clear the attributes because of some corruption in the storage device. The disk check is a useful tool to diagnose any pertaining logical errors in the files system of the storage device and fix them.
These logical errors in the SD card’s file system can cause the storage device to malfunction and restrict you from writing anything over it. It is ideal for performing scans to eliminate any issues with the SD card.
- Press Windows Key + X and open Windows Terminal (Admin).
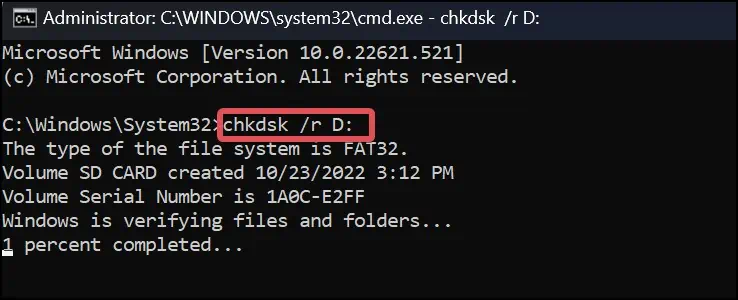
- Type
chkdsk /r [DL]and hit enter. Replace the [DL] with the drive letter of the SD card.
- The scan process will now start, which can take several minutes to finish. Upon completion, this scan will fix the bad sectors of the volume.
Run Malware and Virus scan
Viruses and malware are well known to invoke write protection on storage devices, including SD cards. Therefore, to prevent or eliminate these troublemakers performing anti-malware scans becomes crucial.
Windows defender is a competent application to get rid of such malware and viruses.
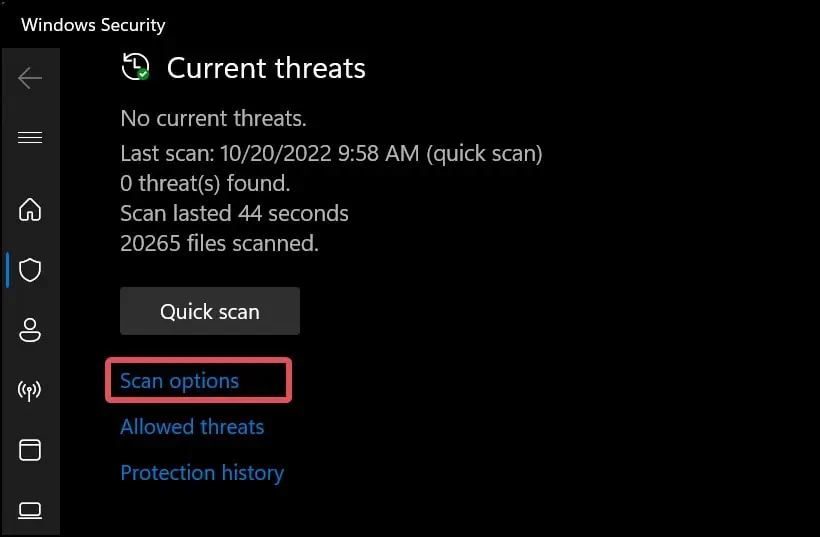
- Press Windows Key + R, type
windowsdefender://threat/, and hit enter. - Click on Scan options.

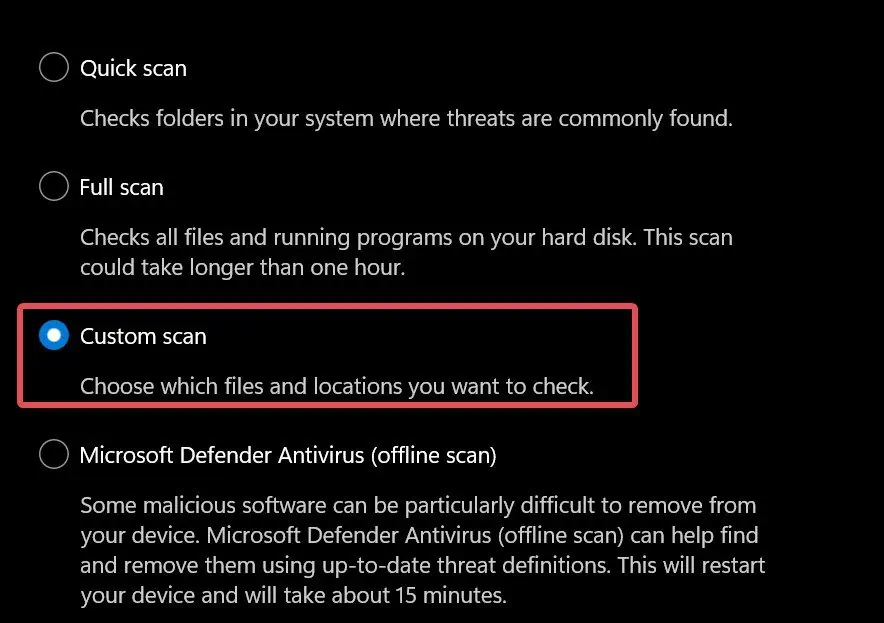
- Choose Custom Scan and click on the Scan now button.

- Select the drive volume of the SD card. The Application will now start going through the SD card and scan for viruses and malware.
Removing Write Protection on Mac
If the SD card is write-protected, you can reset the read and write permissions on it using the Mac terminal.
- Click on the Files tab on the top left of the desktop.
- On the Finders window, Go to Applications.
- Open the Utilities folder.
- Finally, open the Terminal.
- Now, execute this command
diskutil resetUserPermissions / `id -u`
- Sometimes, you must run this command with Superuser privileges to get it working.
sudo diskutil resetUserPermissions / `id -u` - Restart the device and check if you are able to write into the SD card.
Removing Write Protection On Linux
On Linux, you can easily reset the read-write attributes of the SD cards using the Hard disk parameter (hdparm) command line.
- Connect the SD card to your Linux Machine.
- Press Ctrl + Alt + T to open the Terminal.
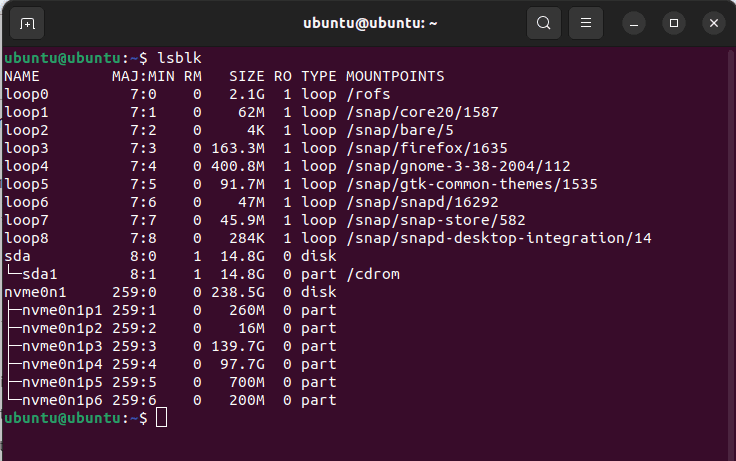
- Type
lsblkand hit enter. This will list all the available volumes connected to your device.
- Identify the SD card on the list and note down its File system information.
- Now, enter this command.
sudo hdparm -r0 /dev/sdb1
Replace the/dev/sdb1in this command with the mount path of the SD card.
- Re-connect the SD card and check if the write protection has been removed from it.

