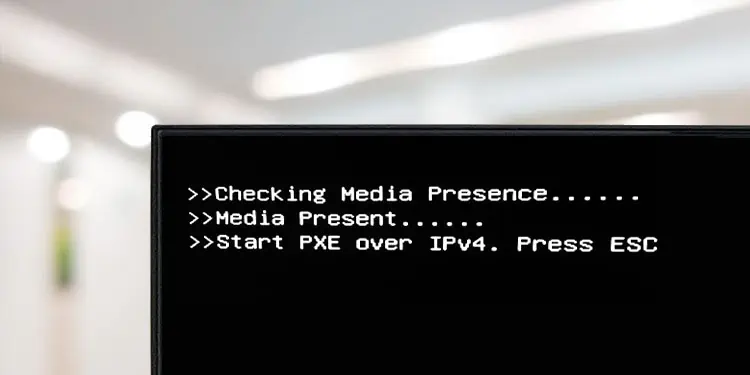
The message “Checking Media Presence” appears when the BIOS is checking for the Operating System (OS) on the network server. So, the problem is that your computer is trying to perform a Network PXE boot instead of booting into the storage device with the operating system.
It indicates that either the storage device is not the highest priority boot device or the computer could not find the OS on the storage device and moved on to the PXE Network as the next boot option.
Change Boot Order
First, you need to ensure that the storage device with the OS is the top boot priority device, not the PXE Network. This way your computer will boot into the OS device before any other media.
- Power up or restart your computer. When you get to the manufacturer’s logo, press the BIOS key repeatedly to boot to BIOS. If you don’t know the particular key, refer to official sources.
- Here, search for Boot Priority, Boot Order, or a related option.

- Move the Storage drive containing the OS is to the first position on the priority list. The BIOS interface itself should tell you how to modify the list.
- You can also remove the Network or PXE devices from the list or move them to the last.
- Save the changes and exit BIOS.

Disable Network or PXE Boot
You can also disable the PXE Network boot altogether so that your computer never looks for this boot option regardless of where it is on the boot order list.
- Get to the BIOS on your computer.
- Look for an option such as IPv4 or IPv6 PXE Support, Network Boot, LAN PXE Boot. You will likely find it inside the Boot or Advanced tabs.
- Set the option to Disabled.
- Save and Exit the BIOS/UEFI.

Check Storage Drive
You should also see if your computer is actually detecting the storage drive. In some BIOS setup utilities, you can check for it in the boot priority list itself. If not, you can see if the disk appears in the Main, Storage, or similar tabs.
If it is a SATA, NVMe, or M2 device, check the message next to these options.

Then, if you have a hardware diagnostic program that you can run from the pre-boot environment, you should check the storage drive’s health. Or, you can remove the storage drive from your computer and connect it to another computer to see if there are any issues with it.
If the storage drive has no issues, it indicates some corrupt boot or operating system files. So you must repair these components.
But if there are some issues, you may have to replace it altogether and install a new OS on the new device.
Repair Boot Files
Depending on whether your storage disk operates in GPT (GUID Partition Table) or MBR (Master Boot Record), it stores the boot configuration files differently. So, you should check the disk type and then use the proper steps to repair the files.
- First, create a USB Installation media on another PC or other device.
- Then, boot into this media and open Command Prompt.
- Insert the USB drive into the computer with the error and power it up or restart it.
- On a UEFI computer, you will get the press any key screen. So, press anything to boot into the USB flash drive. On an MBR system, you must first set the USB to the top of the boot priority list.
- After you see the language preferences, press Shift + F10 to open Command Prompt.
- First, enter the following commands to see if your disk is GPT or MBR.
diskpartlist diskexit
- If the GPT section shows ‘*’ for the disk, it is a GPT disk, and if not, it’s an MBR disk.
- Then, enter the following commands below one by one and press Enter depending on whether your disk is GPT or MBR.
- On GPT:
diskpartlist disk(check your OS disk’s number)select disk X(replace X with the above disk number)list volume(note down the id number of FAT32 volume whose info says System/Hidden)select volume X(replace X with the above volume number)assign letter = S:(You can also use some other free alphabet)exitcd /d S:\EFI\Microsoft\Boot\(make sure to change drive letter S: appropriately)bootrec /fixbootbootrec /rebuildbcd
- On MBR:
bootrec /fixmbrbootrec /fixbootbootrec /rebuildbcd
- Exit the command prompt and restart Windows. Set the top boot priority to the OS device if necessary.


Then, boot into the OS and see if you still encounter the above error. If you do, you need to recreate the boot files.
- Boot into the USB installation device and get to Command Prompt.
- Enter the following commands according to your disk type.
- For GPT:
diskpartlist diskselect disk Xlist volume(note the OS drive letter corresponding to the Info “Boot” while also looking for the required FAT32 volume)select volume X(replace X with FAT32 volume’s number)assign letter = S:exitcd /d S:\EFI\Microsoft\Boot\ren BCD BCD.bakbcdboot C:\Windows /l en-us /s S: /f all(change C: to your OS drive letter, and S: to whichever letter you chose previously.)bootrec /rebuildbcd
- For MBR:
diskpartlist diskselect disk Xlist volume(note the volume number in which the Info is ‘System’. Also, look for the OS drive letter, i.e., in which Info says ‘Boot’. Here, we use C:)select volume X(replace X with the above number)assign letter = S:exitbootrec /fixmbrbcdboot C:\Windows /s S:(replace C: and S: appropriately.)


If repairing boot files doesn’t work, your only alternative is to completely refresh your computer by clean installing the operating system. First, back up all necessary data by connecting the storage drive to another computer.