Sometimes, you may suddenly observe glitches on your laptop screen, such as flickering panels or lines, duplicating displays, and so on. While there are many types of glitches, they have similar solutions, and we have covered all of them in this article.
Before you begin, you need to execute some troubleshooting steps to determine the nature of the issue.
- Get to your BIOS and check if the screen also glitches there.
- Connect your laptop to an external monitor and look out for glitches here as well.
- Open the Task Manager (Ctrl + Shift + Esc) and see if this program also shows the same issue. You may need to move the program to the glitchy area if it is not in full screen.
If your BIOS also shows a glitchy screen but the external monitor does not, the issue is with your display cable or panel.
If both your BIOS and the Task Manager do not show the issue, it’s because of conflicting apps, and you need to disable or uninstall them.
Other cases indicate problems with your Display Driver, RAM, or improper adaptive sync/refresh rate settings.
Check Display Cable and Panel
On a laptop, screen glitches commonly occur due to a loose display cable connection or damaged panel. If you usually open the laptop lid from one side only, it is possible for the panel to get twisted or your connections to come loose. The same issue can also happen if you move it around a lot in a bag.
You need to open the casing on your laptop to check for such issues and repair it. We recommend seeking help from a hardware expert if you are not confident in being able to do so yourself.
First, let’s check the cable’s connection to the motherboard since it is the easiest to do.
- Take out the removable battery.
- Remove all the screws on the lower case of the laptop using a screwdriver. You may need to look under the rubber feet or sticker for additional screws.
- Use a prying tool to remove the case.

- Disconnect any cables connecting the internal battery to the motherboard. Unscrew the internal battery and remove it if there are no cables.
- Look for a cable coming out from the laptop’s hinge and pull it out gently. The cable usually has a thin plastic cap, so it is easy to recognize.

- Then put it back in gently while making sure the connection is tight.
- Reconnect the internal battery and put the case in place without screwing it to the laptop.
- Then, put in the removable battery and see if your issue resolves. If so, you can connect all the screws.
If not, we need to check on the screen side.
- Disconnect all the batteries using the same steps as above.
- Then, gently remove the case on the screen using a prying tool. Use both the outer and inner seams right next to the screen to pry it out.

- Unscrew the panel on the four sides and pull it down.
- Reconnect the cable in the same way you did for the motherboard connection.
- Reassemble the screen, reinsert the battery and the case and check for glitches. If they are gone, you can screw back the case.
If you still get glitches, you need to replace the panel or the cable. We recommend taking your laptop to a technician for this purpose. Or, you can replace the panel by yourself using the same steps as above. If you need to replace To take out the cable, you need to pry out the part supporting the hinges from its seams.
Update or Re-install Graphics Driver
Outdated and corrupt graphics drivers are some of the main causes of many display errors. So, you must ensure they are fully updated and working properly.
Here, we recommend uninstalling the driver and reinstalling the latest version from official sources. It’s best to run the open-source app Display Driver Uninstaller (DDU) to completely remove the residual files along with the driver to avoid future conflicts.
- Download the latest driver for your graphics card but don’t install them yet. Do so for all the graphics cards you have on your computer.
- Download the DDU from its GitHub page or official forum and extract it.
- Create a restore point to be safe and exclude scanning the DDU folder on any third-party antivirus application you have.
- Disconnect any internet connection to prevent your system from automatically downloading and installing GPU drivers.
- Run the Display Driver Uninstaller inside the DDU folder.
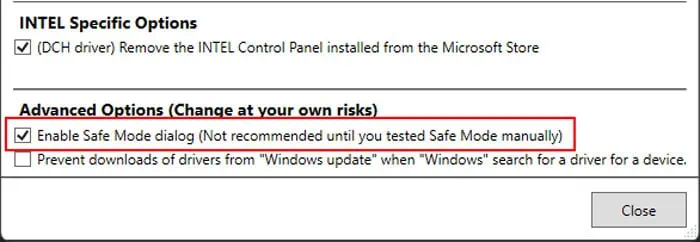
- If the Options window pops up, check Enable Safe Mode dialog, click Close and then close the DDU. If not, click on Options and do the same.

- Open DDU again, and this time, select Safe Mode (Recommended) > Reboot to Safe Mode.
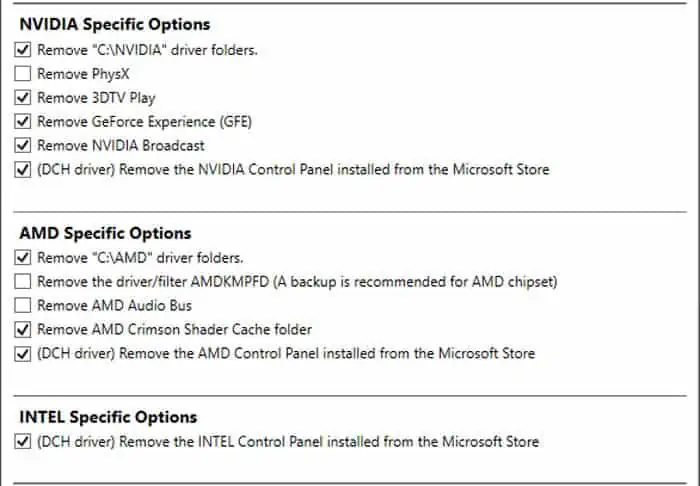
- After DDU opens on Safe Mode, go to Options, check the options for your GPU and uncheck those for other GPUs.
- Make sure to enable Remove “C:\NVIDIA” or “C:\AMD” driver folders and disable removing any audio bus driver.

- Click on Close.
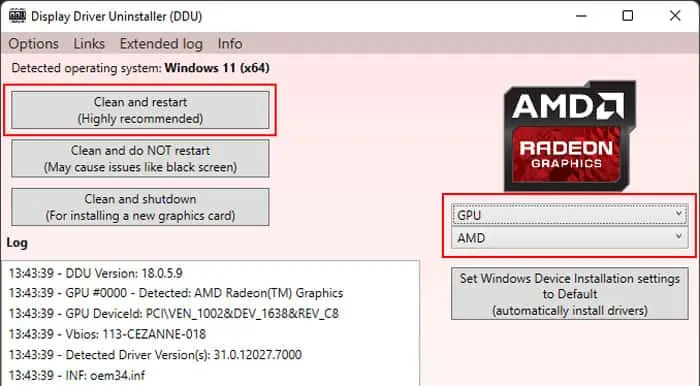
- Set the Select device type drop-down box to GPU and the drop-down box below to your GPU device.
- Click Clean and restart.

After restarting, run the driver installers you downloaded earlier and follow the instructions.
Check RAM
Faulty RAMs can cause many kinds of system issues, including glitchy screens. It is relatively easy to determine as you’ll also be experiencing other errors on your system in such a scenario.
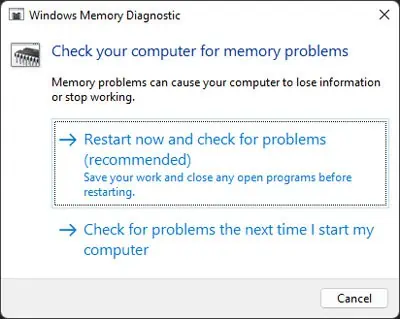
You can use the Windows Memory Diagnostic to check for defective RAMS.
- Open Run by pressing Win + R.
- Type mdsched and press Enter to open this utility.
- Click Restart now and check for problems.

After restarting, your system opens a new screen to run the test. And after it is complete, your PC reboots again and presents you with the test results. If it shows errors, your RAM slot or stick is definitely at fault. You can isolate the exact device responsible by using individual sticks on different slots one at a time and running the test again.
Then you need to replace it to resolve your glitchy screen issue.
Change Adaptive Sync Range
Your screen will start flickering if the FPS drops below the Adaptive Sync/G-Sync/FreeSync range or exceeds it.
You can prevent the flickers due to exceeding the range by setting your screen’s refresh rate to slightly below its maximum supported refresh rate to avoid the issue. But if the drop in your FPS is causing the error, you need to use programs like Custom Resolution Utility to change the range.
If you can’t do so or the issue persists even after doing so, you can try changing some graphics options, such as Variable Refresh Rate (VRR) or Supersampling, which affect your refresh rate.
Apart from these, you can only resolve the issue by disabling Adaptive Sync/G-Sync/FreeSync or setting a much lower refresh rate, such as 60 Hz.
Troubleshoot for Conflicting Apps
You need to troubleshoot in clean boot mode to determine the app causing the issue.
- Open Run.
- Type
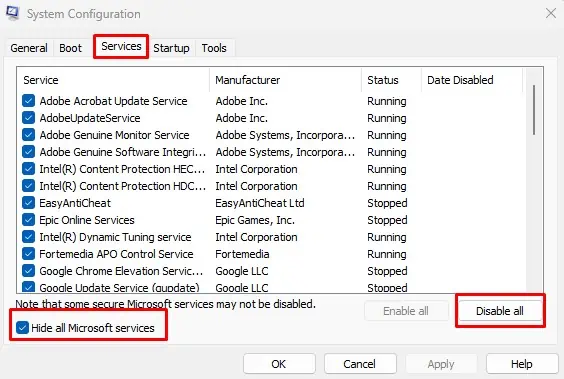
msconfigand press Enter to open System Configuration. - Go to the Services tab.
- Check Hide all Microsoft services and uncheck Disable all.

- Click Apply and go to the Startup tab.
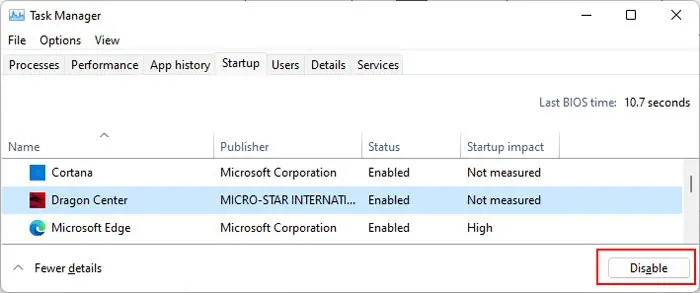
- Pick Open Task Manager.
- Here, select each Enabled process and click Disable.

- Restart your PC to boot in clean mode.
- Go to the Services tab inside System Configuration.
- Enable individual services, click OK and restart your PC. If your screen glitches, take note of the service and move to the next after disabling it again. Do so until you have checked by enabling all services one at a time.
- Then, open the Startup tab in the Task Manager and perform the same process here as well.
After determining the culprits, you can disable or uninstall them to resolve your issue.
