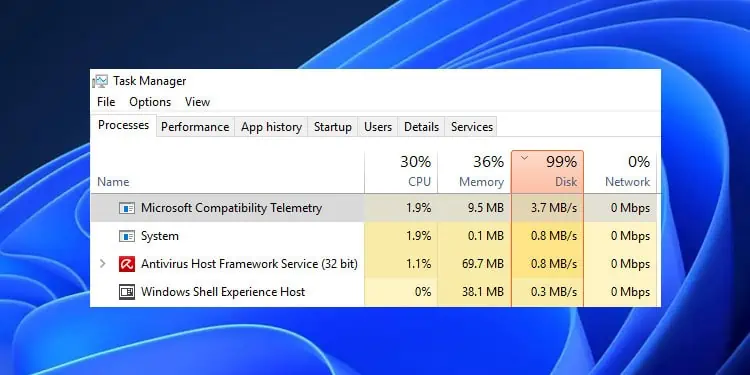
The Microsoft Compatibility Telemetry or Windows Compatibility Telemetry is a program that periodically sends your diagnostic and usage data to the Microsoft server. Microsoft uses this information to introduce new features and resolve bugs in the system.
By default, your system runs this process periodically, during which it can consume a significant portion of your system resources. If it causes high CPU usage, your computer slows down considerably and impacts you from doing any tasks on your system.
How to Fix Microsoft Compatibility Telemetry High CPU?
The only way to resolve the issue is by disabling this process. There are many ways to do so on a Windows system, which we have mentioned below. Depending on your current system configuration, you may need to perform one or more solutions to resolve your issue.
Limit Diagnostic Data Through Windows Settings
The Microsoft Compatibility Telemetry is a part of the complete Telemetry or Diagnostic Data windows component. Windows Settings allow you to choose if you want to send only the required diagnostic data to Microsoft or optional data as well.
If you enable sending optional diagnostic data, this telemetry process will use more resources. So you can try disabling this option and see if it fixes the issue.
- Press Win + I to open Settings.
- Go to Privacy & Security or Privacy and then Diagnostic & feedback.
- Check Required diagnostic data or uncheck Send optional diagnostic data.

- Select Delete under Delete diagnostic data.

Disable Connected User Experience and Telemetry Service
You can also try disabling the Connected User Experience and Telemetry service. The Microsoft Compatibility Telemetry program uses this service for its operation. So, disabling the service prevents the program from running. To disable the service,
- Open Run by pressing Win + R.
- Type
services.mscand press Enter to open Windows Services. - Look for and double-click on Connected User Experience and Telemetry.
- Set Startup type to Disabled and click Stop.
- Click Apply and OK.

Disallow Telemetry From Group Policy Editor
It is also possible to disable optional telemetry operations on your system using the Local Group Policy Editor to avoid high CPU usage of this process. Here’s how to can do so:
- Open Run.
- Type
gpedit.mscand press Enter to open the Local Group Policy Editor. - Go to Computer Configuration > Administrative Templates > Windows Components > Data Collection and Preview Builds.
- Double-click on Allow Telemetry or Allow Diagnostic Data.
- Check Disabled and click Apply > OK.
- Restart your PC to apply the change.

Disallow Telemetry Using Registry Editor
Windows Home users do not have the Local Group Policy Editor by default. In such scenarios, you can disable the Allow Telemetry setting from the Registry Editor.
- Open Run.
- Type
regeditand press Enter to open the Registry Editor. - Navigate to
Computer\HKEY_LOCAL_MACHINE\SOFTWARE\Policies\Microsoft\Windows\DataCollection - Right-click on DataCollection and select New > DWORD (32-bit value).
- Set its name to
AllowTelemetryand make sure its value is 0 (zero). - Then, go to
Computer\HKEY_CURRENT_USER\SOFTWARE\Policies\Microsoft\Windows\DataCollection - If it contains an AllowTelemetry entry, select it, press Delete, and click Yes.


Disable Microsoft Compatibility Telemetry from Task Scheduler
The different telemetry processes run at separate intervals or instances. By default, Microsoft Compatibility Telemetry runs every day at a certain time by default regardless of whether the user is logged in or not.
If you are experiencing high CPU usage due to this process, you can disable this task through the Task Scheduler. Here are the necessary steps:
- Open Run.
- Type
taskschd.mscand press Enter to open the Task Scheduler. - Expand Task Scheduler > Microsoft > Windows > Application Experience.
- Right-click on each task and select Disable.

Delete CompatTelRunner.exe File
If you don’t think you’ll ever need to send compatibility diagnostic data to Microsoft, you can permanently delete the Microsoft Compatibility Telemetry program or CompatTelRunner.exe from your system.
However, this program is under the ownership of Windows NT\TrustedInstaller by default. So you will need to take ownership and provide full permission of the file to your user account to delete it. Here is the complete process:
- Log into an administrator account on your PC.
- Open Run.
- Type
cmdand press Ctrl + Shift + Enter to open the Elevated Command Prompt. - Enter the following commands to take ownership of the
CompatTelRunner.exefile and provide permissions to modify it:takeown /f “%WinDir%\System32\CompatTelRunner.exe” /aicacls “%WinDir%\System32\CompatTelRunner.exe” /Grant Administrators:f
- Then, you can delete the file using the command
del “%WinDir%\System32\CompatTelRunner.exe” - Alternatively, you can rename it to something else to leave a backup. To do so, use the command:
ren “%WinDir%\System32\CompatTelRunner.exe” CompatTelRunner.old
