
If your keyboard keys are sticky and you’re finding them hard to press, know it’s time to clean your keyboard.
To clean a mechanical keyboard, first, pry out the keycaps and soak them. Start brushing every part – from the main surface to in between the switches. You may use microfiber cloth and cotton swabs to get rid of the tough stains.
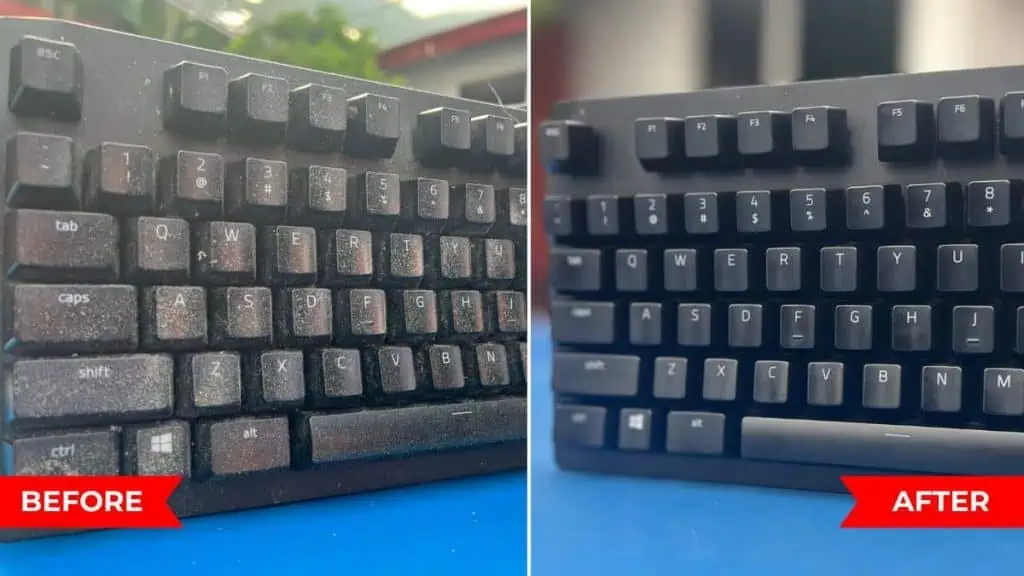
That’s exactly what we did to clean our Razer Huntsman Elite optomechanical keyboard. See how we managed to remove all the dust, dirt, grime, food crumbs, and stickiness.
Even though the cleaning process may vary depending on the keyboard you have, my demonstration below should give you a general idea of how to clean it anyway.
Before You Begin
Whether you’re a gamer or a normal office user, you’re probably spending maximum time on your PC, mostly on the keyboard!
Dr. Gerba from the University of Arizona claims that keyboards get contaminated with up to 3,295 bacteria/square inch. That being said, it’s essential to clean this peripheral at least once a week for health and hygiene reasons.
Don’t wait for your keyboard to accumulate with dust. Those germs and bacteria might make you sick.
But before wiping any part, here are a few tools that you need to gather. These should be easily available in your home. But for some, you might require visiting the nearest departmental store:
- Lint-free microfiber clothes
- Good-quality cotton swabs
- A pair of tweezers
- Keycap puller (should come with your mechanical keyboard)
- Wet Wipes or 70% Isopropyl Alcohol (recommended for cleaning and disinfecting)
- Brush (with soft bristles)
- Compressed Air Can (or Air Duster)
- Cleaning Solution/Soap and Water/Detergent (only for keycaps)
In this guide, I’ve used a rechargeable air duster as well. Don’t worry even if you do not own one. The above equipment list should suffice.
Unplug the Keyboard and Place it on Clean Surface

Start by disconnecting the USB-A or C cable from your computer’s port. If your mechanical keyboard has a pass-through cable, unplug that as well.
Next, take your peripheral to a dust-free table. Note that you’re required to clean the surface throughout the process along with your keyboard.
Personally, I recommend taking it outside your working area. That’s what I usually do when it comes to cleaning my PC components.
Take Off Keycaps
If you’re only planning to clean your gaming keyboard lightly, start by holding it upside down. Shake it gently or give some taps on the back. This should make all the debris and food crumbs fall off.
You may even insert the compressed air can’s pipe underneath the keys. Give short bursts of air and this should blow out the particles that are stuck inside.

Even so, pet hair and stains may still remain! Thus, it’s always best to take off the keycaps. But before that, I recommend taking a picture to ensure you do not forget where to reattach.
Caution: Do not attempt to yank the keys off with your bare hand. You may end up damaging the switches.
Make sure you use a keycap puller to do this job. If you don’t have one, a flat-headed screwdriver would also do.
Place the two ends between the keys and pull them straight. Here’s what our Huntsman Elite looks like after prying out all the keycaps:

Note that the longer keys, (like Space bar, Caps Lock, Shift, Enter, etc.) might take a little more effort. They have stabilizers that ensure the keys do not shake or rattle when pressed.
If you exert too much force while pulling, they can potentially break. So, be very careful!

Soak the Keycaps
Caution:
Even though modern gaming keyboards are spill-resistant, cleaning with liquid solutions should only be performed on keycaps.
Avoid spilling water on the keyboard surface or switches, especially the device’s openings.
Even if tiny drops of water get inside, the PCB might get damaged.
Once all the keys are removed, you can prepare a cleaning liquid solution yourself. Take a bowl filled with soap/detergent and water.

Now, pour down all the keys and rinse them well. I kept them soaked for more than an hour and suggest you do the same.
While this is being done, you can move on with the remaining process of cleaning.
Remove Stain, Crumbs, and Dust
Before proceeding with the following steps, keep the brush, duster, microfiber cloth, and cotton swabs ready:
- Start by holding your keyboard upside down and gently shake. All the food crumbs, dust, and debris should fall down.

- Now, place the keyboard on a table and start by wiping away dust particles using a brush.
- In my case, that wasn’t enough. So, I had to use a rechargeable air duster as demonstrated below.
- Yet, some strands of hair can remain. Pluck them out with the help of tweezers.
- Still, the keyboard will look dirty as we haven’t worked on stains yet. Dip the cotton swab in Isopropyl Alcohol (that’s meant for cleaning).
The alcohol should evaporate quickly. But avoid using any laboratory reagents even if they claim to have non-corrosive properties. - Apply very little pressure and start rubbing the filthy parts using a cotton swab, especially in between the keys. Replace the damaged buds as they may leave strands, which may add up to the cleaning process.
- In case the switches looks dirty, use another cotton swab to clean your mechanical keyboard properly.


Deep Clean Your Keyboard [For Advanced Users]
By now, your keyboard should look much tidier than before. But if yours still has stuck hair or stains in the switch, you’ll need to go one step further.
This involves detaching the keyboard’s top casing from the bottom. Once you get access to the internal parts, start cleaning each of the internal components.
For mechanical gaming keyboards, check if you have hot-swappable keys. If yes, you may use a switch puller to pluck each of them and clean them individually. Also, don’t forget to remove dirt and dust from the compartment.

In fact, if your keyboard is making ratting or scratchy sounds, I advise lubing the switches. You can even use this technique to make your keyboards quieter.
These tasks require basic hardware skills and would be tough for beginners. We’ll soon have a detailed guide to help you disassemble mechanical keyboards.
Finalize Cleaning
There are a few extra areas that you need to work on. These include media buttons, side/bottom housing, cable, ferrite bead, feet, USB connector, etc.
- If your keyboard has media buttons and a digital dial, gently wipe them using a microfiber cloth. In case they have visible stains, you may dip the cloth in Isopropyl Alcohol and redo it.
- Next, clean the entire keyboard surface to ensure no stain remains. Also, dust away additional particles that might have accumulated after cleaning other parts.
- Hold your keyboard and clean the side housing.
- Continue doing so in the bottom housing as well.
- While at it, clean the keyboard feet as demonstrated below.
- In our case, we used a cotton swab to clean the six-pin connector. It’s used for connecting the wristrest and powering the RGB lights.
- Let’s move on to the cable. Take a dry cloth and start wiping it from top to bottom.
- You’ll come across the ferrite bead for sure. Make sure to clean it as well.
- Now, finalize the cleaning by wiping the USB connector.


Dry and Reattach Keycaps
Now that your mechanical keyboard looks neat and tidy, it’s time to move back to the keycaps that we soaked earlier. Start wiping them using a towel one by one and place them all on a clean and dry table.
Don’t reattach them right away! Let them dry for a few hours.

Well, that’s what we did. But even after three hours, it wasn’t enough. Although the keycaps looked all dry, they were still holding water droplets.
Indeed, we didn’t want to take the risk and decided to dry the keycaps overnight. The next day, we reattached all the keys taking help from the photograph taken earlier.

When putting back the keycaps, make sure you check for stuck keys. In our case, we were able to fix the Esc key that was stuck and not working.
Once everything is done and dusted, plug in the gaming keyboard on your computer’s port. Then, I recommend using an online keyboard testing utility to verify if the keyboard works or not.