
If you plan to run resource-intensive programs on your laptop or it’s already experiencing overheating issues, this certainly isn’t a good sign for your battery.
In such a scenario, you may use your device without connecting the battery. But before doing so, ensure there’s no frequent power interruption in your area and that you’ve connected the laptop using its original power adapter. Apart from that, you might be looking to replace your old/dead battery.
Whether your device has an external or integrated battery, here’s a step-by-step guide that should help you remove it.
Step 1: Shutdown Your Laptop

Let’s begin the process by powering down the device. To properly shut down your laptop, close all the running applications first. Then, navigate to the Start Menu and pick Shut Down from the power options. Note the LED and the fan’s sound to ensure the laptop has completely powered off.
Never remove the battery when the laptop is powered. It may corrupt your files and potentially damage the hard drive or motherboard in the long run.
If you’re facing booting issues due to a problematic battery, I recommend performing a force shutdown. All you have to do is press its power button for about 5 to 7 seconds, and this should completely turn off the system.
Now, you need to disconnect all the external peripherals. I advise detaching the power adapter as well to ensure no power flows through the laptop when you’re operating it.
Step 2: Identify Battery Location

Once your laptop is turned off, place it on a flat and stable work surface. Now, you may close its lid and turn it upside down to get to the base panel.
Here, you’ll either notice a dedicated battery compartment (with one or two release latches above it) or simply a plain surface (in some models, vents might be present).
The former case indicates that your laptop has an external battery, and the latter means it has an integrated one (underneath the laptop that requires removing the bottom cover).
Well, the exact battery location varies on different laptop models. Nonetheless, this small compartment is usually at the bottom.
If you’re having trouble finding it, I highly recommend referring to your device’s user manual. While you’re at this, also check whether the battery is replaceable or not. Some manufacturers recommend contacting their official support rather than replacing the component yourself.
Note: If you’re planning to store your laptop battery for a long time, ensure that it’s charged to around 40% to help increase its lifetime.
Step 3: Battery Removal
Now that you’ve identified your battery location, it’s time to remove it. The exact steps vary depending on the manufacturer and model. Nonetheless, the general idea is the same, and the demonstration below should help you remove it from any laptop.
Caution: If you’re planning to replace the battery, make sure you purchase the same type. As mentioned on most batteries, using an incompatible one can lead to fire or explosion. Along with that, it’s essential to follow local ordinances if you’re going to dispose of it.
Removing External Battery
Laptop models with external batteries have individual configurations. Some only include a single-release latch, while others have two separate ones (identified with separate lock and battery icons). The latter one is considered more secure.
All you have to do is slide the dedicated switch, and the battery should get ejected. Although these instructions vary based on models, you’ll likely get a general concept.
- First of all, identify the number of switches.

- If there’s only one, slide the latch in the opposite direction. This should pop the battery right out of its compartment.
- In case there are two, first note the lock/unlock icon. Push the latch toward the unlock icon.
As you can see below, my Lenovo model indicates the number ‘1’. So, I’m going to unlock the latch first. If you have a similar configuration, do not proceed to remove the battery without unlocking the latch first. Else you might break the pins. - Now that the battery compartment is unlocked move to the other switch and push it to the release position (usually labeled with a battery/unlock icon).
In my case, my Lenovo laptop indicates the number ‘2’. - The laptop battery should eject from its compartment. Once this happens, lift the front part.
- Now, remove the battery as demonstrated below.
- Next, use a clean microfiber cloth to clean the battery.
- Along with that, I recommend cleaning every edge of the compartment.
- Also, brush off dust particles that could be stuck between the pins.
- Finally, you may install a new battery (note the prin orientation when doing so) or store the external battery in a cool and dry area (avoid humid places at all costs).
Don’t forget to slide the switch back to the lock position if you replaced the external battery.


Removing Internal Battery
As mentioned earlier, you need to first pry out the laptop’s bottom casing before removing its integrated battery. These types of batteries are usually present in slimmer models and even offer better lifespans than external ones.
Internal/integrated laptop batteries are usually screwed to the dedicated section, making it difficult for normal users to remove and replace them. In fact, some models even use adhesives that permanently stick them to their definite position.
This could mean that the manufacturer doesn’t recommend replacing the battery on your own. In that case, it’s best that you visit an authorized service center.
Before You Begin: As you’re going to tinker with the laptop’s internal parts, make sure you ground yourself. The best way to do this is to wear an anti-static wrist wrap connected to a grounded surface. Along with that, make sure the laptop is properly grounded. This helps prevent your devices from possible ESD damage.
- First, press the power button for 10 to 15 seconds to drain the remaining static charge from your laptop.
- Close the lid, get to the base panel, and start removing the rubber pads.
- Next, use a screwdriver to untighten all the screws that hold the bottom cover in place.
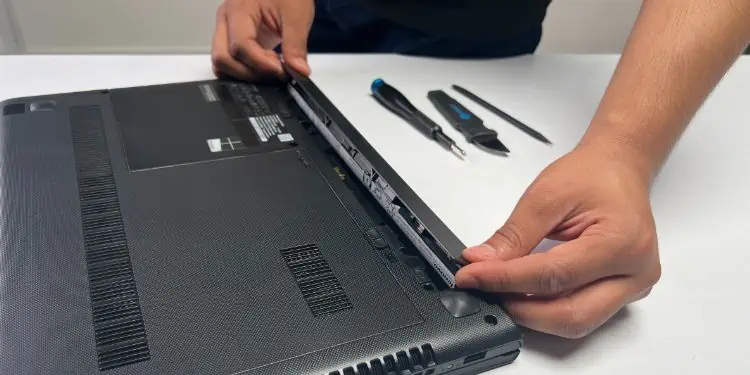
- Just removing the screws won’t help. Now, you need to insert a pry tool at one of the edges. Carefully pull and slide through the edges to pry out the casing. You should hear click sounds during the process.
- Then, pull out the bottom cover.
- Once you’re inside, locate the battery connector. Use a spudger to carefully disconnect it from the motherboard. You may wiggle the cable if you find it difficult to remove.
- Next, locate the screws that hold the integrated battery in place. Unscrew all of them using a screwdriver.
- If you find adhesive underneath the battery, insert a pry/pick tool and apply little pressure to remove it.
- Finally, pull the battery out of its section. Make sure you do not tangle other cables that could be around it.
- Now, use an anti-static cleaning brush to remove dust from the dedicated compartment.
- Along with that, I recommend cleaning the battery before placing it in an anti-static bag.
- Now, you may proceed with installing the new battery. While you’re at it, make sure you tighten all the screws properly and don’t forget to reinsert the connector.
- Finally, close the bottom casing and tighten back all the screws here as well.


