Basically, LastPass is a master notebook that encrypts all your passwords and secures them with a security key that only you know. But are you having issues with auto-filling, syncing, saving passwords, etc in LastPass recently?
The most common cause of this is LastPass’s automatic logging out feature. LastPass generally logs you out if your device is left unattended for an extended period of time.
And, if you don’t log in with your master password, you won’t be able to use any of the LastPass features. But this is not the only possible reason for LastPass to not work.
Why Is My Lastpass Not Working?
There could be several reasons why LastPass is not working on your device. Below are some of the possible reasons for LastPass to stop working on your device.
- Lastpass Not Enabled: If you have not enabled LastPass extensions on your browser then LastPass won’t autofill the passwords for you.
- Not Logged In: When you are not logged in to LastPass, the LastPass icon on your device will show inactive. You need to log in to the app to enable its features.
- Site Set as Never URL: Never URL is used to disable LastPass on specific websites. If you have set any website on Never URL then, LastPass features will not work on those websites. But you can change this from the account settings.
- Lastpass Opened on HTTP: For security reasons, LastPass needs to open on HTTPS instead of HTTP. So, if you are having problems with auto-filling it could be due to this.
How to Fix Lastpass Not Auto Filling
When you save passwords in LastPass, it remembers the passwords for you and also auto-fills them when in need. But if LastPass is not autofilling passwords, you can try these things to manage or fix them.
Disable Browser Password Autofill
The browser password autofill is usually turned on by default on most of devices. If this is turned on in your device then it might be interfering with the autofill of LastPass. Turn off password autofill from Chrome and see if it works
- Click on three vertical dots on the top right corner of the browser
- Go to Settings.
- Go to Autofill.
- Click on Passwords.
- Turn off Offer to Save Passwords.
- Turn off Auto Sign-In.

Confirm Autofill is Enabled
Autofill can be turned on or off anytime from the settings. You need to make sure autofill is always turned on so that you get access to your passwords anytime. Here’s how you can do it:
First login to LastPass by:
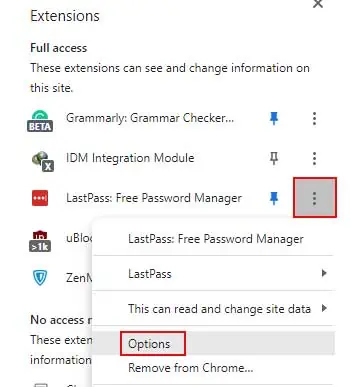
- Click on Extensions
- Click on More next to the Lastpass extension.
- Click on Options

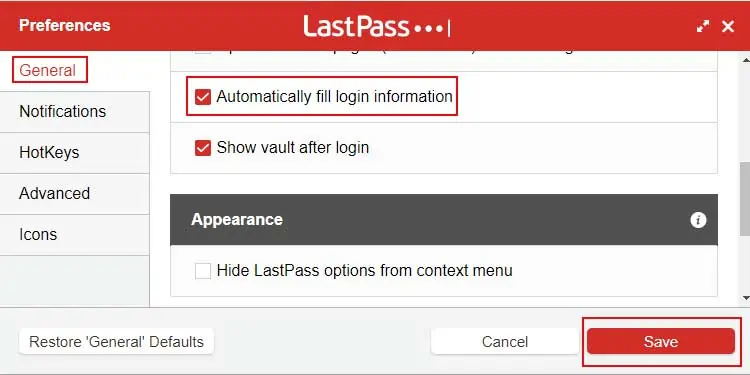
- Scroll down to the General tabs.
- Turn on Automatically Fill Login Information.
- Click on Save.

Don’t Put on Never URL
Check your account settings to see if you have set the website that you are using to Never URL. If yes, then delete the website from the Never URL list. Autofill will work only after you do that. Follow these steps to remove the website from Never URL.
- Click on extensions.
- Click on the extension of LastPass
- Click on Open My Vault.
- Go to Account Settings
- Select the Never URL tab.

- Check if your site is listed.
- If yes, click on the delete icon.
- Click OK.
Uninstall and Reinstall LastPass
Try uninstalling and reinstalling LastPass if the above-mentioned solutions do not work for you. This will remove previous settings and data. Here’s how you can do it
On Windows 10
- Press Windows + I keys
- Click on Apps
- Select Apps and Features on the left pane
- Scroll to find Lastpass
- Click on it
- Click on Uninstall.
On Windows 11
- Press Windows + I keys
- Click on Apps
- Click on Apps and Features
- Scroll to find Lastpass
- Click on the three dots next to it
- Click on Uninstall.

Now that you have uninstalled LastPass, Restart your device and reinstall LastPass.
How to Fix Lastpass Not Syncing
Many users also claim that they can not sync their passwords between browsers. Follow these steps to fix that if you’re also having issues with syncing.
Refresh Site in LastPass
You can temporarily fix syncing issues by refreshing the sites from the settings. Sometimes, there are glitches in the app which happen to be the cause for these errors. You can refresh sites using the LastPass extension. Here’s how to do it:
- Go to extensions.
- Click on the extension of LastPass
- Go to Account Options/ Your Email Address
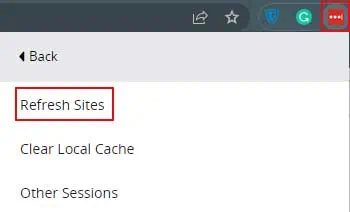
- Click on Advanced.
- Click on Refresh Sites.

Update Your Browser and Lastpass to Its Latest Version
If you are using an older version of your browser or the app, you need to update them instantly. When you keep using older versions, no matter how many times you fix its issues, it will still create more. Follow these steps to update the browser and app:
Here’s how you can update your Lastpass:
- Click on the three vertical dots at the top right corner of your browser.
- Click on More Tools.
- Go to Extensions.

- Find Lastpass.
- Click on Details.
- Click on Update.
The Update option will only show if there is any update available.
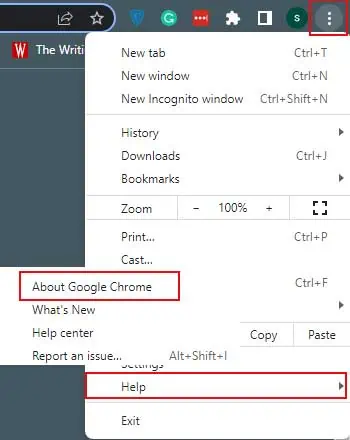
Here’s how you can update your browser:
- Click on the three vertical dots at the top left corner
- Click on Help.
- Click on About Google Chrome

If a newer version is available, update it.
Log Out and in Your Lastpass Account
Logging in and out of your account will work like refreshing your account. It will remove the minor bugs if any and could solve the issue of LastPass not syncing. You can follow these steps to log in and out of your account:
- Click on extensions.
- Click on the extension of LastPass
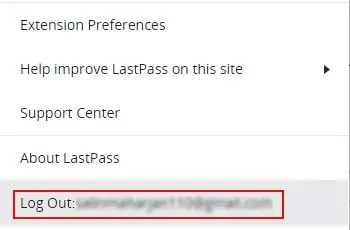
- Click on your email address.
- Click on Logout

If you are successfully logged out, the LastPass icon will turn gray in color.
- Click on extensions.
- Click on the extension of LastPass
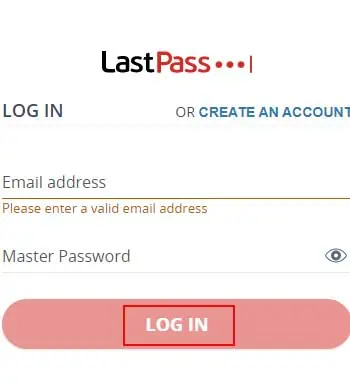
- Enter your email address and password
- Click on the Log In

- Complete multi-factor authentication if needed.
How to Fix Lastpass Not Saving Password
Technical issues, bugs, glitches, or extensions can cause issues like LastPass not saving passwords. However, you can try these solutions to fix LastPass not saving passwords.
Clear Cache Data
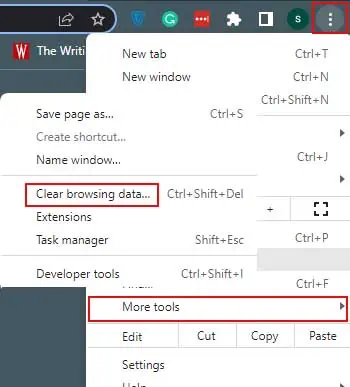
The previous data and new data can clash sometimes which causes LastPass to not save passwords. You can clear the cache data/browsing data of your browser and see if it works or not.
- Click on the three vertical dots at the top right corner.
- Hover on More Tools.
- Click on Clear Browsing Data.

- Select all the options available there.
- Set the Time Range to Last 4 Weeks.
- Click on Clear Data.
- Close and reopen the browser.
Delete Temporary Files
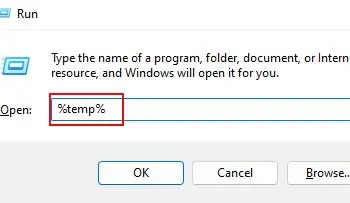
If your device has temporary files piled up then delete them from your device. The temporary files take up your storage and also interrupt with working of your device. Follow these steps to delete the temporary files:
- Press Windows + R keys
- Type
%temp% - Press Enter

- Select all the files
- Press Delete.
How to Fix Lastpass Not Logging In
Due to some aspects, many users face a common issue with Lastpass which is failing to log in from a new device. When you log in to a new device, LastPass just simply does not load. We have found some solutions to this problem and mentioned them below.
Turn Off Country Restriction
If you have country restrictions turned on and you just recently traveled countries, then LastPass will not work there. You need to turn off Country Restrictions so when you travel somewhere your passwords won’t get unreachable from you. Here’s how to do it:
- Open Lastpass
- Go to Account Settings
- Click on Show Advanced Settings at the bottom of the new screen
- Scroll down to Security.
- Uncheck the box: Only Allow Login From Selected Countries.

- Save changes.
Check Date and Time
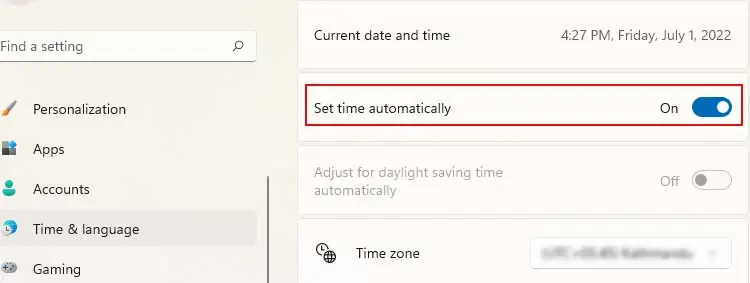
Maintaining date and time might not look as important but sometimes these things also cause errors or connection timeouts. Check your date and time and fix them if they are incorrect. Follow these steps to fix date and time.
- Press Windows + I keys
- Go to Time & Language
- Select Date & Time
- Turn on Set Time Automatically

- Turn on Set Time Zone Automatically.
Disable Email Verification
This feature allows LastPass to send you a verification email every time you try to log in from another device. It is a good feature security-wise but is also rather annoying. Turn this feature off by following these steps.
- Open Lastpass
- Go to Account Settings
- Click on Show Advanced Settings.
- Scroll down to Security.
- Select the box: Don’t Require Email Verifications From Unknown Devices and Locations.


