Lightshot is a handy app for taking instant screenshots while still being able to edit and customize them simultaneously.
Also, it overcomes various limitations of your system’s built-in screenshot tools. However, it isn’t always the perfect app.
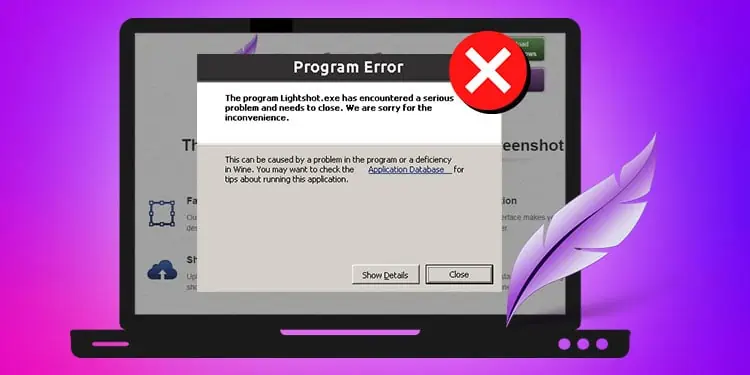
Sometimes the app doesn’t respond or crashes when opening. To resolve these issues, try relaunching the application and see if it solves your problem.
Nonetheless, continue reading further to find various fixes for other issues you may face while using Lightshot.
Why is Lightshot Not Working?
- Screenshot copied to clipboard but not saved
- Using the wrong keyboard shortcut
- The default save location has changed
- Opening a similar screenshot capture tool
How to Fix the Lightshot Not Working?
Before you begin, it might be helpful to know that Lightshot doesn’t work in some specific situations.
For instance, you cannot take screenshots using Lightshot while playing a game in the full-screen mode. Likewise, it may not work while taking screenshots of a particular window of a setting.
However, you can overcome the above issues with workarounds. You can use the game bar as an alternative for taking in-game screenshots. Likewise, for the latter issue, launch the Lightshot app, click its icon from the taskbar, and you should be able to take screenshots after that.
On the other hand, go through the following fixes until your specific problem gets resolved.
Use the Correct Keyboard Shortcut
It could be the case that you are just copying the screenshot to the clipboard and not actually saving it. As a result, you aren’t finding the screenshots anywhere on your PC. Therefore, use the correct keyboard shortcut.
For copying the screenshot to the clipboard:
- Ctrl + C (Windows)
- Cmd + C (Mac)
For saving the screenshot:
- Ctrl + S (Windows)
- Cmd + S (Mac)
Furthermore, make sure you are pressing the whole key combination.
Close Similar Applications
If you have installed similar applications like Lightshot, they may interfere with the Lightshot app. And, you might get an error like “Failed to register hotkey.” Therefore, close them to avoid Lightshot issues while taking screenshots.
To close applications running in the background,
On Windows
- Press the Ctrl + Shift + Esc key to open the Task Manager.
- Under the Processes tab and the Apps section, select the conflicting application.
- Then, click the End task button in the bottom right corner
 .
. - Repeat the above process if you have multiple screenshot capture apps.
- Check if the Lightshot is working as expected.
On Mac
- Search for and open Activity Monitor on the Spotlight app. You can use the shortcut key Command + Spacebar to open the Spotlight app.
- Select Lightshot from the list of apps/processes.
- Then, click the cross icon in the top left corner and select Quit/Force Quit.
- See if the Lightshot application works as expected.
Configure the Keyboard Shortcut
Windows has its own built-in screenshot capture tool called “Snip & Sketch.” And, since it is the default tool for taking screenshots on Windows, it may override the shortcut key PrtSc/PrintScr.
And although the key works even when using Lightshot, sometimes it may fail to work. Therefore, assign a different shortcut key to avoid issues while launching Lightshot. Here’s how you can do it.
- Launch the Lightshot application.
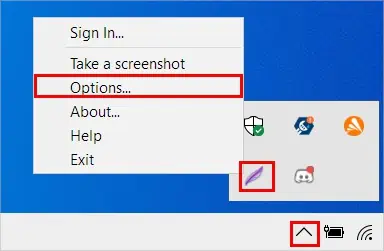
- Then, click the Show hidden icons(which looks like an up arrow) from the taskbar.
- Now, right-click on the Lightshot icon(feather) and click Options.

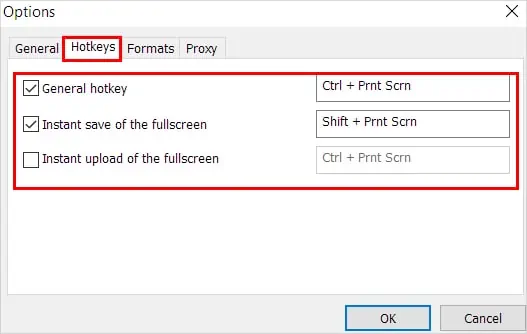
- Under the Hotkeys tab, assign a different shortcut key (e.g., Ctrl + PrntScrn) to take screenshots with Lightshot.

- Click OK to confirm.
- Check if you can take screenshots with Lightshot now.
In case you don’t have a print screen button, you can set assign a new keyboard shortcut and use it for taking screenshots.
Stop the Default Screenshot Tool from Launching
By default, Windows launches the snipping tool when you press the Prt Scrn/Prt Scn key. Likewise, the Lightshot application also uses the same key for taking screenshots. So, it may cause conflict, and the key may not work as expected.
You can prevent the snipping tool from using the PrtSc key to resolve the above issue.
Here’s how you can do it using the Settings app.
- Press the Windows + I to open the Settings app.
- Then, navigate to Ease of Access > Keyboard.
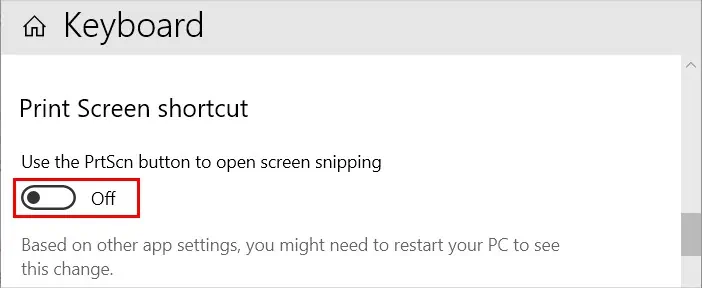
- Now, in the right pane, scroll to the Print Screen shortcut section and toggle off the button under Use the PrtScn to open screen snipping.

- Restart your PC and see if your problem has been solved.
Check the Save Location
By default, Lightshot creates and saves all its screenshots inside the following path on Windows:
C:\Users\[Username]\Documents\Lightshot
However, if you launched Lightshot, clicked its Save button, and saved to a different location, it automatically saves the new screenshots in that location. This is because it always saves the current screenshot according to the most recent save location.
As a result, you may not find the screenshots in the usual save location.
On the other hand, if you use OneDrive on your system, it can save every screenshot taken to its folder. To prevent it,
- Open the OneDrive app.
- Now, click the OneDrive icon(which looks like a cloud) from the taskbar. If you don’t find it, click the Show hidden(up arrow) icon.
- Then, click the gear icon and select Settings.
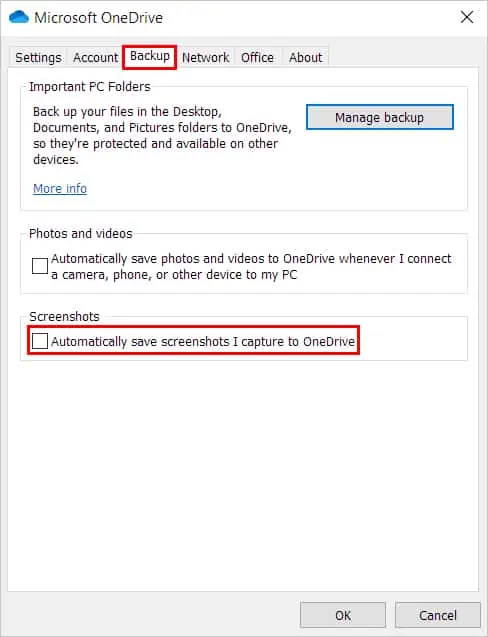
- Under the Backup tab, uncheck the Automatically save screenshots I capture to OneDrive checkbox.

- Click OK.
Reinstall the Application
If the problem persists, you can just reinstall the application to resolve any unknown issues with the application. To uninstall the app,
On Windows
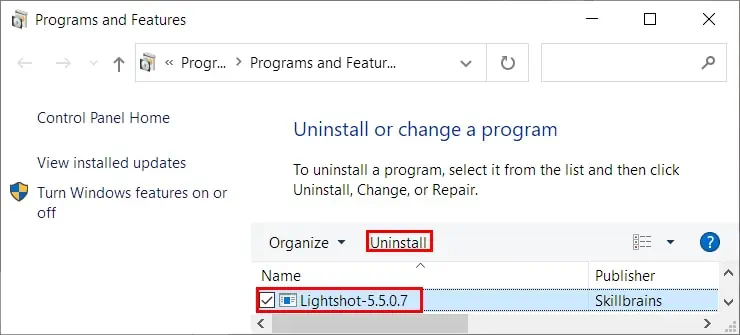
- Press the Windows + R key and type the command
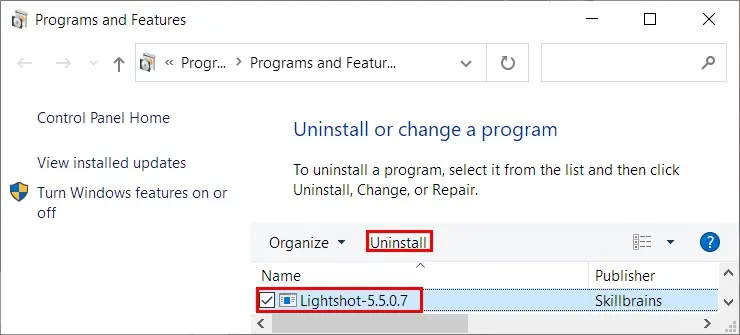
appwiz.cpl. - Select Lightshot from the list of applications.
- Then, click Uninstall from the top bar.

- Next, click Yes to confirm.
On Mac
- Click Finder from the bottom of your screen.
- Select Applications from the left sidebar.
- Now, drag and drop the Lightshot app to the Trash icon located at the bottom of your screen.
After uninstalling the application from your system, download the appropriate application for your system from the Lightshot official website.
Likewise, if you are using the Lightshot in a browser, uninstall it and download it again to resolve the issue.
Provide Permissions for Lightshot (Only for Mac)
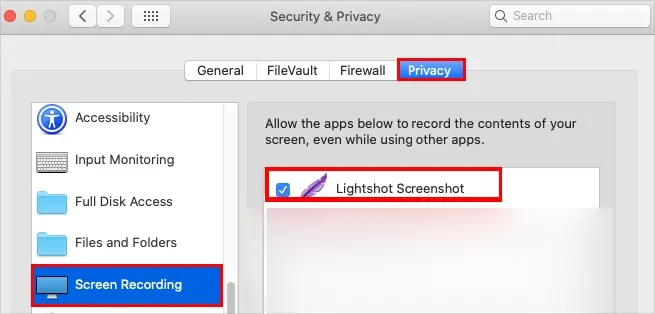
Lightshot needs permission on Mac to work to capture screenshots of your system. So, in case it’s not enabled, you can face issues. Here’s how to allow the Lightshot app on Mac.
- Click the little Apple icon in the top left corner of the screen.
- Navigate to System Preferences > Security & Privacy.
- Now, under the Privacy tab, select Screen Recording from the left sidebar and check the Lightshot Screenshot checkbox.


 .
.