Tech News Today
  • Hardware
    • Motherboards
    • CPUs
    • Graphic Cards
    • RAM
    • SSDs
    • Computer Cases
    • Monitors
    • Peripherals
    • Power Supply Unit
    • PC Builds
    • Computer Tips
  • Software
  • Operating System
    • Windows
    • Mac
    • Linux
  • Gaming
  • Mobile
  • Console
  • More
    • Internet
    • Networking
    • Security
    • Buyer’s Guide
    • Gadgets
    • Laptops
    • Reviews
    • How To
    • News
Facebook Twitter Instagram
Tech News Today
  • Hardware
    • Motherboards
    • CPUs
    • Graphic Cards
    • RAM
    • SSDs
    • Computer Cases
    • Monitors
    • Peripherals
    • Power Supply Unit
    • PC Builds
    • Computer Tips
  • Software
  • Operating System
    • Windows
    • Mac
    • Linux
  • Gaming
  • Mobile
  • Console
  • More
    • Internet
    • Networking
    • Security
    • Buyer’s Guide
    • Gadgets
    • Laptops
    • Reviews
    • How To
    • News
Tech News Today
Home»Virtualization»VT-x Is Disabled in the BIOS? Here’s How to Enable it

VT-x Is Disabled in the BIOS? Here’s How to Enable it

Abhishek SilwalBy Abhishek SilwalJuly 5, 2022
vt-x is disabled in the bios

VT-x or Hardware Virtualization Technology helps users run more than one Operating System at the same time. Most users use it to run Virtual Machines or Emulators in isolation from the host machine.

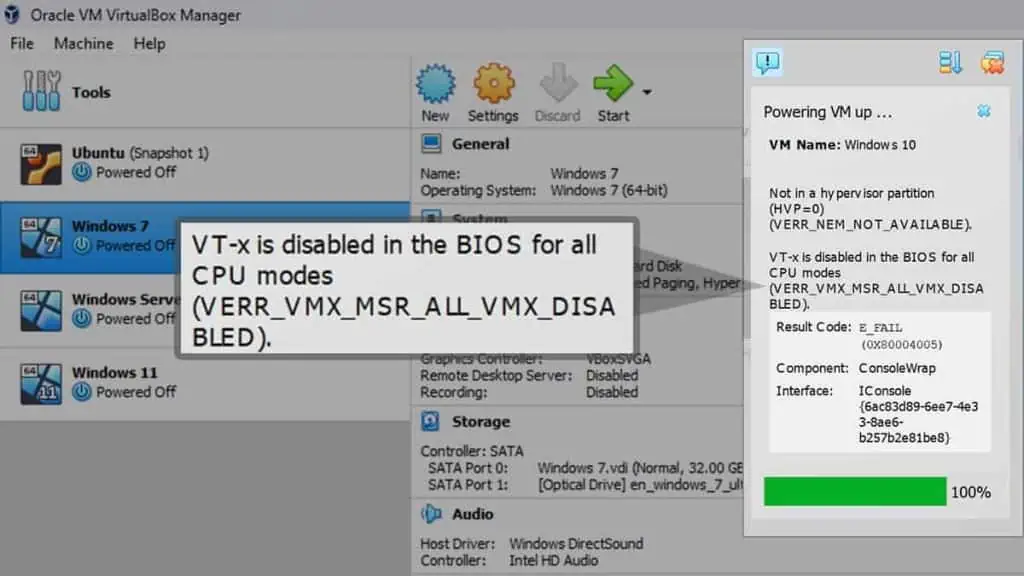
If this feature is not enabled or there are some conflicts, you will get the “VT-x is disabled in BIOS” error on VirtualBox and Android Studio. On VirtualBox, the message displays something like: “VT-x is disabled in the BIOS for all CPU modes (VERR_VMX_MSR_ALL_VMX_DISABLED).” And on Android Studio, the error message displays, “Intel HAXM is required to run this AVD. VT-x is disabled in BIOS.”

Since the solutions for both these errors are similar, we have compiled them into a single article. However, some fixes are specific to one application only. So read carefully and apply the relevant fixes.

Table of Contents

  • Why my VT-x is Disabled in BIOS
  • How to Enable VT-x in BIOS
    • Check VT-x Status
    • Enable VT-x in BIOS
    • Disable/Restart Hyper-V Feature
    • Check VT-x in VirtualBox Settings
    • Check PAE/NX Setting for VirtualBox VM
    • Reallocate VirtualBox VM RAM Size
    • Install / Reinstall HAXM (on Android Studio)
    • Disable Security Applications and Processes

Why my VT-x is Disabled in BIOS

Here are some potential reasons for the “VT-x is disabled in BIOS” error message:

  • Virtualization not enabled in BIOS.
  • Trying to Run 32-bit guest OS with more than 4 GB RAM.
  • Improper PAE/NX setting for VM.
  • Interference due to Security Apps that use Virtualization.
  • Hyper-V conflicting with VirtualBox or HAXM.
  • Bugs in Intel HAXM (Android Studio).

How to Enable VT-x in BIOS

First, make sure you are not running a 64-bit guest OS on a 32-bit host machine. Then, apply the possible solutions below to resolve your issue.

Check VT-x Status

You may get the error message “VT-x is disabled in BIOS” on VirtualBox or Android Studio even when Virtualization (VT-x) is enabled BIOS. So, first, you need to check the status of this feature.

Before that, make sure to use identification tools such as Intel Processor Identification Utility and AMD-V Detection Utility to check if your CPU supports VT-x. If it doesn’t, you will need a CPU upgrade.

To check if VT-x is enabled in BIOS or not,

  1. Open the Task Manager by pressing Ctrl + Shift + Esc.  
  2. Go to the Performance tab and click on CPU.
  3. Check the status of Virtualization.
    virtualization-task-manager

Also, while it may seem like you need to enable Virtualization to run VMs, it’s not always the case. For instance, running a 32-bit OS on a VM doesn’t require VT-x, but the performance improves if it’s enabled. It is because a 32-bit OS can run on a Software-assisted Virtualization, but a 64-bit guest OS needs Hardware-assisted Virtualization.

Enable VT-x in BIOS

If Virtualization is disabled, you must enable it from your BIOS or UEFI settings. You can get to the BIOS by pressing the BIOS key on the startup logo screen. The keys for some motherboards are:

  • ASUS: F9, F10, or Delete
  • Dell: F2 or F12
  • HP: F10
  • MSI/Gigabyte: Delete
  • Lenovo: F1, F2, or Enter + F1
  • Acer: F2 or Delete

You can also access UEFI through the Advanced Startup Options. To do so:

  1. Click on the Restart button on the power options menu while holding Shift.
  2. On the Advanced Startup Screen, go to Troubleshoot > Advanced options > UEFI Firmware Settings.
    select UEFI settings
  3. Select Restart.

How you can enable Virtualization depends on the motherboard or PC you have. You can find the VT-x option for most processors inside the UEFI’s Advanced tab (in Advanced mode). If not, look inside the CPU Configuration, Security, or Overclocking tabs to find the VT settings.

To enable hardware virtualization, the option you need to enable is Virtualization Technology, VT-x, or SVM. You can also enable Virtualization for Directed I/O, VT-d, or IOMMU to allow VMs to access your I/O devices properly.

If you have any problem enabling VT-x in BIOS, you can visit our dedicated article on How to Enable Virtualization to find the necessary steps. You can also seek help from your motherboard’s official website.

Disable/Restart Hyper-V Feature

Oracle VirtualBox v6 has introduced experimental support for Hyper-V. But all previous versions conflict with this feature. So, for earlier VirtualBox applications, you need to disable the feature using the steps below:

  1. Open Run and enter optionalfeatures.
  2. Search for and uncheck the following options:
    • Hyper-V
    • Windows Sandbox
    • Windows Subsystem for Linux
    • Containers
    • Windows Hypervision Platform
      Enable-virtualization-Hyper-V
  3. Click Ok.
  4. Now, open the Elevated Command Prompt and enter bcdedit /set hypervisorlaunchtype off.

If you have VirtualBox v6+, you can try resetting Hyper-V to fix any bugs causing compatibility issues. Here’s how you can do so:

  1. Open the Elevated Command Prompt.
  2. Enter the following commands:
    • bcdedit /set hypervisorlaunchtype off
    • bcdedit /set hypervisorlaunchtype on

If you have multiple OS, you need to enter your current identifier as well. For e.g., bcdedit /set {current} hypervisorlaunchtype off

Check VT-x in VirtualBox Settings

Another configuration you need to check is the VT-x setting of your VirtualBox VM. Here’s how to access this setting:

  1. On Oracle VirtualBox, select your VM and click Settings.
  2. Go to System > Acceleration.
    virtualbox-enable-vt-x

If you are running a 32-bit system and your BIOS Virtualization setting is Off, uncheck Enable VT-x/AMD-V. Otherwise, make sure to enable it.

Check PAE/NX Setting for VirtualBox VM

A 32-bit OS can only access up to 4 GB of RAM or physical memory by design. To access more than 4 GB RAM with such OS, you need the Physical Address Extension (PAE) feature. And with PAE enabled, you need NX to run the 32-bit OS in protected mode.

If you are setting up a 32-bit guest OS on VirtualBox, you must enable PAE and NX on both your host computer and the VM settings.

To enable them on your PC:

  1. Press Win + R to open Run.
  2. Type cmd and press Ctrl + Shift + Esc to open Command Prompt as admin.
  3. Enter the following commands to force-enable the features:
    • bcdedit (note the identifier for your current boot loader, for example, current)
    • bcdedit /set [{identifier}] pae ForceEnable
    • bcdedit /set [{identifier}] nx AlwaysOff

Now, enable PAE/NX on your VM settings using the steps below:

  1. On VirtualBox, select your VM and click Settings.
  2. Go to System > Processor.
  3. Check Enable PAE/NX and click OK.
    virtualbox-enable-pae-nx

If you are running a 64-bit guest OS, enabling PAE/NX will instead cause this VT-x issue. So, disable the option using similar steps. You only need to do so from the VM settings, not your host PC.

Reallocate VirtualBox VM RAM Size

An alternative to the solution just above is to reallocate your RAM size. As mentioned earlier, without PAE, you’ll get this error if you try to run a 32-bit OS with more than 3584 MB RAM.

To resolve this issue, you can set its RAM to 3584 MB or below using these instructions:

  1. On VirtualBox, select the VM with this issue and click Settings.
  2. Go to System > Motherboard.
  3. Drag the slider next to Base Memory to set RAM to 3584 MB or lower.
    virtualbox-memory
  4. Click OK.

If you are using a 64-bit guest OS, low RAM is actually a hindrance. Some users have reported that they encountered the VT-x is disabled in BIOS error with low RAM. In this scenario, you need to increase the VM’s RAM allocation.

Install / Reinstall HAXM (on Android Studio)

If you have enabled VT-x and VT-d in BIOS and the Hyper-V feature is Off, the only remaining cause for this issue on Android Studio involves bugs with the HAXM program. It is also possible that you haven’t installed the program at all.

To install Intel HAXM,

  1. On Android Studio, go to Configure > SDK Manager > SDK Tools.
  2. Check Intel HAXM installer and click OK.
    intel-haxm-installer

If it’s already enabled or enabling it doesn’t help at all, you need to install the latest version. First, uninstall it using the steps below:

  1. Open Run and enter appwiz.cpl.
  2. Select Intel HAXM and click Uninstall.
  3. Follow the on-screen instructions.

Then, download and install the latest HAXM from the GitHub page.

Disable Security Applications and Processes

It is also possible that some third-party security application is blocking the VM’s access to Virtualization resources. So, disable all third-party security software on your PC and check if the issue resolves. You can also try clean booting your OS to see if any other apps are using the VT-x resources.

Your computer also uses VT-x for the following security features:

  • Device Guard and Credential Guard.
  • Core Isolation and Memory Integrity.

You can try disabling them as well. To disable the first feature,

  1. Download the Device Guard and Credential Guard hardware readiness tool.
  2. Open PowerShell as admin and enter: 
  3. DG_Readiness_Tool_v3.6.ps1 -Disable –AutoReboot (replace v3.6 with the tool version).

To disable Memory Integrity:

  1. Open Run and enter windowsdefender:
  2. Go to Device Security > Core isolation details and toggle Off Memory integrity.
    memory-integrity
fix
Abhishek Silwal
  • LinkedIn

Abhishek Silwal is an Electronics Engineer and a technical writer at TechNewsToday. He specializes in troubleshooting a wide range of computer-related issues. His educational background in Electronics Engineering has given him a solid foundation in understanding of computers. He is also proficient in several programming languages and has worked on various robotics projects. Even in his early days, he used to tinker with various computer components, both hardware, and software, to satiate his curiosity. This experience has given him a breadth of experience that goes beyond his educational qualification. Abhishek has been writing articles on dealing with varieties of technical issues and performing specific tasks, especially on a Windows machine. He strives to create comprehensive guides on fixing many system and hardware issues and help others solve their problems. You can contact him at abhisheksilwal@technewtoday.com

Related Posts

virtual machine disks consolidation is needed

4 Ways to Fix “Virtual Machine Disks Consolidation is Needed”

December 27, 2022
virtualbox shared folder

How to Create Shared Folder on Virtualbox

November 29, 2022
failed to open a session for the virtual machine

How to Fix “Failed to Open a Session For The Virtual Machine” Error?

September 30, 2022
how to uninstall virtualbox

How to Uninstall VirtualBox on Windows

September 28, 2022
how to use vmware

How to Use VMware (Detailed Guide)

September 23, 2022
virtualize a physical machine vmware

How To Virtualize A Physical Machine With VMware

September 17, 2022
Add A Comment

Leave A Reply Cancel Reply

Latest Posts
Best-1200W-PSU

8 Best 1200W PSUs for Extreme PC Builds in 2023

May 16, 2023
Best-1000W-PSU

10 Best 1000W PSUs in 2023

May 16, 2023
best-700w-psu

10 Best 700W PSUs for Gaming in 2023

May 14, 2023
You may also like
antimalware service executable high memory

Fix: Antimalware Service Executable High Memory

May 18, 2023
printer-printing-pink

Why is My Printer Printing Pink? 6 Ways to Fix It

May 18, 2023
how to clean usb c port

How to Clean USB-C Port Safely

May 17, 2023
Recommended
Cookie Clicker Garden Guide

Cookie Clicker Garden Guide to Unlocking Every Seed

September 26, 2021
monitor no signal

Computer Turns On But Monitor Says No Signal (9 Ways To Fix)

November 10, 2022
Facebook Twitter Pinterest
  • Home
  • About Us
  • Our Team
  • Editorial Guidelines
  • Privacy Policy
  • Affiliate Disclosure
© 2023 TechNewsToday, editor@technewstoday.com | Tech Central Pvt. Ltd.

Type above and press Enter to search. Press Esc to cancel.