
While specifying boot priority is not required when using a single bootable device, it is essential for users who prefer multi-booting. Since your ASUS system selects the drive listed at the top of the boot order, you need to arrange them in a proper sequence.
To manage your bootable devices on ASUS BIOS, get to Boot Priority in the EZ mode or Boot Option Priorities in the Advanced mode. Now, drag and drop the drives in desired positions or set them accordingly in the respective boot options.
For instance, I have installed Ubuntu on my primary drive and Windows on the secondary. By default, Ubuntu is booted every time I start the PC but what I prefer is Windows.
Even though it’s possible to select the latter from ASUS Boot Menu, doing so every single time on startup can be quite tedious. Instead, keeping the secondary drive first in the boot priority list will be the best solution here.
Restart Your Computer to Access BIOS Interface
To access the Boot Order settings, you need to get to ASUS Legacy/UEFI screen first. If you haven’t accessed the interface before, the process isn’t as daunting as you might think.
Start/restart your PC and as soon as you see the ASUS/ROG/TUF screen, press the Del or F2 key.

The first screen is usually accompanied by “Please press Del or F2 to enter UEFI BIOS setting” or a similar message. Note that if you are late in pressing the dedicated key, another logo screen appears with a ‘loading’ icon and you won’t be able to access the ASUS BIOS.
To avoid this from happening, I suggest spamming the BIOS key as soon as your computer starts up. This even helps if the Fast Boot feature is enabled.
Note: The steps in this guide are emphasized on ASUS UEFI Utility. While the exact process slightly differs on Legacy BIOS, the idea remains the same. You just have to navigate to the dedicated Boot section and change the priority in a similar way that I have demonstrated below.
Manage Boot Priority in EZ Mode
In most ASUS models, the default BIOS menu screen is EZ mode. It offers a simple user interface that is easy to follow along, especially for beginners.
In EZ mode, you can manage all the basic system settings, including the boot device priority. My basic instructions below should help just that:
- Locate the Boot Priority section, which should be at the bottom-right part of the EZ mode screen.

- If you have more than four devices and want to manage all, press the Switch all button.
- Click and drag the device (that you prioritize the most) to the first position in the list.
Since I want to use Windows, I have kept the dedicated hard drive in the top slot as shown above (for Windows, it should show Windows Boot Manager). - Then, place the next prioritized drive in the second position.
- Repeat the above steps for your other bootable devices. In my case, I have connected four drives and this is how my final boot order will be:


Additional Tip: To quickly switch between EZ and Advanced modes in ASUS BIOS, use the F7 key.
Change Boot Priority in Advanced Mode
If your ASUS Setup mode is set to Advanced, you’ll directly be navigated to the Advanced mode. While you can quickly switch to EZ, it’s not at all necessary as there’s a dedicated Boot Option Priorities section in this mode as well (don’t confuse it with Boot Override).
- First of all, navigate to the Boot tab.
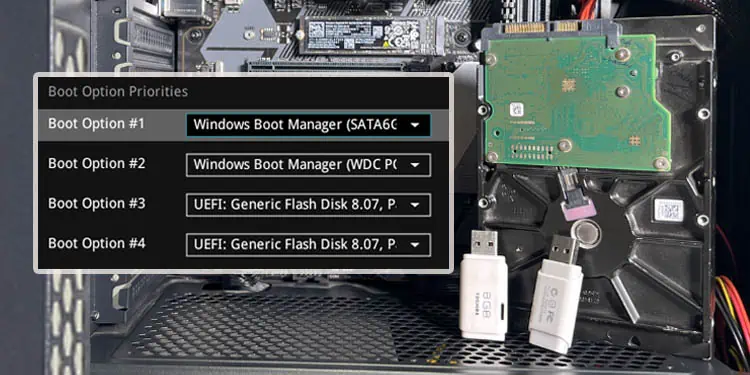
- Locate the Boot Option Priorities section. Here, the number of boot options will change based on the number of connected devices.
For instance, I have four drives connected, and hence four options are available to me. - Start with the first boot option. Expand the drop-down and select the storage device that you wish to boot from.
In my case, I am picking the USB flash drive as I want to install Windows 10. - Now, expand the second boot option’s drop-down and select the device you wish to keep as a second priority.
- Repeat the same steps for the remaining boot options. As you can see below, you even get to disable the boot option.


Save Changes and Reboot
Once everything is configured, make sure you save this setting before exiting from the ASUS BIOS Utility. Press F10 followed by Ok and this should do the job.

Since managing bootable devices is just a minor change, it won’t be shown in the dialogue box (as demonstrated in the above figure).
Quick Troubleshooting: If you’re trying to access an MBR-partitioned bootable drive on a UEFI system, it will likely not get detected in the Boot Priority section. A simple solution is to enable CSM, which should add legacy compatibility. So, you don’t require converting this drive to GPT.