
Like most motherboards, ASUS also includes the ‘Fast Boot’ feature that helps accelerate the bootup time. It works by initializing all hardware components simultaneously during the startup but this does come with certain trade-offs.
Depending on your requirement, navigate to Boot > Boot Configuration in ASUS BIOS to enable/disable Fast Boot. Along with that, some models even let you tweak additional settings, such as NVMe Support and Next Boot after AC Power Loss.
Since this feature can make it a little difficult to access the BIOS interface, I like to keep it disabled on my high-end ASUS systems. However, if your computer takes too long to start and you wish to save some time, enabling Fast Boot should be a good idea.
Enter UEFI/Legacy BIOS Utility
While you can configure ‘Fast Startup’ from Windows, the ‘Fast Boot’ feature on BIOS is a completely different concept.
The former puts your computer in a hibernation state, and the feature is enabled by default on the latest Windows versions (from 8 onwards).
On the other side, BIOS Fast Boot operates on the hardware level and can significantly improve the bootup speed even when you’re using an older Windows version.
In order to access this feature, you need to enter the BIOS screen first. Typically, Fast Boot is available on UEFI systems. However, upon my extensive testing, some Legacy ASUS boards also support it.
- The easiest way to get to the UEFI/Legacy screen is by pressing the Del or F2 key when the PC is POSTing.

- However, if the Fast Boot is already enabled on your ASUS BIOS, try hammering the BIOS key as soon as you hit the power button. Do this continuously until you reach the interface.
- Since this might not work every time, I rather recommend accessing the UEFI Utility from the Advanced startup options.
Keep holding Shift before choosing Restart (in the Start Menu). Then, select Troubleshoot > Advanced options > UEFI Firmware Settings. Press Restart in the final screen and you should be good to go.


Navigate to the Boot Configuration Section
After accessing the BIOS screen, you need to now move to the dedicated Boot Configuration page. While the Fast Boot option is present directly under Boot in Legacy systems, there are a few more steps you need to take on the UEFI utility:
- Since you can’t configure Fast Boot in the EZ mode, ensure you’re in the Advanced mode first. Just like me, you may quickly switch between them using F7.
- Now, navigate to the Boot tab.
- In some ASUS series, you’ll find the Boot Configuration section here. Take a look at the UEFI screen of my ROG STRIX B450-F GAMING below:
- But for other boards, you need to enter the dedicated section first. Here’s a demonstration of it on my Prime B450 Plus BIOS:


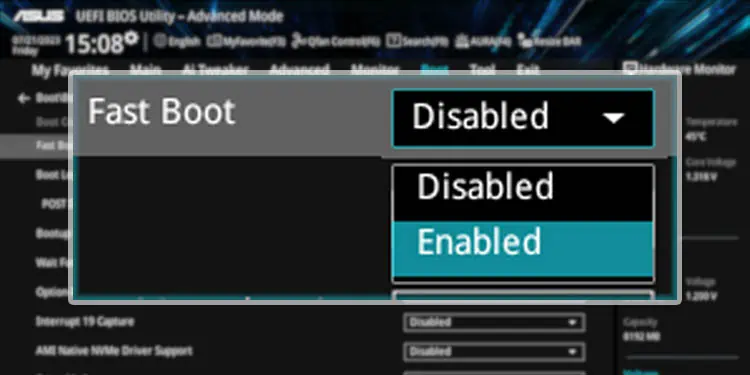
Enable/Disable Fast Boot
Now comes the main step. To tweak the current configuration, all you have to do is expand the Fast Boot option and set it to either Enabled or Disabled.

While some other motherboards, like Gigabyte and ASRock, offer an additional Ultra Fast Boot option, I couldn’t find such a feature on my ASUS laptops and motherboards.
However, I have come across ‘MRC Fast Boot’ in some Intel 700 series ASUS motherboards. This option speeds up the memory initialization process during startup, significantly improving the bootup time.
Since the BIOS options are usually different on every series (can even vary based on models), you may test whether there’s a similar one on yours.
To save time, you can use F9 to open the Search dialogue box. Input the correct keyword (in this case, ‘fast boot’) and hit Enter.
The related setting should appear and you can configure its setting without having to move to different sections in the BIOS screen.
Configure Additional Fast Boot Options
To circle back to what I said earlier, enabling Fast Boot comes with certain trade-offs. It will disable different functionalities, like making it hard to enter BIOS, Wake on LAN, boot from removable devices/optical/network, etc.
This is because enabling Fast Boot starts your computer with a minimal set of devices and skips the testing of most hardware components during POST. For that reason, many users might be experiencing compatibility problems.
However, some ASUS models provide some additional options once you enable this feature. For instance, I can manage the following settings on my ROG STRIX B450-F GAMING motherboard:
- NVMe Support: Enabling this option will check the NVMe devices during POST.

- Next Boot after AC Power Loss: Set either normal or fast boot in case an AC power loss occurs.
I prefer keeping it to Normal so that POST is fully completed. So, I can detect whether there’s a major hardware failure after the power surge.

Save and Exit From BIOS
Once you have configured Fast Boot and its related settings, don’t forget to save the changes before exiting the BIOS screen.
You may move to Exit > Save Changes and Reset or simply hit the F10 key. Either way, a confirmation prompt appears (as demonstrated above). Press Ok and you should notice the changes as soon as your ASUS computer restarts.

Since Fast Boot completely depends on the system, I suggest monitoring the performance when the option is both enabled and disabled. Ensure opting for the right setting that best suits you.