
Choosing the right network profile is based on how much users trust the network they are connected to. Windows users basically have three network profiles—Private, Public, and Domain. However, Windows sets the Public profile as the default network profile, except when the device is connected to a Domain.
Devices set to private network profiles are more open than those with Public profiles. The public network profile provides better security, but it is not ideal for resource sharing, such as your files or printer. All these factors can make the network profile selection confusing. But, don’t worry! we will guide you through all network profiles and select the best one.
Available Network Profiles in Windows
Network profiles allow users to quickly change to different file transfer and security settings. Here’s what three network profiles offer to the users while they are on a network.
- Private Network: It is only intended for a trusted and secure network. This profile is common in home networks and in an on-site enterprise network. The major feature of this network profile is that it leaves the network discovery disabled which users can enable later on for resource sharing.
- Public Network: It is ideal for those users who frequently connect to public networks. This profile disables the network discovery as well as resource sharing (File or Print sharing) disabled to protect the user data and the computer.
- Domain Network: It is set to default when the network adapter identifies a domain controller on the client computer and the user can log in to such domain. The rules set during the Domain profile usually override the configurations set by other network profiles. This network profile only authorizes the domain group for resource sharing.
How to Change Network Profile in Windows?
Windows prompts you to choose the preferred network profile when it’s the first time you try connecting to a network. However, you can change the profiles anytime later using these methods.
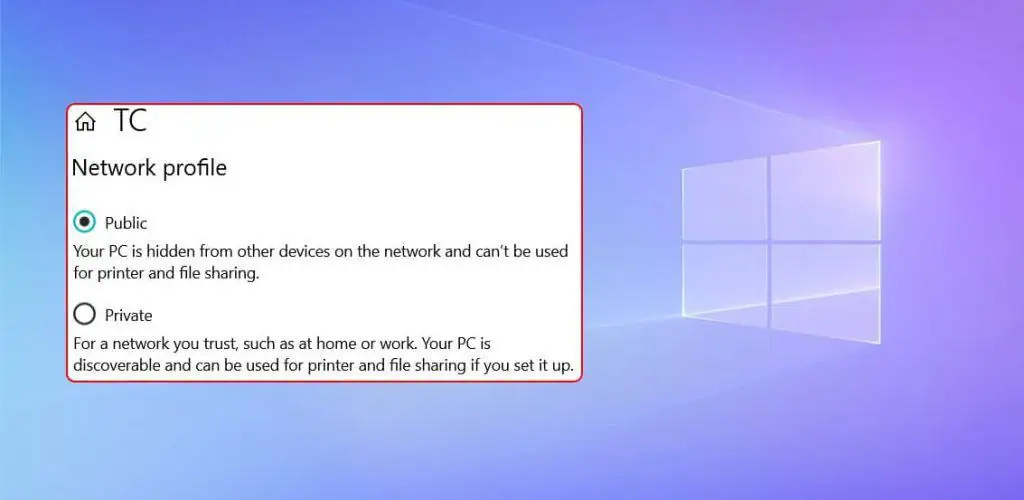
Through Windows Settings
The most convenient way of changing the network profiles on Windows is through Windows settings. You will have two network profiles i.e. Private or Public to choose from the Windows Settings.
- Press Windows Key + I to open Settings.
- Go to Network & Internet > Ethernet or Wi-fi

- Under the Network profile type, select the preferred network type.


Through PowerShell
Powershell is a great command-line tool that features various cmdlets to help you configure the network settings. NetConnectionProfile is one such cmdlet that allows the users to choose the category of network profile for a network.
- Press Windows key + R, type
powershell, and then press Ctrl + Shift + Enter. This will launch the PowerShell with administrative privileges. - Now, type
Get-NetConnectionProfileand hit enter. This cmdlet will give you the status of the active network connections on your computer. - Check the Network category field for the network profile info. Also, note the network name.
- Now to change the profile of the network use this syntax.
Set-NetConnectionProfile -Name "NetworkName" -NetworkCategory <Private or Public>
Enter the name of the network instead of the NetworkName and change the network category to private or public.


- You can again check the status of the network profile using the cmdlet mentioned in step
Through Registry Editor
The Registry Editor on Windows facilitates the users to make root-level changes in the system configurations. If the earlier options do not work for you, you can modify the registry key to change the network profile.
Note: Back up the registry before you make any changes to it.
- Press Windows key + R to open Run.
- Type
regedit. Hit Enter. - Now, Go to this registry location
HKEY_LOCAL_MACHINE\SOFTWARE\Microsoft\Windows NT\CurrentVersion\NetworkList\Profiles - Click on the subkeys for the network of which you want to change the profile. You can verify the name of the network through the entry named ProfileName.
- Now open the DWORD entry named Category.
- Enter these values in the Value data field as per the profile you want to set for the network.
- For Public Network profile : 0
- For Private Network Profile: 1
- For Domain Network Profile: 2
- Click on Ok. You must restart the computer for these changes to work.


Through Group Policy Editor
If you do not want to tweak the registry, you also have options to configure the network profile from the Group policy editor. This utility allows users to manage different settings of their Windows devices including the network configurations.
Note: Group Policy editor is not available for Windows Home edition users. This is a readily available feature only on the Windows Professional, Education, and Enterprise edition.
- Press Windows Key + R, type
gpedit.msc,and hit Enter. You must now see the Group Policy Editor Window. - Now, go to Computer Configuration > Windows Settings > Security Settings > Network List Manager Policies.
- Double-click on Unidentified Networks.
- In the Location Type, set the preferred network profile and click on OK.


Which Network Profile Should I Choose?
The preference for a network profile is based on how reliable the network is and how the user plans to work on the network. If the network is not worthy of the user’s trust, such as the Public Wi-Fi at hotels and malls, a Public profile is the ideal choice.
If the network is home or office-based, a private profile is the recommended option as this profile is better off for resource sharing.