
If your network driver is not working, the first thing you should do is restart the adapter. Reloading the driver like this often restores the network connection.
If the driver is defective, obtain a new driver from the device manufacturer and install that. This is a sure-shot solution, but that’s only if the network driver is actually at fault.
Quite often, people attribute network issues to the network driver even though something else is causing the problem. So, start by making sure you need to troubleshoot the driver.
Confirm Driver is the Problem
The way to fix a corrupt driver is to remove it and install a new one. But this will only help if the driver is actually dysfunctional, to begin with.
Some users may encounter error messages like:
- Windows Could Not Find a Driver for Your Network Adapter
- “This Device Cannot Start. (Code 10) {Operation Failed} The requested operation was unsuccessful.”
- The Wi-Fi Adapter is experiencing driver or hardware-related problems.
Or, if your device supports both Ethernet and WiFi, one of them may stop working while the other still functions.
If you see such indications that your driver or adapter is faulty, use the fixes from this guide.
Perform a Power Drain
Power draining your device as described here serves various purposes. For starters, it reloads the network driver. On many laptops, an extended power drain will also reset the wireless adapter.
- If your laptop has a removable battery, power off the device, unplug the charger, and remove the battery. Then, hold the Power button for 60 seconds.
- If the battery is non-removable, use the power button to turn off your laptop. Keep holding the button down for another 60 seconds.
- On Desktops, simply disconnect the power cable and press the power button for 15-20 seconds.
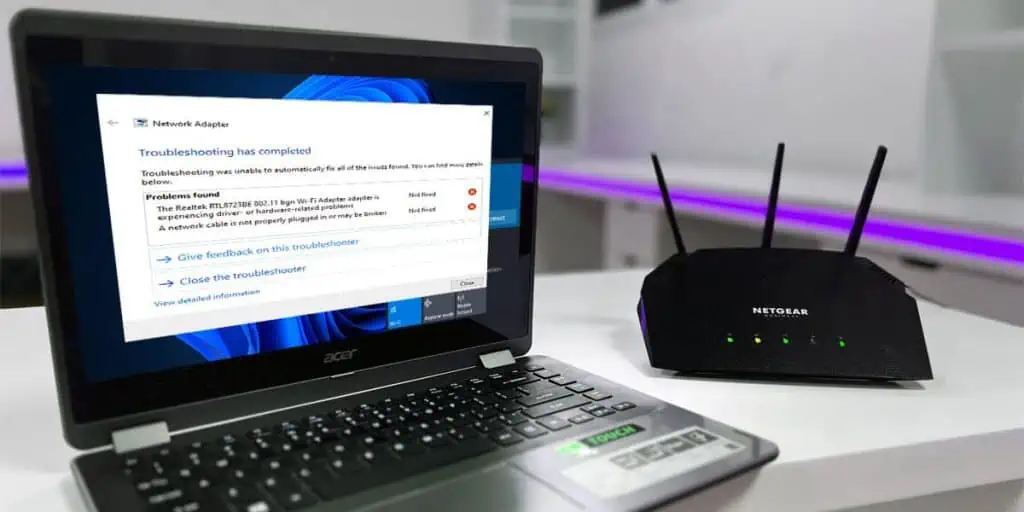
General Troubleshooting
Restarting the adapter and using the built-in troubleshooter are two easy yet effective solutions for network problems in Windows.
- Press Win + R, type
ncpa.cpl, and press Enter. - Right-click the network adapter and select Disable. Wait a few seconds, then right-click and enable the adapter.

- Now, press Win + R and enter
ms-settings:troubleshoot. - Click on Other troubleshooters and run the Network & Internet troubleshooter.
- Try any solutions that the troubleshooter suggests.


Install New Network Driver
If the general fixes don’t help, you must deal with the driver directly. Start by uninstalling the current defective driver.
- Press Win + R, type
devmgmt.msc, and press Enter. - Note the name of the adapter from the Network adapters section. Now, right-click it and select Uninstall.
- Enable the remove driver checkbox and click on Uninstall.


At this point, use USB tethering via your phone, or use another device to download the new driver for your adapter.
- Go to your motherboard’s support page.
- From the Drivers section, download and install the network driver.
- If you’re using an external adapter, search for the driver online.
- Download and install it from the official source.


Reset Network Configs
Occasionally, the problem will be on the network configuration side and the new driver won’t make a difference.
- In such cases, press Win + R.
- Type
cmdand press Ctrl + Shift + Enter to launch an elevated command prompt. - Execute the following commands one by one to reset your network configs:
netsh winsock reset
netsh int ip reset
ipconfig /release
ipconfig /renew
ipconfig /flushdns
Check Adapter Status in BIOS
Sometimes, the network adapter won’t be accessible in Windows. It’ll be missing from locations like the Device Manager, Windows Settings, Taskbar, etc.
Many people think of this as a driver problem, but it actually happens because the adapter is disabled via the BIOS.
To ensure this is not what’s happening in your case,
- Turn on your PC and press the BIOS key (usually Del) during startup.
- Look for the Network Adapter setting in sections like Integrated Peripherals.
- Ensure the network adapter is enabled here.
- If you enabled it just now, press F10 to save the changes and exit the BIOS.


Check If Adapter is Dead
At this point, it’s likely the adapter itself that is faulty. Test it on a different system, or acquire a USB adapter to test on your system.
Also, consider connecting the adapter to a different port on your board. Either way, you’ll be able to confirm if your adapter is dead and needs to be replaced.