
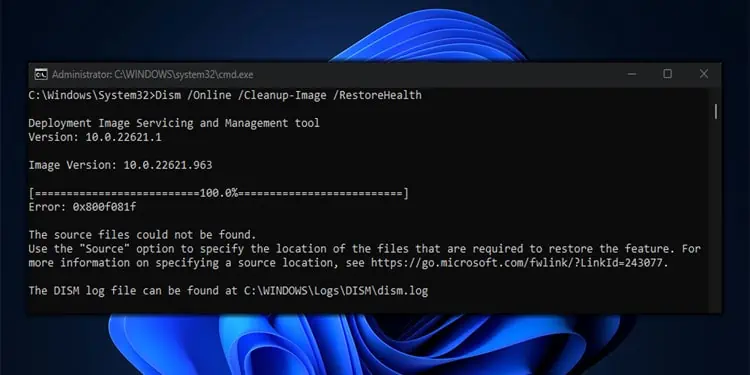
The DISM (Deployment Image Servicing and Management) command checks the integrity of critical Windows files and repairs them if necessary. The DISM uses an existing .wim (Windows Imaging Format) file to fix any corruption on Windows images. If the DISM command fails to locate or access this file, the command line will display the DISM 0x800f081f error.
As for why the OS couldn’t find the WIM file, the problem could have occurred during the Windows installation, resulting in a missing Windows image format file. Besides this, permission issues when reading the file or a corrupted Windows Component Store is also viable reason for the error message.
To fix the DISM 0x800f081f error, you need to make sure that the OS finds the .wim file so that DISM successfully repairs the issue with your Windows image.
How to Fix DISM 0x800f081f Error Code in Windows?
To fix the DISM 0x800f081f error code, you must make sure that the PC locates and reads the correct file to restore the Windows image. First, try simple solutions like restarting the PC and updating Windows.
Windows update contains not only feature and security upgrades but also error fixes, and running the Windows update should fix the issue. In case it does not you may even need to reset Windows update and its component.
If that does not work, try checking your internet connection. Sometimes, DISM may require Windows Update services to download files to fix any issues with the Windows image. And internet issues may also cause complications when running DISM.
If that does not work, you may need to perform some advanced fixes.
Run DISM Using Windows ISO File
As previously discussed, the error message is because Windows failed to locate the Windows image format file. So, what you can do is you can manually provide the location to the image format file.
To do this, you need the ISO file of Windows (whichever version of Windows you are currently using). To get the ISO file, visit Microsoft’s official download center. Alternatively, you can also get your Windows ISO file using the Media Creation Tool.
- First, download the Media Creation Tool for Windows 10 or Windows 11, depending on your PC specification.

- Run the Media Creation Tool.
- Click on Accept.
- Check Use the recommended options for this PC and click Next.
- Select ISO file and press Next.
- Choose the location where you want the ISO file and select Save. Once the process completes, you will see a Windows ISO file in the selected location.
- Right-click on the ISO file and select Mount or simply double click on it.
- Go to sources and copy
install.esdfile. - Paste the copied file into the root folder of the C drive.


Once you have copied the file location from the root folder, you need to point to the file and run the DISM command.
- Press the Windows + R key to open Run.
- Type
cmdand press Ctrl + Shift + Enter to run Command prompt as admin. - Type
cd\and press enter to go to the root folder of the C drive. - Type
dism /Get-WimInfo /WimFile:install.esdand press Enter to display all the index for each edition of Windows. - Note the Index for your edition of Windows.
- Type
Dism /Online /Cleanup-Image /RestoreHealth /Source:esd:C:\install.esd:<index number> /limitaccess - Replace
<index number>with the index number that matches your Windows edition and press Enter to run the command.


The DISM command should run without giving any error code.
Restart Windows Update
When the DISM finds any error with the system image, it repairs the OS using the Windows Image Format (.wim) file. The Operating system uses Windows Update components to get the required file.
Failing to locate required file through Windows update is likely to trigger the error message. Try resetting Windows update files to fix the DISM 0x800f081f error. These files are located in C:\Windows\SoftwareDistribution. Replacing these files will reset Windows update
Before we can replace the files, you first need to stop services related to Windows Update.
- Press the Windows Key + R to open Run
- Type
cmdand press Ctrl + Shift + Enter to run the command as administrator. - Type the following command. Press Enter after each command.
net stop bitsnet stop wuauservnet stop cryptSvcnet stop msiserver

- In Command Prompt, run the following command to rename the SoftwareDistribution folder.
ren %systemroot%\SoftwareDistribution softwaredistribution.bakren %systemroot%\system32\catroot2 catroot2.bak

- Now, type the following Command to restart services that were previously stopped.
net start bitsnet start wuauservnet start cryptSvcnet start msiserver

- Try running the DISM command to see if it fixed the issue.
Start Cleanup component
Another reason you get this error message is due to a previously installed Windows Store Component. When updating the OS, Windows uses a store component to get the necessary files.
Although Windows automatically cleans Windows Store components after a certain time, its previous version could cause issues when you run the restore system image using DISM.
According to Microsoft, StartComponentCleanup cleans Windows Store Components when the system isn’t in use. The command will automatically run after a store component has been installed for 30 days. Once this period completes, it uninstalls Windows store components from the previous version.
However, sometimes you may need to perform it manually.
- Press the Windows + R key to open Run.
- Type
cmdand press Ctrl + Shift + Enter to open Command Prompt as admin. - Type
Dism.exe /online /Cleanup-Image /StartComponentCleanupand press Enter to start the cleanup process. - Restart your PC once the process completes.

Change Group Policy Settings
You can also specify the file network location that Windows uses for component installation or a component repair. To do this, you will need a Windows ISO file. First, follow steps 1 to 9 from the above fix.
Once you paste the install.esd file in the root folder, run group policy editor.
- Press the Windows + R key to open Run.
- Type
gpedit.mscto open Group policy editor. - Navigate to Computer Configuration > Administrative Templates > System.
- Double-click on Specify settings for optional component installation and component repair settings.
- Check Enabled.
- Under Alternate source file path, type
WIM:C:\install.esd:<index number>. Replace<index number>with the index number of your edition of Windows. - Click Apply, and then OK.


