All the resources or web servers on the internet have unique addresses assigned to them, which are the IP addresses. The Domain Name System (DNS) is basically a phonebook for the internet that translates or resolves the domain name or URL you type on web browsers to these IP addresses so that you can access the resources.
Normally, your ISP automatically designates the DNS servers you need for the domain name resolution. However, these servers may come with certain restrictions. So, you may want to change the DNS for faster internet browsing as well as to access more resources on the internet.
Caution:
Using random DNS servers can invite various DNS problems. These issues range from less severe ones like high latency to major attacks like DNS cache poisoning, Denial of Service (DOS), and so on.
If you don’t have an appropriate DNS server in mind, we recommend using public DNS servers as manual DNS addresses. Many public DNS are available for your use, such as:
GoogleYou can use the first address in the Preferred DNS address and the second one under Alternate DNS Addresses.
Change DNS Server on Windows
There are many methods to set up or change the DNS server on Windows. You can use all of them to change the DNS address for the IPv4 address, or the IPv6 address, or both depending on your need.
If you don’t know which one to change, go for IPv4, as it is the default internet protocol for almost all web servers.
ipconfig /flushdns command on Command Prompt. If you want more information, I recommend checking out my other article to reset an internet connection on Windows.
Through Windows Settings
Windows Settings is the default application you can use to change all your system settings, including the manual DNS server address. It also allows you to easily encrypt your DNS for more security.
- Press Windows key + I to open Windows Settings.
- Go to Network & internet and select your network type (Ethernet or WiFi).
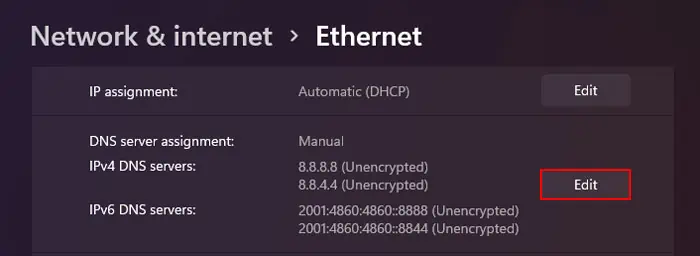
- Click on Edit under DNS server assignment.

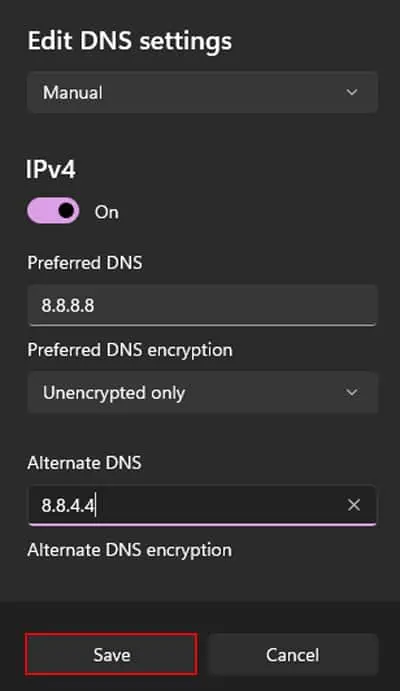
- Set the drop-down box to Manual.
- Toggle On the IPv4 or IPv6 switch depending on which protocol’s DNS address you want to modify.
- Enter the Preferred and Alternate DNS addresses per your preference.
- You can also modify the Preferred and Alternate DNS encryption drop-down boxes to set up encryption.
- Select Save after you are done.

From Control Panel
You can also change all relevant network settings, including the DNS address, using the Command Prompt.
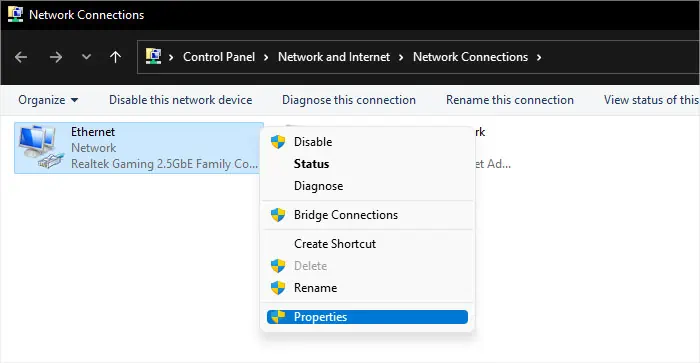
- Open Run by pressing Windows + R.
- Type
ncpa.cpland press Enter to open Control Panel’s Network Connections options. - Right-click on your Ethernet or WiFi connection (depending on which one you are using) and select Properties.

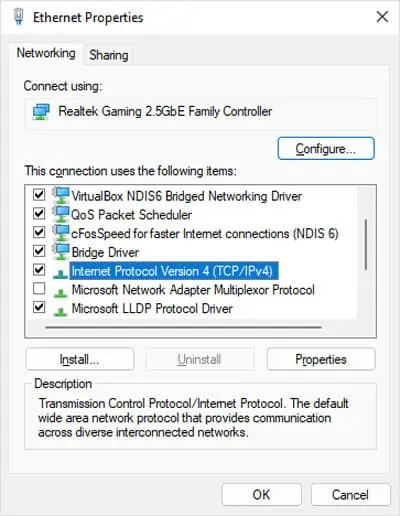
- Double-click on Internet Protocol Version 4 (TCP/IPv4) or Internet Protocol Version 6 (TCP/IPv6) depending on your need.

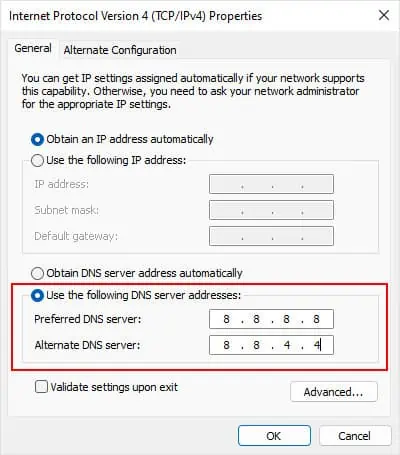
- Check Use the following DNS server addresses.
- Enter the Preferred DNS server and the Alternate DNS server addresses. Click OK.

Using Command Prompt
It is also possible to change the DNS server address for both IPv4 and IPv6 using the Command Prompt.
However, the command to set up the primary (or preferred) and the alternate DNS server addresses are somewhat different. So go through the following steps carefully before carrying them out.
- Open Run.
- Type
cmdand press Ctrl + Shift + Enter to open the Elevated Command Prompt. - Type
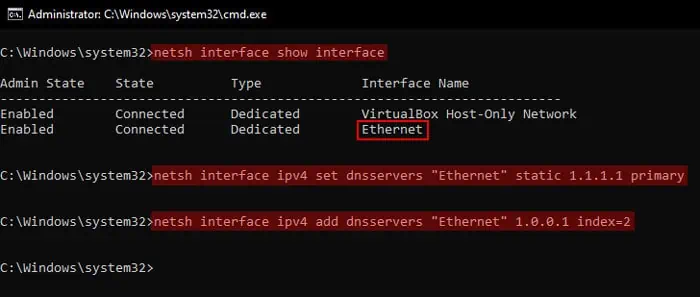
netsh interface show interfaceand press Enter to check all available network interfaces on your computer. - Then, type the command
netsh interface <ipv4/ipv6> set dnsservers <Interface Name> static <Preferred DNS address> primarywhile replacing all the values in the angled brackets appropriately and press Enter.- <ipv4/ipv6> – You can use either ipv4 or ipv6
- <Interface Name> – Use the proper Interface Name that you saw from the netsh interface show interface command.
- <Preferred DNS address> – The Preferred or primary DNS server address you want to set up.
- Now, use the command
netsh interface <ipv4/ipv6> add dnsservers <Interface Name> static <Alternate DNS address> index=2to set up the Alternate DNS address. - For instance, if you want to set IPv4 DNS addresses for Ethernet as 1.1.1.1 and 1.0.0.1, you need to enter the following commands:
netsh interface ipv4 set dnsservers “Ethernet” static 1.1.1.1 primarynetsh interface ipv4 add dnsservers “Ethernet” 1.0.0.1 index=2
With PowerShell
You can also use the Set-DNSClientServerAddress cmdlet on PowerShell to change the DNS server address.
You can actually use the same cmdlet with the same attributes for both IPv4 and IPv6. Your system will automatically change the setting for the relevant protocol depending on the address.
- Open Run.
- Type
powershelland press Ctrl + Shift + Enter to open the Elevated Windows PowerShell. - Type
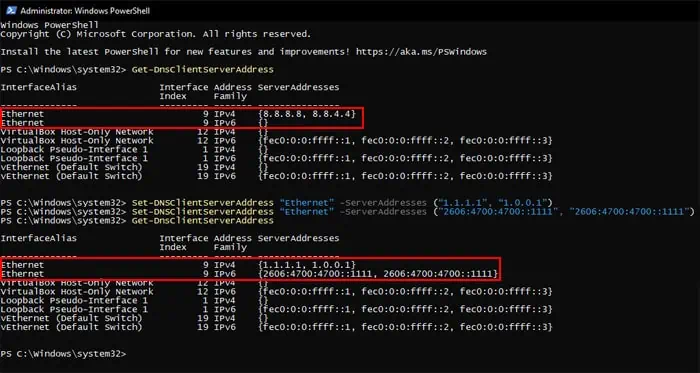
Get-DnsClientServerAddressand press Enter to list out all the available network interface names or aliases. - Then, type
Set-DNSClientServerAddress “Interface Alias” -ServerAddresses (“Preferred DNS address”, “Alternate DNS address”)and press Enter. Make sure to replace “Interface Alias”, “Preferred DNS address” and “Alternate DNS address” with the proper values. - For example, if you want to set Cloudflare’s IPv4 DNS addresses for Ethernet, you can use the cmdlet
Set-DNSClientServerAddress “Ethernet” -ServerAddresses (“1.1.1.1”, “1.0.0.1”) - Similarly, you can use
Set-DNSClientServerAddress “Ethernet” -ServerAddresses ("2606:4700:4700::1111", "2606:4700:4700::1111")to set the Cloudflare public DNS for IPv6.
Change DNS Server on Mac
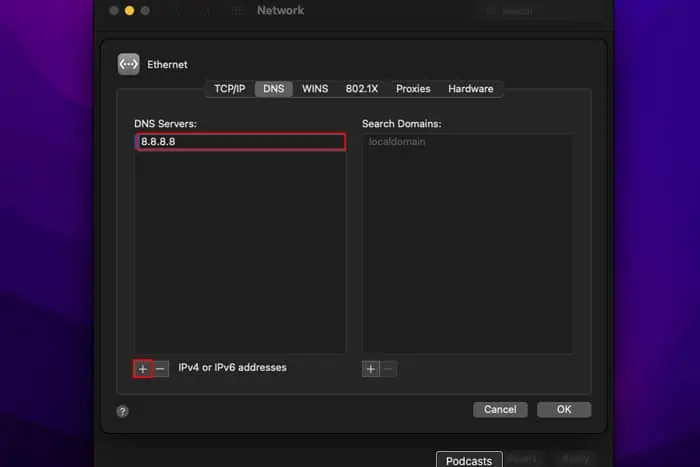
Mac also offers an easy way to change the DNS server address through its Network Preferences.
You can also set up a search domain in the same setting window which you can use to easily go through the website you visit most frequently.
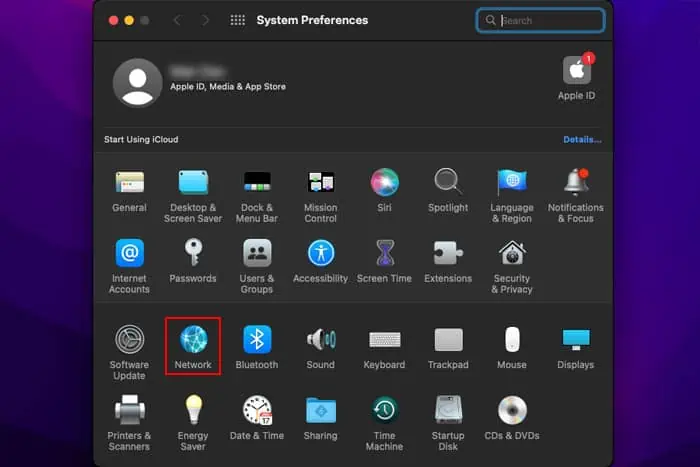
- Click on the Apple icon and go to System Preferences > Network.

- Select a network from the list and choose Advanced > DNS.
- Click the lock and enter your credentials.
- Select the + sign below the list of DNS Servers.
- Type the address and press Enter.

- You can use a similar method to add a search domain on its list depending on your need
- Click OK and then Apply.
Change DNS Server on Android
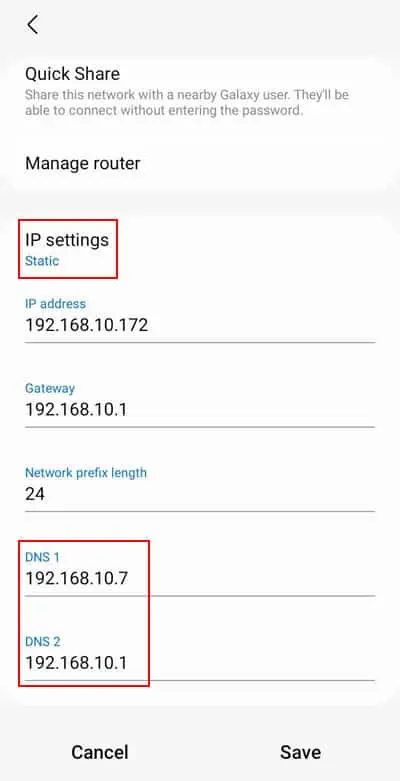
You can easily change the DNS server on Android phones by enabling Static IP settings for a particular Wi-Fi network. Unlike other devices, you can only set up manual DNS address if the IP address is also static.
Android phones show different settings and interfaces depending on the Original Equipment Manufacturer (OEM), so the steps below may not work on your device. But the general process should be the same, so you should be able to figure out what you need to do after exploring the WiFi settings for some time.
- Open Settings and go to Connections > Wi-Fi.
- Tap on the gear icon next to your network.

- Select View more or Advanced.
- Tap on IP settings and set it to Static.
- Enter the DNS addresses in DNS 1 and DNS 2. You don’t need to change the IP and Gateway addresses.

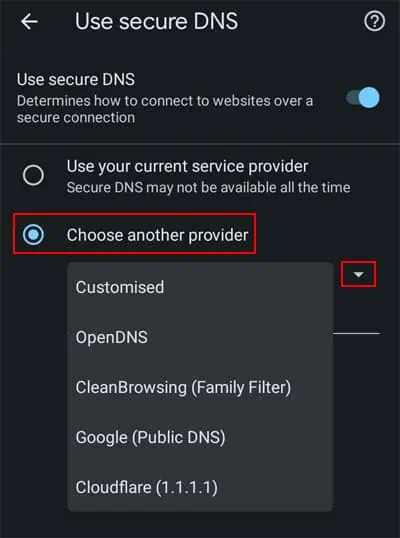
You can also change the secure DNS on certain web browsers like Google Chrome. In fact, they automatically provide options to use public DNS like Google’s, Cloudflare’s and so on.
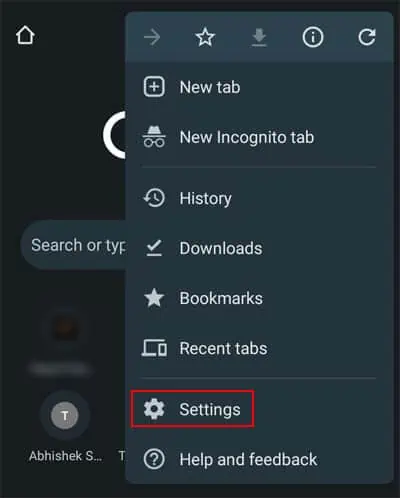
- Open the Google Chrome app.
- Tap on the triple-dot icon and select Settings.

- Go to Privacy and security > Use secure DNS.
- Check Choose another provider.
- Tap on the downward arrow icon and select a public DNS.

Change DNS Server on iPhone
Similar to Android, you will need to get to the settings for a particular Wi-Fi network and enable manual DNS to change the address.
Also, keep in mind that the steps may also differ depending on the iPhone version and software. But since the steps should be relatively similar, you can look around for the proper options on your own. If you encounter any issues, I recommend seeking help from official sources.
- Go to Settings and select Wi-Fi.
- Tap on the i icon next to your network.

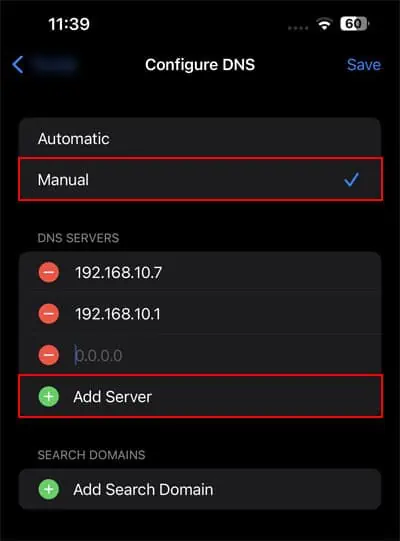
- Select Configure DNS and then check Manual.
- Tap on Add Server.

- Set the DNS server per your wish and click on Save.
Change DNS Server on Router
Apart from your main devices, you can also change the DNS server on your router’s configuration. You will need to access the router’s portal to change this setting.
Different routers (and their different models) have different portal interfaces and configurations. So you need to visit official sources to get detailed information on how you can change the DNS server. Here, I have used a TP-Link router to give you an example.
- Enter the router’s Gateway IP into your web browser’s address bar. For TP-Link, the address is
192.168.0.1or192.168.1.1
The router should usually have stickers that show the gateway address. If not, you can use the following commands on the default command-line interface of your device to get this info:- Windows –
WMIC NICConfig where IPEnabled="True" get DefaultIPGateway - Mac –
netstat -rn | grep default | awk '{print $2}'
- Windows –
- Enter your username and password to log in to this portal.
- On the TP-Link router’s portal, go to the Advanced tab.
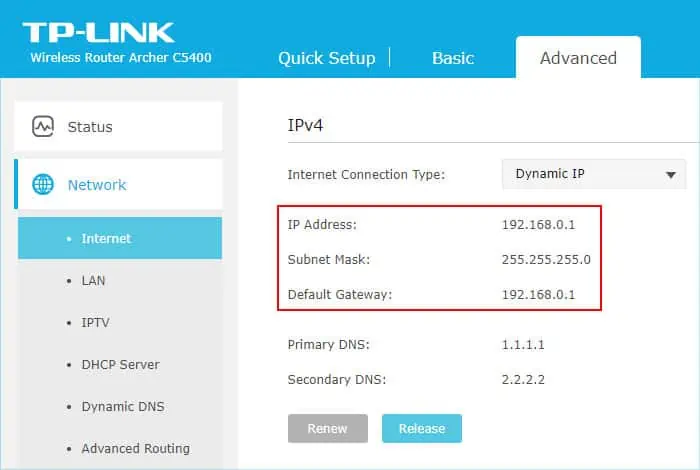
- Expand Network and select Internet.
- Check the value of the IP Address, Subnet Mask and the Default Gateway.

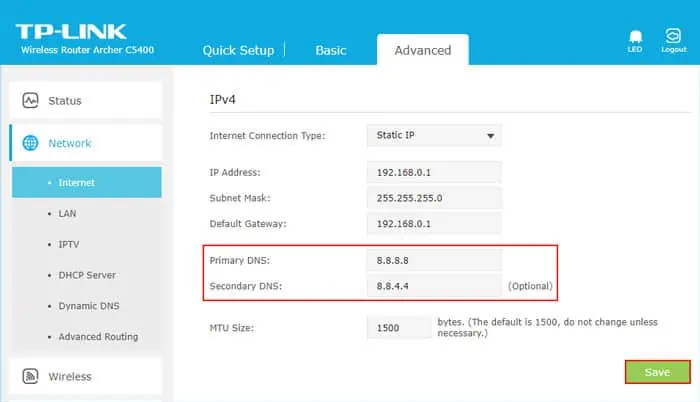
- Set the Internet Connection Type to Static IP.
- Enter the IP Address, Subnet Mask and the Default Gateway that you noted previously.
- Set the Primary DNS and Secondary DNS depending on your wish.
- Click Save.


