
It’s not the most fun part of owning a computer, but cleaning and regular maintenance are important for the component’s performance in the long run. The CPU, specifically, is a component that’s not often cleaned.
For general maintenance, compressed air on the cooler fans and some on the CPU will suffice. If the CPU fan is extremely dirty, or you need to clean thermal paste off the CPU or the socket pins, this will require some deeper cleaning.
When handling components like the CPU, it’s important to account for static charge to prevent any damage to the components. You can either wear an anti-static wristband, or you can touch the PC chassis occasionally to discharge the static electricity safely.
Next, you’ll want a clean workspace and a place to store the smaller components such as the screws safely. They’re hard to keep track of, so if they get misplaced, it’ll be a hassle later.
Finally, here are the main things you’ll need when cleaning the CPU:
- Anti-static equipment
- A very soft-bristled brush
- 99% Pure Isopropyl Alcohol
- Microfiber cloth or cotton swab
How to Clean Thermal Paste Off The CPU?

Using Isopropanol or a thermal paste cleaner and a microfiber cloth, you can gently rub and clean the thermal paste off the CPU. Here are the complete steps to do so:
- Turn off your PC and unplug all the power cables.
- Either lay the case on its side or remove the motherboard from the case.
- Carefully remove the CPU Cooler from the motherboard.
- Apply some Isopropyl Alcohol to the microfiber cloth and gently clean off the old thermal paste from the CPU. Repeat the same process on the Cooler Block as well. Once you’re done, leave the surfaces to dry for a few hours.
- If you need to clean the pins or the cooler fan further, check the sections below first. Otherwise, apply a pea-sized amount of thermal paste onto the center of the CPU.
- For stock Intel Coolers, place the cooler straight back down, aligning the four pins on the cooler with the four holes around the CPU. Press down two diagonally opposite pins until you feel them click into place, then repeat this process for the remaining two pins as well. For AMD coolers, hook the cooler down on both sides, then close the latch arm.
- Connect the cooler fan plug into the CPU Fan header on the motherboard.
- Place the motherboard back in the case, reconnect all the cables and screws, and power on your PC.
- Cleaning the old thermal paste and applying a fresh coat should have a noticeable impact on the CPU temperature. As such, most users like to monitor the CPU temperature.
How to Clean A CPU Fan / Cooler?

Light cleaning with a can of compressed air is generally enough for the CPU fan. But in cases where that’s not sufficient, here’s how you can deep clean the CPU Fan:
- Follow the steps from the section above until you’ve detached the CPU Cooler from the motherboard.
- Grab one of the handles holding the heat sink and fan in place and gently pull it outward. Repeat the same for the other handles until the heat sink and fan are separated. You can also use a flat head screwdriver if the handles are difficult to remove with your hand.
- Hold the fan blades in place and use compressed air to remove the dust. Alternatively, you can just use a normal brush to do the same as well.
- For deeper cleaning, you can apply some isopropyl alcohol to a cotton swab or a microfiber cloth and use these to clean the fan further.
- Next, grab the heat sink and rinse it in flowing tap water while using a brush to remove all the dust.
- Let it dry for a few hours. Do not neglect this step, as letting the heat sink dry completely is very important.
- Once the heat sink is completely dry, apply some isopropyl alcohol to a microfiber cloth and clean off the old thermal paste.
- Reassemble the fan and heat sink by reversing the process of Step 2.
- Finally, check the section above for steps on cleaning the CPU, reapplying thermal paste, and reassembling everything.
How to Clean CPU Pins / Socket?

People sometimes apply too much thermal paste on the CPU, and when they install the cooler, it ends up leaking onto the pins. This is a common issue that, fortunately, isn’t a big deal most of the time as most thermal pastes these days are not electro-conductive.
The CPU pins are very fragile, though, so you still have to be very careful when dealing with them. With all that said, here are the necessary steps:
- Check the sections above for steps to remove the CPU if necessary.
- If you have a can of contact cleaner spray at hand, you can use that to clean off the paste easily. Most people don’t have it, though, in which case, you can follow the steps listed below instead.
- Grab a toothpick and carefully remove as much of the paste as you can without moving the pins.
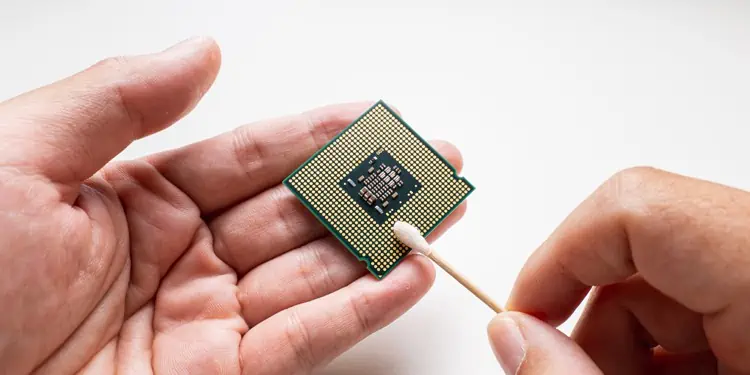
- Grab a clean soft-bristled toothbrush, apply some isopropyl alcohol to it, and use it to, very gently (applying almost no pressure) clean the paste off the pins. Make sure none of the pins get bent here, as fixing them can be a real hassle later. It’s also worth mentioning that q-tips and Isopropanol work fine as well, as long as you don’t leave any cotton fibers between the pins.
- When the brush has picked up some paste, wipe it off using a microfiber cloth. Then get back to the pins. Repeat this until you’ve cleaned off as much thermal paste as possible from the pins.
- Once the cleaning is complete, let the CPU dry for a couple of hours.
If you’re trying to clean the gold-plated contact points on the CPU, we recommend using an alcohol pad/wipe. Don’t forget to dry the CPU afterward.
AMD mostly uses PGA sockets where the pins are on the CPU, and they line up with holes in the socket. If you’re trying to clean thermal paste off such sockets, we recommend wiping in a straight line using an isopropyl wipe.
For deeper cleaning, you can pour some isopropanol into the socket holes, gently stroke using a brush to remove as much paste as you can, then use compressed air to blow out all the Isopropanol along with the paste. Once again, remember to let the motherboard completely dry before reseating the CPU.