
Installing the CPU is the most intimidating part of PC building for many first-timers. But it’s a quick and easy process if you know what you’re doing.
On brand-new systems, correctly align your Intel CPU to the socket using the markings. Then, gently place it in the socket and lock the retention latch. Finally, peel off the sticker and install the CPU cooler.
If you’re replacing an old CPU, you’ll need to remove the cooler and old CPU first. Other than that, the process is mostly the same as above.
I’ll install an i3-12100 on my ASUS PRIME B660M-K D4 board (LGA 1700 socket) to guide you through both scenarios.
Before You Begin
- Ensure the CPU is compatible with your motherboard before anything else. Just a quick reminder for beginners.
- Use an anti-static wrist strap or periodically touch an unpainted metal surface to discharge static electricity. This will protect the components from ESD.
- If you’re building a new system, skip ahead to the Install CPU section.
- If you’re replacing the CPU on an old system, follow the default outline.
Remove the Cooler
Intel’s stock coolers use a push-pin locking mechanism that’s very easy to work with. To detach the stock air cooler:
- Shut down the system and unplug the power cable.
- Lay the case on its side and open the side cover. You’ll have to remove the screws and slide open the cover in most cases.
- You can leave the motherboard in the case (convenient for most people). Or, you can disconnect everything, remove the standoffs, and take out the board. Then, you can place it on a test bench like I’ve done here.

- Unplug the CPU fan connector from the motherboard.
- Turn the pins in the indicated direction (counter-clockwise). Then, pull them up to unlock them.
- After unlocking all four pins, pull the cooler straight up/out. Gently wiggle it if it feels hard to remove.


Remove the Old CPU
- You can use a tissue, microfiber towel, or any lint-free cloth really to wipe off the old thermal paste.
- After cleaning the CPU, push down on the retention arm. It should move sideways, and then up.
- Grab the processor by the sides and carefully lift it straight up and out.
- Store the CPU in a CPU clamshell or an antistatic bag if you plan to use it in the future.


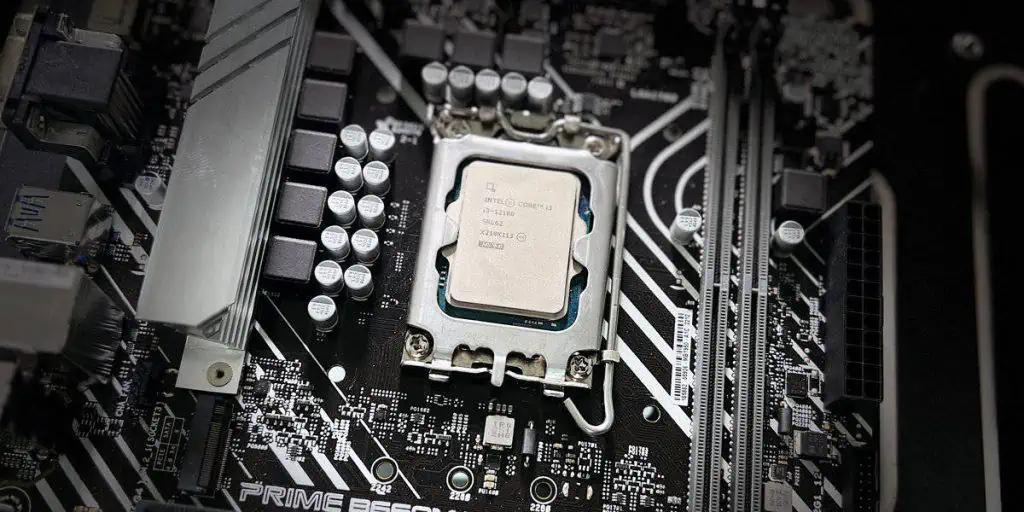
Install New Intel CPU
After pushing down the retention lever, it should move to the side and come up. This will open the socket and allow you to insert the new CPU. Now,
- Grab your new CPU by the sides. Try not to touch the gold contacts.
- Align the CPU with the socket. They should have one unique marking (e.g., a triangle) to indicate the correct orientation. This is extremely important as trying to force an incorrect orientation will lead to bent pins, and possibly a dead CPU.
- Gently place the CPU straight into the socket. Modern CPU sockets use a Zero Insertion Force (ZIF) design, which means you need to apply virtually no force to install the CPU.
- The markings and notches should fit perfectly and the CPU should be snug in the socket.
- Finally, pull the load plate back down, and set the retention arm back in place to lock the CPU down. You may have to apply more force than you’re comfortable with here. A faint creaking or crunching sound is also normal and common.
- If the socket cover is present, it’ll pop out at this point. Store it safely, as you may need it for motherboard RMA purposes.


Put the System Back Together
After installing the CPU, you must put together the CPU cooler and the rest of the system as well.
- If you’re installing a new cooler, take off the sticker. If you’re reusing your old cooler, clean the thermal paste off the heatsink and apply some on the CPU.
- To attach the stock Intel cooler, all you need to do is connect the heatsink to the IHS. The four mounting pins should align with the holes on the motherboard.
- Push down on the pins to lock them.
- Connect the CPU fan cable to the CPU_FAN header on the motherboard.
- Put together the rest of the system.


Test the New CPU
After installing the CPU, the final step is to verify that the system boots properly.
- If you encounter a CPU fan error during POST, reseat the CPU fan cable. Also, ensure it’s connected to the CPU_FAN header and not the CPU_FAN2 or CPU_OPT headers. These are different.
- If the system doesn’t boot, check for diagnostic indicators on the motherboard. If there’s a red CPU light on, reseat the CPU. If any other LEDs are lit, troubleshoot accordingly.
- If you’re using a new CPU with an older board, check the BIOS changelogs online. The board may need a BIOS update to make it compatible with the CPU.
- If the system boots without issues, you may look into benchmarking performance or overclocking/undervolting your CPU as you see fit.