
Managing a cluttered Gmail inbox can be overwhelming.
To simplify this, creating a rule in Gmail (often referred to as a filter) can help automate and organize specific email types.
With a rule, Gmail will automatically move such emails to a specific folder/label or forward them to another email address for you.
Let’s quickly get into the methods and create a filter to tame your Gmail inbox.
Using Search Bar
You can use this method to create any rule from scratch. Additionally, you can combine multiple search operators simultaneously to perform a specific type of search or create a filter.
- Open a browser and log in to your Gmail account.
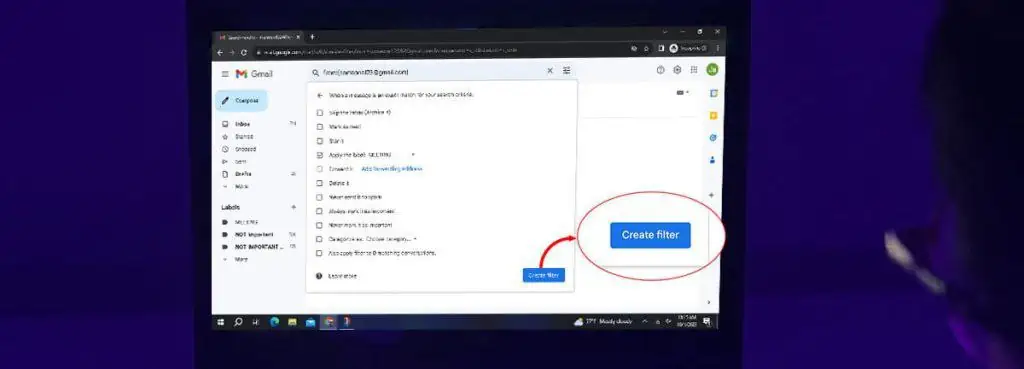
- Click the Show search options icon at the end of the search bar.

- Fill in and select one or more search fields to set up a filter according to your preferences.
- From: In this field, mention the sender’s email address whose messages you want to filter. multiple senders by typing out their email addresses with a comma between them.
- To: Here, you specify the recipient’s email address. You can use it to create a filter to forward your incoming emails to multiple email addresses.
- Has the words: Use this to filter emails containing specific words or phrases.
- Search: You can use this field to create a filter within specific labels or categories.
- Has attachment: enable this option to filter emails containing one or more attachments.
- Once you have mentioned the necessary filter criteria (s), click Create filter.
- Next, choose the preferred action you want to apply to such filtered messages.
- Skip the Inbox: Use it to create a filter that archives and hides messages from your primary inbox.
- Apply the label: Use it to automatically move the filtered messages to a particular label.
- Forward it: Add a forwarding address to forward the messages matching the filter criteria to another email address.
- Delete it: Select it to automatically delete and move every filtered message to Trash.
- Also apply filter to matching conversations: Enable this option to immediately apply the filter action to messages matching the filter.
- When done, click Create filter.


Using the “Filter messages like this” Feature
Unlike the above method, the “Filter messages like these” feature lets us create a filter using an existing message, which already matches your filter criteria.
For instance, you can use it to move, delete, or forward all incoming emails from a particular sender or a newsletter.
Here’s how to use it.
- Open one of the messages that fits your filter criteria.
- Then, click on the three dots icon next to the Reply icon and select the Filter messages like these option.
- Use additional options/fields if necessary.
- Click on the Create filter button.
- Next, select the preferred action you want to apply to the filtered messages.
- Click Create Filter.


How to Manage Gmail Rules and Filters?
Once you create a rule, you can find it along with all other existing rules that you have previously created in the Gmail settings.
You can even edit or delete such rules. If you need such rules for another Gmail account, Gmail already provides the option to export and import them using an XML file.
- Log in to the Gmail account with the filters.
- Click on the gear icon in the top right corner.
- Under the Quick settings section, click See all settings.
- Next, select the Filter and Blocked Addresses tab.
- Enable the checkbox next to the Gmail filter/rule.
- Then, click edit or delete next to the rule you want to make changes or remove.
- Alternatively, click the Export button below if you want to import into another Gmail account.


BONUS TIPS
- Similar to the rules, you can turn on the Vacation Responder to automatically send a reply when you are out of the office or not working.
- Once you block an email address, Gmail will create a rule on its own and send all incoming messages from that email to the Spam folder.
- Apart from creating filters to skip unnecessary emails, consider unsubscribing from newsletters to prevent their emails from reaching your inbox in the first place.