
Whether you’re trying to remotely access your computer from another network or wish to host a game server on your computer, port forwarding is an excellent choice. It allows incoming traffic to pass through a specific router port to access the desired device/service from another network.
The procedure to forward ports varies based on the router’s manufacturer, model, and firmware. Nonetheless, the general concept is the same. This article should help you understand the basics to port forwarding and how to set it up on different routers.
What is Port Forwarding?
Port forwarding or also known as Virtual Server is a NAT application that allows users to specify ports to make desired services/devices within a LAN accessible over the WAN.
As we know, a router assigns private IP addresses to different connected devices over the local area network. If a user wants to access a specific device within this LAN from a different network (even though the correct public WAN IP is used), he will be blocked by the router’s firewall. However, you can set up port forwarding to resolve this issue.
Initially, the router lacks information (destination IP and port number) regarding where to send the incoming request to. Once you specify these details (open a specific port), the networking device understands and forwards the request to the respective service/device.

Let’s understand this with a simple example. Suppose I’m trying to access my home computer from the office. I need to first know the public IP of my home router assigned by the ISP. To know yours, you may simply perform a search on Google with the related keyword like, “What’s my IP?”.
When I send the request using the public IP, the router still has no idea where to send the request. Therefore, the firewall blocks this traffic for security reasons.
Now, I specify a port number (say, 3389 for Remote Desktop Connection) and my home computer’s IP address. Based upon the new request, the router understands to open its port 3389 and send the request to the specified IP address. This way, I can now access my home computer from whatever network I want.

An important thing to consider when forwarding ports is that your LAN IP needs to be static. By default, the DHCP server assigns dynamic IP that can change over time. If you specify a static IP, it can’t be used in the long run and the port forwarding won’t work.
To access the router remotely, it’s essential to know the WAN IP, which is also usually dynamic. So, I recommend getting a static public IP from your ISP. In case that’s not feasible, you may set up a Dynamic DNS (DDNS). You can create a free account and get a domain name–paid or free based on your choice.
How to Port Forward on Different Routers?
Although port forwarding sounds technically difficult, setting it up is simple and straightforward. Also, the process varies based on the router’s user interface.
In this section, I have mentioned the step-by-step process for some popular manufacturers. Don’t worry if you do not find your model here. The idea behind forwarding ports is somewhat similar. With my tips, you should be able to set up port forwarding on any router!
Before You Begin
- First, identify the service’s port number and protocol (TCP/UDP/both). You can look this up online or from the service’s manual.
- Access your router page using the correct credentials.
- Reserve the service’s IP address from the router’s dedicated section. If you don’t find it, you may set a static IP address from your computer’s network settings.
- Also, confirm that your WAN/public IP is static. You need to contact your ISP or enable Dynamic DNS from the router’s configuration page.
- Get to the Port Forwarding or Virtual Server section.
- Now, set up port forwarding by specifying name, IP address, port number/rage, and protocol.
- Save the settings and enable port forwarding (if required).
- Test from another network to confirm that the forwarded ports are working.
On TP-Link
I have used BE900 Wi-Fi 7 Router for demonstration. The steps may vary for other TP-Link models.
- After accessing the router page, switch to the Advanced tab.
- From the left pane, select NAT Forwarding.

- In some models, you’ll find the Port Forwarding option.
In others, you need to look for Virtual Servers. - Find and press the Add button.
- Once the Add a Forwarding Entry dialogue box pops up, enter the Service Name of your choice. For demonstration, I have selected the HTTP Service from View Common Services. This should automatically fill up the necessary details.
- Next, enter the target device or the reserved IP address. You may even pick your connected device by clicking on the View Connected Devices button.
- Then, select Individual Port or Port Range based on your choice.
If you have selected Individual Port, you can simply enter the dedicated port number. Since HTTP uses port 80, I input that as shown below.
But if you have selected Port Range, you need to now input the initial and the final port numbers in the dedicated fields. - Now, enter the internal port number that will be opened for your device. You may utilize the same one used as the external port.
- Set the appropriate protocol and hit the Save button.
- Finally, from the Port Forwarding section, verify that the service is added.


On ASUS
I have used the ASUS RT-AX95Q model for demonstration. The steps may vary for other models.
- In the left pane, navigate to Advanced Settings and pick WAN.
- Now, switch to Virtual Server / Port Forwarding.
- Press the Add Profile button.
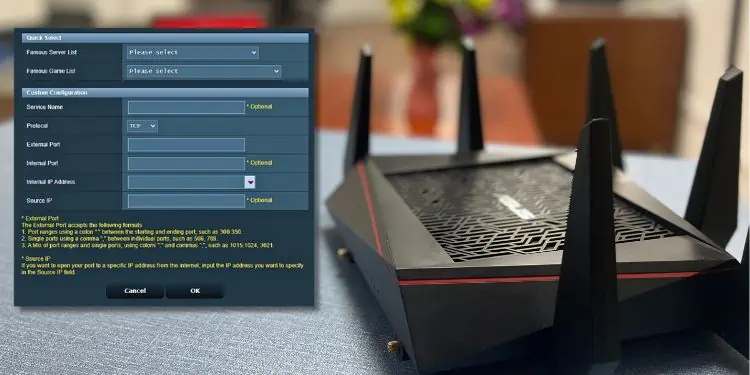
- Once a dialogue window pops up, you’ll likely notice two sections–Quick Select and Custom Configuration.
In the former, you just require selecting a server or game list. For example, if you wish to set up port forwarding on Xbox, you may pick the Xbox Live option from the game List. You’ll notice that the custom configuration will be filled automatically. - For custom configuration, enter a service name first. As an example, I’m going to forward the port for Remote Desktop Connection.
- Then, set the Protocol. Since Remote Desktop utilizes both TCP and UDP port 3389, I’m going to set this field to Both.
- In the External Port field, enter the port number. The Internal Port field can also be the same or you may skip it.
- Next, input your device’s IP or the reserved address in the Internal IP Address field. You can even expand the drop-down and select the listed device.
- The Source IP field is optional if you wish to open your port to a specific IP address from the internet.
- Once you’ve filled in the details, hit the Ok button.
- Now, check the service under the Port Forwarding List section. You can even edit or delete it if needed.
- While you have successfully set up port forwarding in your Asus router, this setting will not work until and unless you enable it. You can do this from the Basic Config section as demonstrated below.


On Cisco/Linksys
I have used the Cisco RV160W model for demonstration. The steps may vary for other CISCO/Linksys routers.
- From the menu on the left part of the window, expand Firewall.
- Pick Port Forwarding.
- Move to the right and hit the ‘+’ button to add a service.
- You can pick the external and internal services from the respective drop-downs.
- Set the Interfaces to Any.
- Now, make sure the Enable field is checked before pressing the Apply button (at the top).


On Netgear
I have used an older Netgear model Dg834g for demonstration. The steps may vary for the newer ones.
- Open the router page and from the left pane, choose Services. This is under the Content Filtering section.
- Move to the right and hit the Add Custom Service button.
- Now, enter your service’s name.
- Next, choose the protocol. For example, Remote Desktop uses both TCP and UDP 3389. So, I’ll select TCP/UDP from the drop-down.
- Now, enter the port number (in my case, it’s 3389) in both the Start Port and Finish Port fields. If you’re specifying a port range, make sure you enter the lower value in Start Port and the higher in the Finish Port.
- Press the Apply button to confirm the addition of the service.
- You can now check this from the Services section.
- Move to the left pane again. This time, pick Firewall Rules from the Content Filtering section.
- Under Inbound Services, click on Add.
- Next, select the service you added earlier from the Service Type drop-down.
- Then, set the Action field to ALLOW Always.
- In the Send to LAN Server field, input the server’s IP address.
- You can set the WAN Users to Any. If you’re willing to allow port forwarding to a single address or address range, set it accordingly. Then, don’t forget to enter the IPs in the start and finish fields.
- Leave the Log to Never and hit the Apply button.
- To confirm the service is added, get to the Firewall Rules and check the data under Inbound Services.


On Belkin
I have used Belkin’s N450 model for demonstration. The steps might be slightly different for other routers from the same manufacturer.
- From the left part of the window, find Firewall and select Virtual Servers.
- To add a popular service, you can select one from the Add drop-down. For demonstration, I’m choosing Web Server (HTTP).
- Hit the Add button and the table should be updated.
- You’ll notice that the Private IP Address field is still empty. Here, you need to add the IP address of your device or the one you had reserved earlier.
- Scroll down and click on Apply changes.
- Now, wait for the settings to be applied. The remaining time should be shown on the screen as pictured below.


On D-Link
I have used D-Link’s DIR-657 model for demonstration. The steps might be slightly different for other routers.
- On the router’s home page, select the Advanced tab.
- From the left pane, pick PORT FORWARDING.
- Now, navigate to the 24 –– PORT FORWARDING RULES section. Start by providing the service name. You can even expand the Application Name drop-down and select the available service.
- Under Ports to Open, set the TCP, UDP, or both fields. If you have set the application as I did above, the field should be automatically filled.
- Also, enter the IP address.
- Now, make sure the Schedule is set to Always and Inbound Filter to Allow All.
- Then, put a checkmark on the filled data as demonstrated below.
- Then, hit the Save Settings button from the top.


