
I will be using the following components and show you how to install the IO shield the correct way:
– PC Case: NZXT H510 ELITE
– IO Shield: From ASUS ROG STRIX B550-I GAMING and MSI PRO B760M-E DDR4 motherboards
You’ll have no problems installing any IO shields after going through this guide.
Align IO Shield With the Motherboard Ports
Interestingly, an IO shield can fit into your PC case even if you face it upside down. As you can see, here’s the IO shield from one of my mini-ITX motherboard ROG STRIX B550-I.
I have just placed it the opposite way. Still, it fits correctly into my PC case. But that’s not how it is supposed to sit.

If placed incorrectly, the holes on the shield won’t align with your motherboard. And you’ll only need to go through the extra effort of taking it apart and reassembling it.
In most cases, you can know the orientation just by looking at the labels on the shield. The holes for audio ports often lie at the bottom of the IO shield. Similarly, the USB, HDMI, or PS/2 holes, generally, lie at the top.

Nevertheless, if your IO shield does not have labels, align it with the motherboard ports and find the correct orientation.

Bend the Prongs on the Rear of the IO Shield
Alright! I believe you have now found the correct direction for installing the IO shield. But hold on! Don’t rush installing it yet. There’s one more thing you should consider beforehand.
If you look at the rear of the IO shield, you’ll find a lot of “pointed bits” there. Often referred to as prongs. Here are the prongs on my MSI PRO B760M-E DDR4 IO shield.

Let me quickly tell you that these prongs are responsible for grounding motherboard ports. They help pass the excess current on the mobo through the grounded PSU and safeguard your system. That’s why they should always be kept in touch with the ports.
Having said that, there are also some shields, like the one on my ROG STRIX B550-I. Take a peek below and you’ll see that it doesn’t have prongs. Rather, they have foam padding that performs the same function as the prongs do.

- Line up the IO shield with your motherboard ports. Then, gently push it so that the ports come out of the holes.

- Bend the prongs such that they just touch the ports. They should not prevent the shield from attaching to the motherboard.
- Once you are done with the prongs, take the IO shield out of the motherboard.

Install IO Shield Into the PC Case
Okay! Let’s move towards the installation part now. Before that, check if there are any motherboard standoffs or case fans that will interfere with the process.
Should the case fan come into your way while installing the IO shield, consider removing them. If you don’t really need case fans, take them apart.
My NZXT H510 Elite mid-tower case had a standoff near the IO shield compartment so I had to remove it. Yet, you are good to go if that does not interrupt you.

- Place your PC case in an upright position.
- Grab the IO shield and insert it into its respective compartment. Do remember that you should insert it from the inner side of the PC case.
- First, make sure the bumps at the bottom of the shield are clearly visible from outside.
- Similarly, adjust the shield such that you can see the bumps on the right side.
- Now that the bumps at the bottom and right are visible, press the left side of the shield from inside. Please refrain from pressing the shield at the center. You may end up bending it.
- Keep applying pressure from bottom to top until the left side bumps come out. You’ll hear a perfect click sound once they come out of the casing.
- Alright, we’re done with the three sides. After that, push the top of the IO shield from the inner side of the PC case. You may also squeeze the shield with your fingers and push it out.
- Once the bumps from all sides are clearly visible, you’re good to go.


Finalize the Installation
If you’re here, I believe you have installed the IO shield correctly into its place. Let’s finalize the installation then.
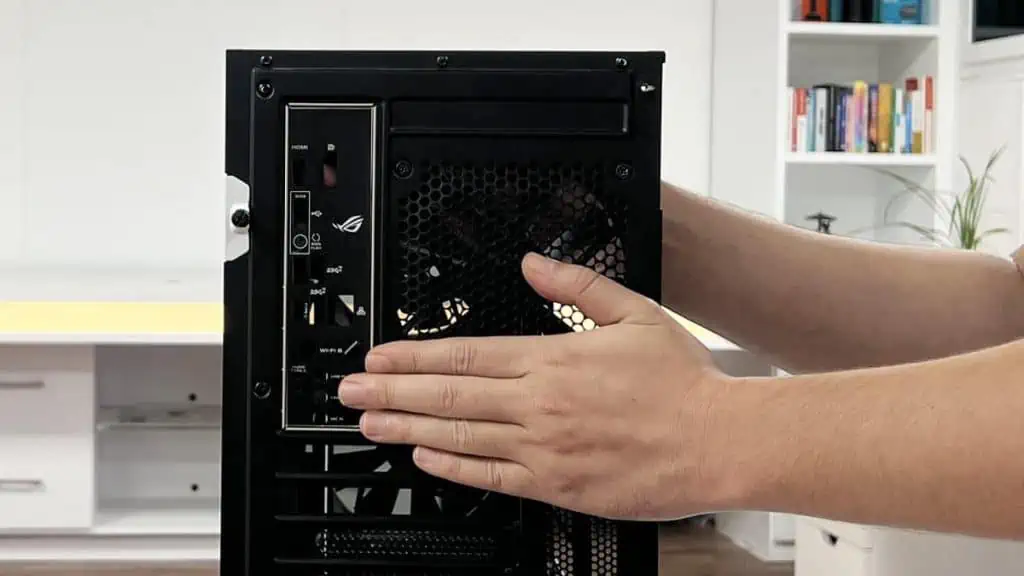
- Start by making a few taps on the exterior of the shield. Make sure it is completely attached and does not fall off. A well-attached IO shield will help prevent dust buildup on your PC.
- Reinstall the case fan if you had removed it earlier.
- Align the motherboard ports with the IO shield and fit it into your case. Use the motherboard screws that came with your PC case to do the needful.
- You can now move on to other hardware components and continue your PC build.
