While the CPU cooler is the main component responsible for maintaining your CPU temperature, it only works well in conjunction with your case fans. What’s more, your case fans are necessary to cool down other components as well. So if they stop working, you need to replace them.
The general process is to expose the fans, replace them and reassemble your PC. The exact process to perform all these tasks depends on your PC case as well as your motherboard.
Note: Your new case fan must fit into the fan slots on your case. So, if you are switching to a bigger or a smaller fan, make sure that it is compatible with your case.
Expose and Disconnect the Case Fans
You need to properly expose the fan to be able to unlock and remove it from your case. It’s also better to disconnect the fan cables at the same time.
- Shut down the computer and disconnect all the cables (peripherals and power supply).
- Press and hold the power button for a few seconds to discharge all the excess charge inside.

- Next, open the PC case. For that, unscrew the left side panel and then remove it. Usually, you need to slide it out, but depending on your PC case, you may need to follow a different method.
If you encounter any issues, check the user manual for the PC case. - Then, detach the fan and RGB connectors from the motherboard’s headers. Also, make sure to remember where the headers are as you need to connect the new fans there.
- The RGB connector’s clip may be locked to the header. You need to press on the far edge of the clip to unlock it.
- The fan cable may go through locks, straps or around other PC components. So check the cable routing and properly remove it.


Remove Additional Panels (if Necessary)
Depending on how you have routed the fan cables or where the fans that you wish to remove are, you may need to open the right side or the front panel as well.
- For the right side panel, you generally need to unscrew it and then slide it out. But for some PC cases, there are separate mechanisms like a lock button.
- The front panel is usually connected using several pressure clips or screws. So either unscrew them or squeeze the clips from inside, and then pull out the front panel. If its uses pressure clips, you usually need to pull it out from one side (usually the top or bottom) first.
- If you encounter any issues or can’t figure out what to do, it’s best to check the official user manual for additional guidance.


If there are any fan cables that you have yet to detach, now is the time to do so.
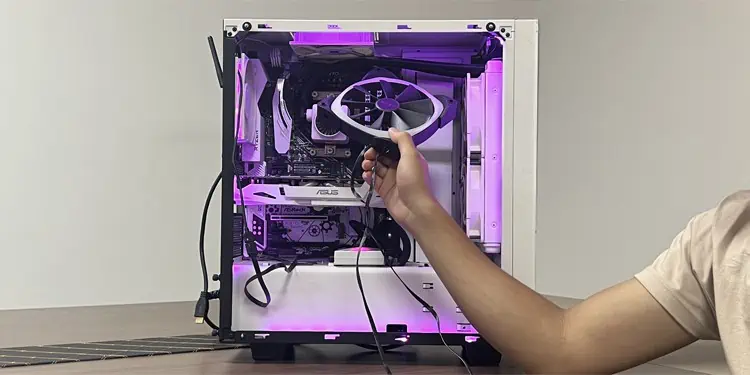
Replace the Case Fans
Now, you need to take out the old fan and replace it with a new one.
- Fans are usually connected to the case with some screws, which should be exposed once you remove the necessary panels. So unscrew the fan and take it out.
- You can also clean the area if it is dirty.
- Then, align your new fan to the same place and then screw it tightly. Make sure that you have the correct fan direction for the panel.
- Then, move its fan and RGB cables through the same route as the previous fan and connect them to their proper headers. You can use the original or any other headers.
- It’s better to use the header with the label CHA_FAN or SYS_FAN. The fan header should have a plastic guide to indicate where your connector goes.
- If the RGB header has a plastic clip (usually on controllers), you need to lock the connector there. Otherwise, you need to look for an arrow mark on the connector. The pin with the arrow is the +12V voltage pin.
Then, check the labels on the motherboard’s header or the user manual to figure out the voltage and RGB pins on the header and attach the connector accordingly.
- It’s better to use the header with the label CHA_FAN or SYS_FAN. The fan header should have a plastic guide to indicate where your connector goes.
- If the cables don’t reach the headers, you can use molex extension with fan power. However, keep in mind that doing so won’t let you control the fan speed.
- If your previous setup did not have proper cable management, you can use zip ties or velcro tapes to bundle your cables together for better organization.
- Before putting back the case, it’s better to connect the power cable and turn on your PC to see if the fan works properly.


Reassemble Everything
Now, you need to reassemble everything, which mainly includes the panels. You can reverse the disassembly process to attach them to the case.
If they were connected with screws, align them properly in place and fasten the screws. Otherwise, you only need to align them in place and press them towards the case to get the clips or locks in place.
Now, you can connect all the cables and start using your PC.