Passwords are essential security features to protect your system against any unwanted access. But it can be tedious if you have to enter it time and again, especially if you need to restart your computer or put it to sleep multiple times.
In such cases, you can either remove the password altogether or simply bypass the login screen. But I highly recommend you only do so temporarily for your computer’s security.
Removing Windows Password on Microsoft Account
You can’t remove the password on a Microsoft Account as it is tied to the actual online account. You can use the password replacements we discussed earlier. But to actually remove any security key, you need to switch to a local account instead. After logging in to the Microsoft account,
- Press Windows key + I to open Settings.
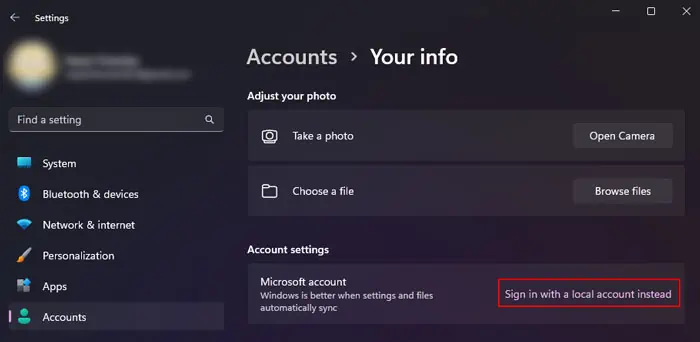
- Go to Accounts > Your info.
- Click on Sign in with a local account instead and then Next.

- Confirm your password for security and click OK.
- Specify an account name and leave the other fields blank.
- Click Next and then Sign out and finish.
If you don’t remember the password, you need to reset the password first.
- Go to the online Microsoft Password Reset page on any other computer or device.
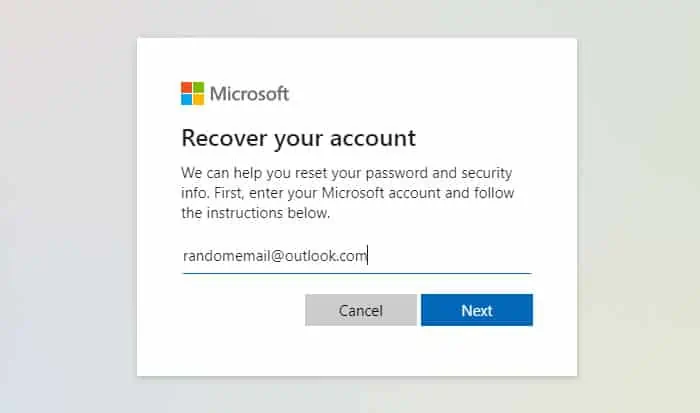
- Enter your account’s email address and select Next. Follow the given instructions.

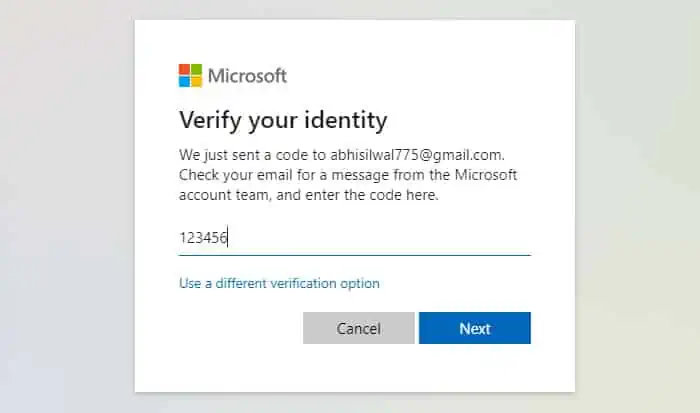
- After you reach the page where you need to enter the security code, check your emails for the code. You may need to wait for some time.
- After getting the code, enter it.

- Then specify your new password. Hit Next.
- Then, log in to the account on your computer and perform the above steps to switch to a local account without any password.
Removing Windows Password on Local Account After Login
If you can log in to your or any other administrator account, you can use various tools on Windows to remove your local account password. These programs include the Windows Settings, Control Panel, Local Users and Groups MMC snap-in, and so on.
Through Windows Settings
The easiest way to remove your password after logging in to the corresponding account is through Windows Settings. You will need to remember the current password to apply this method.
- Press Windows + R to open Run.
- Type
ms-settings:signinoptionsand press Enter to go to the Sign-in options Settings. - Select Password and hit Change.

- Enter the current password and click Next.
- Leave the new password and the password hint blank and select Next and then Finish.

From Local Users and Groups
You can use the Local Users and Groups utility on Windows to modify a user password. It allows removing both the current as well as another account’s password (only if you have logged in to an admin account).
- Open Run.
- Type
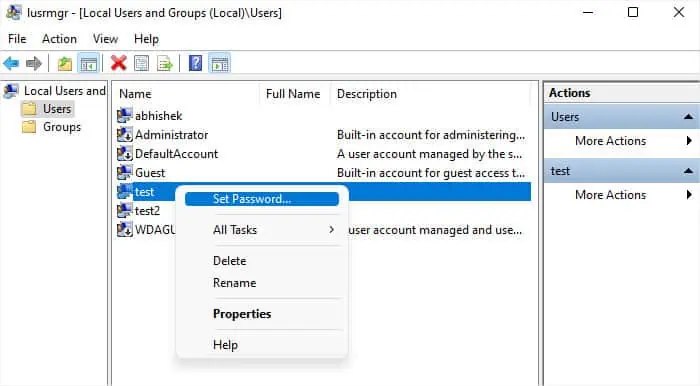
lusrmgr.msc. Click OK. - Click on Users on the left side or double-click Users in the middle.
- Right-click on your or any other user account and click Set password.

- Confirm with Proceed.
- Leave the new password text fields blank and click OK > OK.
Using Control Panel
After logging in to another admin account, you can also use the traditional configuration tool, the Control Panel, to remove the password for your original account.
- Open Run.
- Type
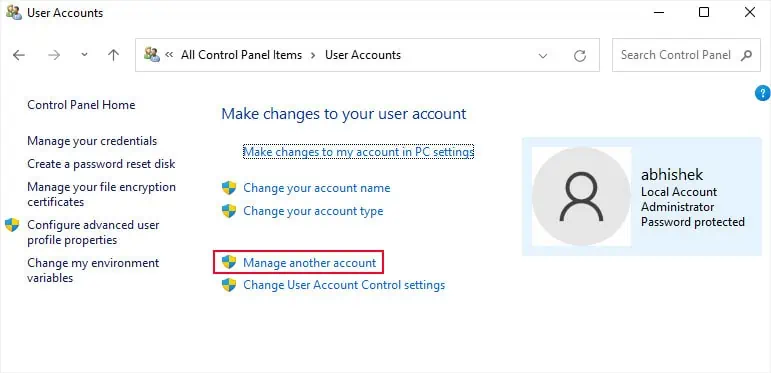
control userpasswordsand press Enter to open the User Accounts applet inside the Control Panel. - Select Manage another account and then select the account whose password you want to remove.

- Pick Change the password.
- Leave the fields blank and hit Create password.
Through Netplwiz Tool
Windows also includes another tool, Netplwiz, through which you can specify the basic configuration of the user accounts. It also allows you to remove the password of another account but not the current one.
- Open Run.
- Type
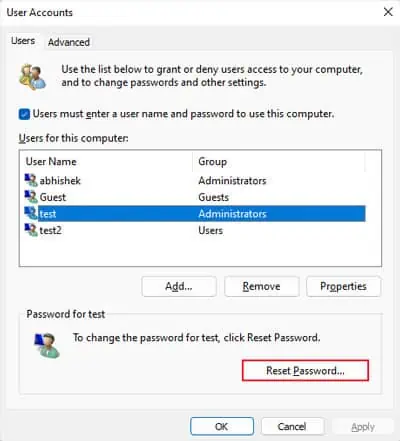
netplwizand press Enter. - Select the corresponding account and click Reset Password from below.

- Leave the text fields blank and select OK > OK.
Using Command-line Interface
Another way to remove the password is by using Command-line Interfaces like Command Prompt and PowerShell. It is actually the quickest method as you’ll only need one command on each program.
On Command Prompt
- Launch Command Prompt as admin.
- Type
net user “User Name” *while replacing “User Name” with the user account name whose password you want to remove. Then, press Enter. - Press Enter two times for Type a password for the user: and Retype the password to confirm: without typing anything.

On PowerShell
- Open Run.
- Type
powershelland press Ctrl + Shift + Enter to open Windows PowerShell as Admin. - Type
Set-LocalUser -name "User Name" -Password ([securestring]::new())while replacing “User Name” with the user account name and press Enter.
Removing Windows Password on Local Account Without Login
If you don’t remember the password for your current or another admin account, you won’t be able to access any of the tools we mentioned earlier.
If you had created a password reset disk for your local account, you can use the disk to remove or reset your password from the login screen. But if not, you need to edit some registry files from the recovery environment.
Using Password Reset Disk
- First, enter any random text as the password on the login screen.
- After it gives the Password is incorrect error, hit OK.
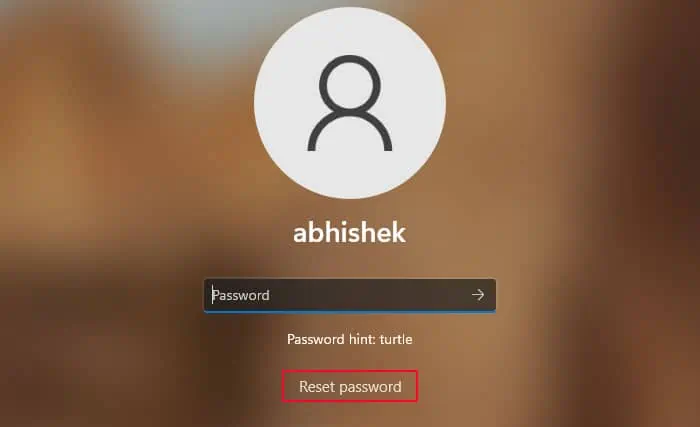
- Make sure to plug in the password reset disk into your computer and click on Reset password > Next.

- Set the drop-down box to the disk and select Next.
- Leave the new password fields blank and click Next > Finish.
By Editing Registry Files
Windows comes with a hidden administrator account that is disabled by default. But it is possible to enable it through the Command Prompt in the Windows Recovery Environment (WinRE) or Advanced Startup by modifying a SAM registry file.
- First, you need to get to WinRE.
- Click on the power icon on the login screen.
- Press and hold Shift on your keyboard and click Restart on the power options.
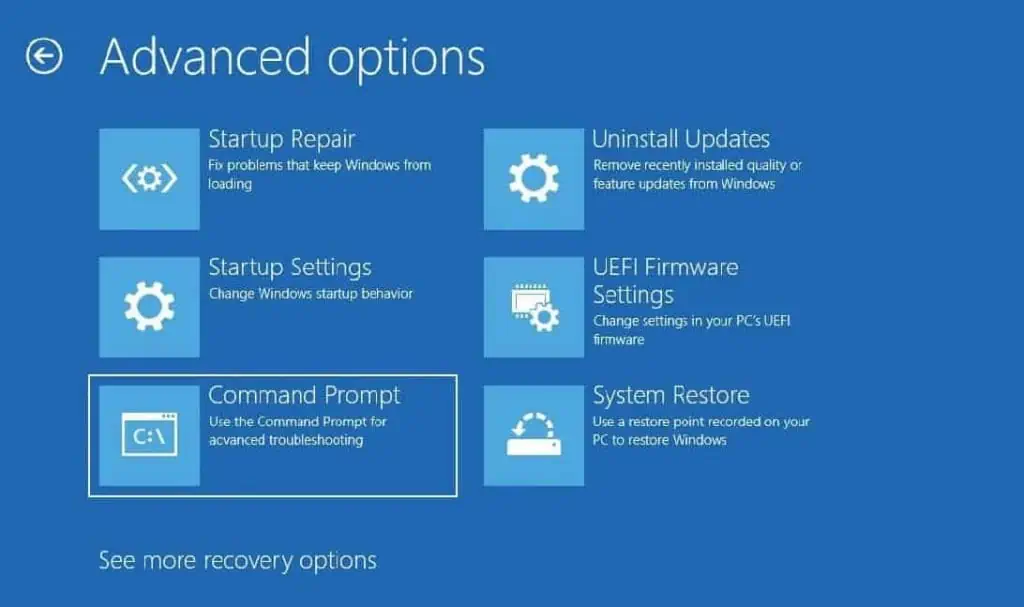
- Then, head over to Troubleshoot > Advanced options > Command Prompt.

- Enter regedit in the prompt. It will load the Registry Editor GUI.
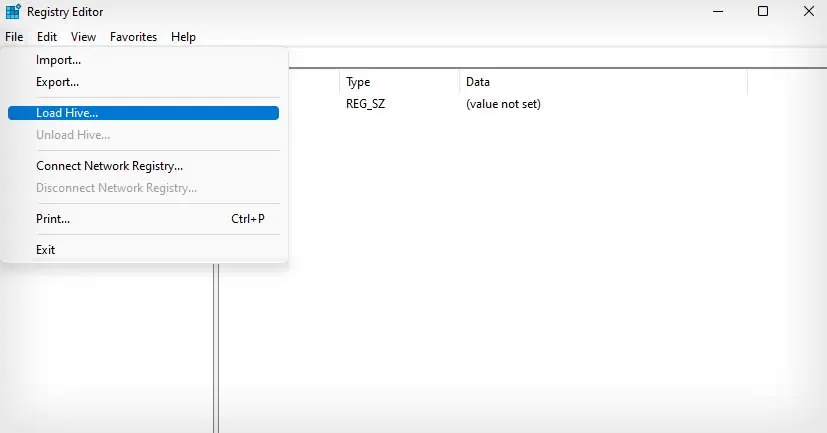
- Select the HKEY_LOCAL_MACHINE key and then click on File > Load Hive.

- Search for your original OS drive. It will not be
X:but should contain the folders like Windows, Users, and so on. - Go to Windows > system32 > config inside this drive.
- Select SAM and click Enter.
- Use
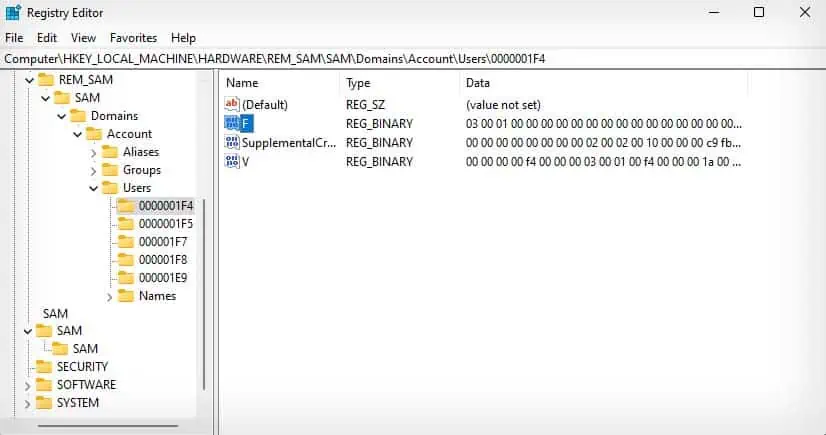
REM_SAMfor the Key Name and press Enter. - Now, go to
Computer\HKEY_LOCAL_MACHINE\REM_SAM\SAM\Domains\Account\Users\000001F4in the Registry Editor. - Double-click on F.

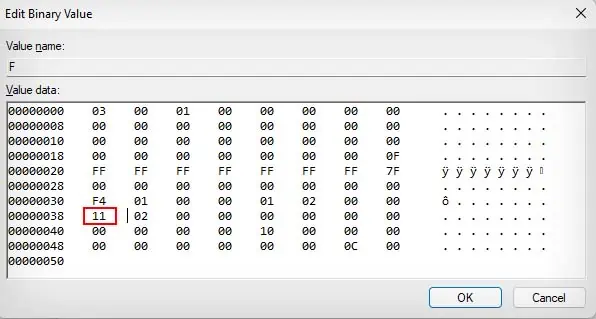
- Look for the 00000038 row.
- Change the first value next to it from 11 to 10 and hit OK.

- Exit Registry Editor as well as Command Prompt.
- Now, click on the Continue option.
- You will get to the normal login screen. Here, sign in to the newly displayed Administrator account and use any of the methods in the previous section per your preference.
- Then, open Command Prompt as admin and enter the command
net user administrator /active:noto disable the hidden admin account.
Bypassing Password Login Screen
You can also completely bypass the login screen if you don’t want to keep entering the password. It will help you effectively eliminate the need to enter the password for both the Local and the Microsoft user accounts. However, keep in mind that doing so will compromise your system to unauthorized access.
You can remove the login screen you get after initially starting the computer or waking up from sleep. But it is impossible to remove the screen after you manually lock your account. It is the last line of security features to protect your system.
On Initial Boot
You can use the Netplwiz tool to prevent the necessity of having to enter the username and password to log in to your account on the initial boot. But this option is not available by default on the latest Windows systems, so you need to show it by changing a registry entry first.
- Open Run.
- Type
regeditand click OK. It will load the Registry Editor. - Go to
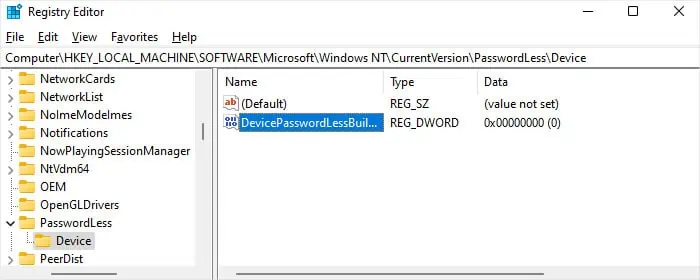
Computer\HKEY_LOCAL_MACHINE\SOFTWARE\Microsoft\Windows NT\CurrentVersion\PasswordLess\Device - Double-click on DevicePasswordlessBuildVersion.

- Change the Value data to zero
0and hit OK. - Close the Registry Editor and open Run again.
- This time, type
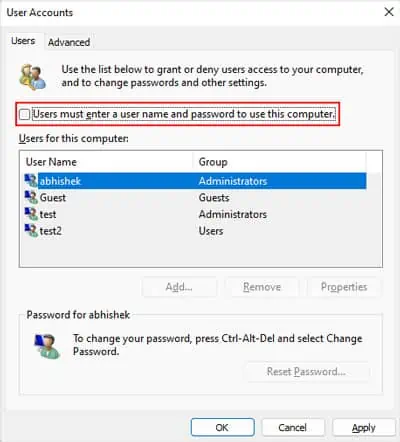
netplwizand press Enter. - Untick Users must enter a username and password to use this computer.

- Select OK and enter the username and current password to specify which user the computer automatically signs in to. If it is a Microsoft account, remember to enter the full name with the email domain.
- Click OK.
On Wake-up After Sleep
Just following the above method does not bypass the login screen after waking up from any idle state like sleep or hibernation. You need to change a certain setting for this purpose.
- Open Run.
- Type
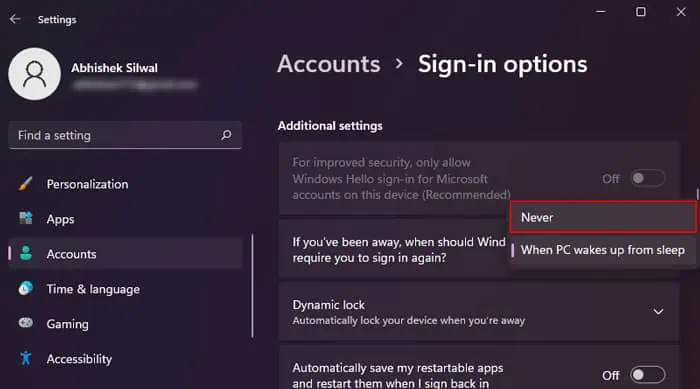
ms-settings:signinoptionsand press Enter to go to the Sign-in options Settings. - Look for the option If you’ve been away, when should Windows require you to sign in again?
- Set it to Never.

If the option is grayed out, this setting is configured in its group policy and you need to modify that instead.
- Type
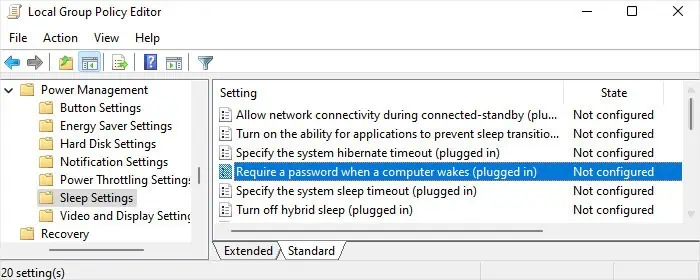
gpedit.mscon Run and press Enter to open Local Group Policy Editor. - Go inside Computer Configuration > Administrative Templates > System > Power Management > Sleep Settings.
- Double-click on Require a password when a computer wakes (plugged in).

- Check Disabled and click OK.
- Similarly, change Require a password when a computer wakes (on battery) as well.
