If you want to surf the Internet anonymously without disclosing your identity or access the content prohibited in your geography, VPN is for you. With VPN, Internet traffic flows through a virtual tunnel with real-time data encryption.
After using a VPN, your Internet activity remains within yourself only. Even your ISP cannot track it. While saying so, it does not mean that VPN is used for only illegal and prohibited activities over the Internet.
This article will discuss why you need to use VPN and some methods to set it up on Windows 11. Not only tech-savvy people but even non-techies can also use the VPN feature after reading this post.
How to Setup VPN on Windows 11?
You can use different methods to set up a VPN connection. You can either use any VPN application available on the Internet or an in-built VPN feature available on Windows 11. Here we will discuss some methods in detail.
From Windows Settings
You can set up a VPN connection manually from Windows Settings. Follow these steps:
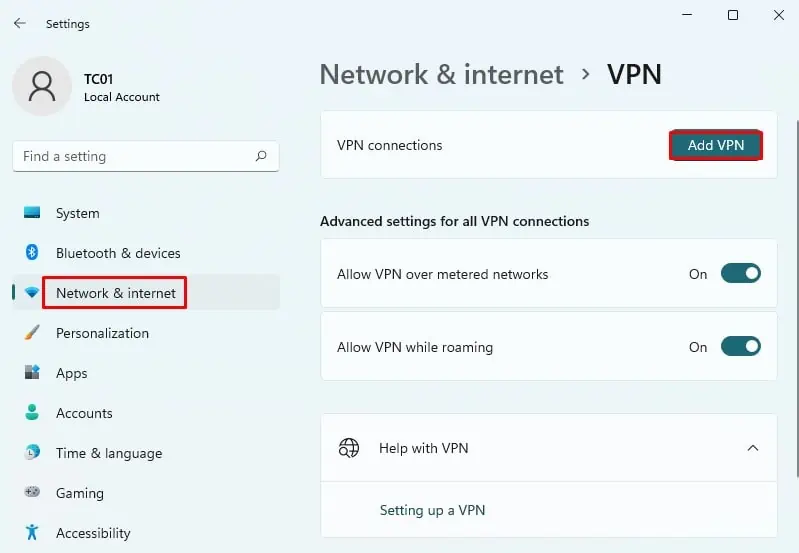
- Open Settings and navigate the Network and Internet tab on the left pane.
- Click on VPN and then Add VPN button.
- A new Add a VPN Connection popup will appear. Now you need to enter the details of your VPN connection.
- Select Windows(built-in) under VPN provider.
- Give your connection a name in the Connection name field. You can give it any name.
- In the Server name or address field, enter the VPN server’s address.
- Specify your VPN type, if there is any. Else leave it. It is automatic by default.
- Under Type of sign-in info, provide the username and password or any other authentication type if you got any. It is optional information to enter.
- Click Save.
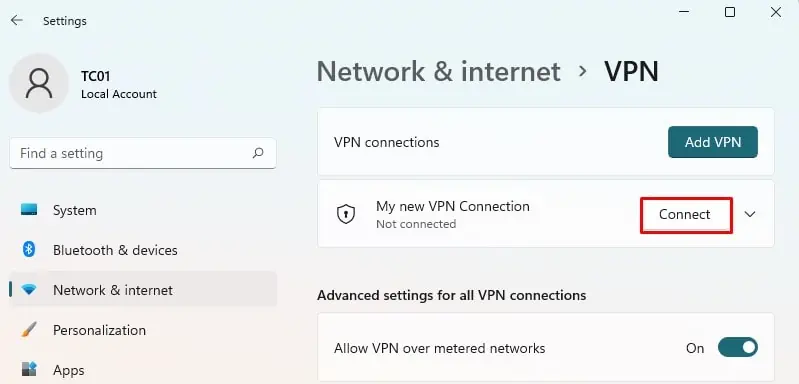
- Finally, the newly added VPN will be shown under VPN connections. Click on Connect button, and you are done.
From Network and Sharing Center
It is also a manual method of setting up a VPN in Windows 11. However, it requires some extra effort than the previously discussed method. Follow these steps to set up a VPN from the network and sharing center:
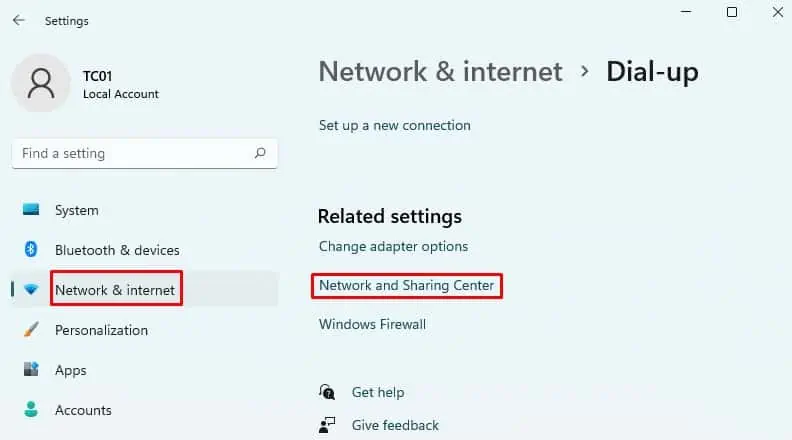
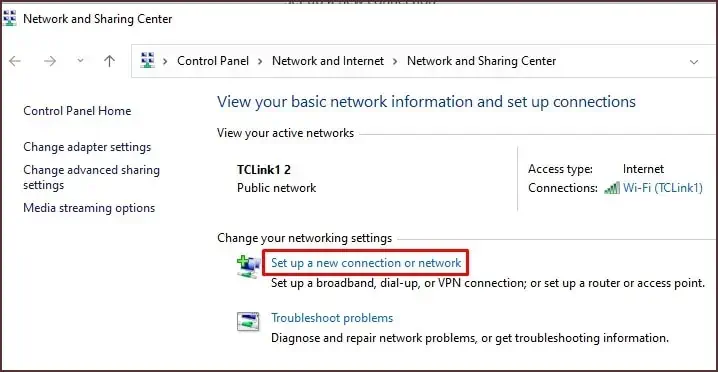
- Open Settings > Network & Internet > Dial-up > Network and Sharing Center.
- Under ‘Change your networking settings, ‘ click on Set up a new connection or network.
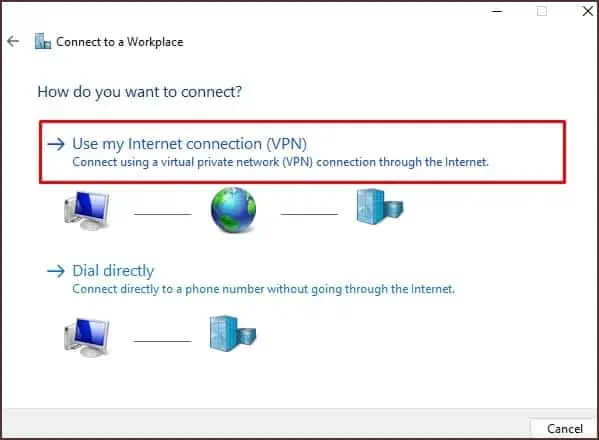
- A new window will pop up. Click on Connect to a workplace option and click on Next. Then click on Use my Internet connection (VPN) option.
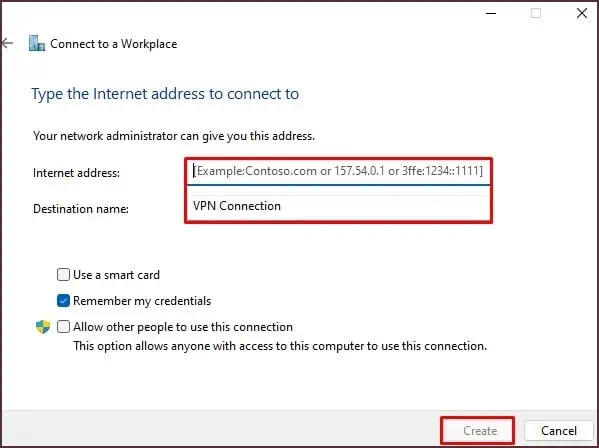
- Fill in the Internet address and destination name in the respective fields. It is provided to you by your network administrator. Click Create.
- After you click Create, you will see Change adapter options available in the left menu.
- Right-click on the VPN profile you just created and click on Properties.
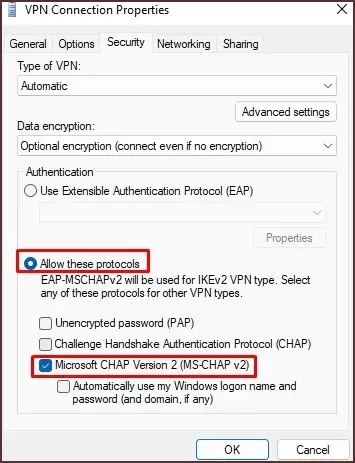
- Click on the Security tab, select the type of VPN and check the option Microsoft CHAP version 2 (MS-CHAP v2). Before checking this option, be sure to check the option Allow these protocols.
- In the Networking tab, click the TCP/IPV4 option and open its Properties.
- In the new popup window, enter your preferred DNS server under Use the following DNS server addresses.
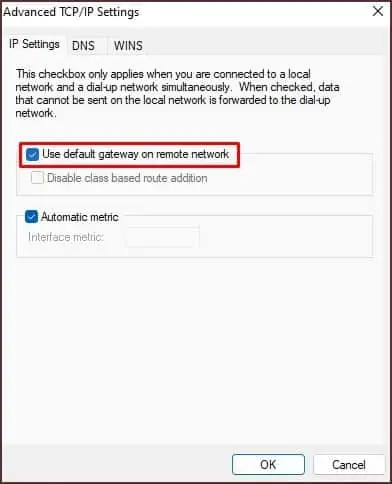
- Click the Advanced button and check the Use default gateway on remote network option.
- Save the settings. Now you are done with setting up the VPN in Windows 11.
You can see your new VPN profile under VPN connections. Click on Connect button to connect through it.
From VPN Applications
If you don’t want to bother setting up a VPN manually from Windows settings, you can directly use VPN applications available on the Internet. They may be either free or paid versions of VPN.
Some popular VPNs on the Internet are NordVPN, Surfshark, ExpressVPN, and CyberGhost. You can download their app, register with them and connect to your preferred location. You can also use VPN extensions in the browser. Opera browser has an in-built VPN feature. You don’t even need to use extensions in Opera.
How to Disconnect or Remove a VPN Connection?
After you have finished using VPN, you may want to disconnect your PC from VPN or remove your created VPN profile.
To disconnect or remove a VPN connection:
- Open Settings and then select Network and Internet tab on the left pane.
- You will see existing VPN connections on your PC under the VPN menu.
- Click the Disconnect button next to the VPN profile to disconnect from it.
- To remove the VPN profile you created, click on the VPN name and the Remove button.
How to Fix VPN Not Connecting?
VPN may not always start correctly. If your VPN is not connecting, you can fix it easily. Reinstalling the network adapters and flushing the DNS work like a charm when VPN is not connecting. There are a few other methods as well to fix the issue. Let’s discuss some of them in detail:
Reinstall the Network Driver
You can fix many issues with your network and connections by reinstalling the network drivers. Sometimes, VPNs may not work due to their messed-up configuration. You can follow these steps to reinstall the network adapters:
- Open Device Manager.
- Expand the Network adapters option.
- Right-click on WAN Miniport driver and select Uninstall device.
- Restart your PC.
Restarting will reinstall the drivers and fix issues with them.
Flushing the DNS
Faulty DNS cache is also responsible for causing issues while connecting to VPN servers. You can consider flushing it and checking if it works. Follow these steps to flush the DNS:
- Press Windows key + R to open Run.
- Type,
cmd
and press control + shift + Enter to run it as an Administrator. - Open the Command prompt as an administrator. Then press Enter key after each of these commands:
ipconfig /flushdns
ipconfig /release
ipconfig /registerdns
ipconfig /renew
netsh int ip reset
netsh winsock reset
These commands will flush your DNS and you are good to go.
Disable Internet Protocol Version 6 (IPV6)
IPV6 may sometimes interfere with a VPN connection. Try disabling it to see if it fixes the issue. To disable IPV6:
- Press Windows key + I and select Settings
- Click on Network & Internet > Dial-up.
- Go to the Change adapter options
- Right-click on your VPN profile and click on the Properties option.
- Inside the Networking tab, uncheck the TCP/IPv6 option.
- Save the settings, and you are done.
Allow VPN Through Firewall
Windows Firewall protects your PC by screening and blocking the detrimental programs from the Internet. But sometimes, it may interfere with the VPN settings and obstruct its functionality. Let us see how we can allow VPN through a firewall:
- Open Control Panel.
- Click on System and Security > Windows Defender Firewall.
- Click on Allow an app or a feature through the Windows Firewall option from the left menu.
- In the new Allowed apps window, click on the Change Settings button.
- From the list of apps, select your VPN app.
- Check public, private, or both, depending upon which network you want to run the VPN.
- Click the OK button to save the settings.
Update the Windows
Sometimes the glitch in Windows system files may cause an issue while connecting to a VPN. Updating the entire Windows fixes many bugs and issues with your system, including VPN issues. To update the windows:
- Click on the Start button and open the Settings app.
- Select Windows Update tab on the left pane and then click on Check for updates.
It will download and install any updates available and fix issues with your system.
After performing these operations, connecting to the VPN must be no issue.
Should You Use VPN?
If you take your online privacy seriously, you will surely want to use VPN. Besides the anonymity it provides, there are other advantages to using a VPN. We have listed some of them below.
- You may be vulnerable to spying and attacks when connected to public networks. VPN is the best choice if you are concerned with your privacy and want a secured connection.
- In some countries, Banks make their Internet banking website accessible only from their country’s IP address. If you are out of your country and want to maintain account access, VPN comes in handy.
- Remote working has been made possible with a VPN. When you want to work from outside the organization, you may require a VPN to connect to your office’s network.
- Using a VPN, you can change IP address to different locations and enjoy the cheap airline tickets.
- Not every VOIP application provides end-to-end communication encryption. VPN helps solve the problem of eavesdropping in communication.
However, there are certainly some limitations to using a VPN which raises red flags about whether to use it or not. See some of the drawbacks below and decide if you want to use VPN.
- Some VPN service providers who claim to be free actually sustain themselves by selling your personal information. There is even more chance of your information leakage with a free VPN service. It would help if you consider using paid versions of VPN instead.
- If you accept cookies from the website you surf, VPN cannot fully secure your connection. These websites can track you even if you use VPN.
- VPN does not protect from phishing attacks. Malware and viruses can enter your device even if you use VPN.
- Some websites can identify that you are using a VPN. It may completely block your access to their website if it finds so. They block your IP address and prevent you from accessing their website.
Related Questions
Should I Use VPN While Torrenting?
Torrenting is considered illegal as it sometimes voids copyrights. People make use of VPN to download the contents from torrents. Your ISP may not know that you are using a torrent. But most of the ISPs have FUP (Fair Usage Policy). They may throttle your Internet speed if you consume large bandwidth using torrents.
Why Is My Internet Slow While Using a VPN?
You may experience a slower connection when you surf the Internet using VPN. It is because you are using a free VPN service. Consider using a premium VPN if you want constant speed. They use multiple servers to handle large connections and hence will not throttle your speed.