Mapped Drives are great options to link a folder to a drive or share resources on a domain. However, in some scenarios, they may not show up. Most people have encountered this issue while using Group Policy Preferences or logon scripts to create mapped drives if UAC is enabled.
The reason for the issue is how the UAC treats your Administrators user group. If you use an elevated process to create the drive, your system only makes it available to full admin users. However, when UAC is enabled, your system treats the Admin user as a standard user only, unless you are using an elevated process.
The methods we mentioned earlier all use elevated processes to create the mapped drives, so they don’t show up in your explorer, which you can’t run as admin by default. Similarly, mapped drives you create from non-admin methods don’t show up in elevated processes.
There are also other few possible reasons for mapped drives not showing. In this article, we provide the solutions for all the causes of the issue.
Causes For Mapped Drive Not Showing
Here are the main reasons for mapped drives not showing on your PC:
- Design issue due to UAC providing standard access token instead of an administrator token to unelevated process.
- Mapping drive with the same letter as a previous persistent one without removing its residual settings.
- Multiple drive mapping policies that conflict with each other.
- Policies that delete mapped drives running alongside policies that create them.
- Improper Item-level targeting configuration.
- SMB protocol disabled on your system.
How to Fix Mapped Drive Not Showing?
First, make sure to run gpupdate /force on Command Prompt to force the group policy to apply. You can also run the gpresult /r command to check all active policies.
If you still encounter this issue, you can try out the following solutions:
Restart Windows Explorer
Sometimes, the mapped drive doesn’t show on your File explorer. It happens in the following conditions:
- You created the drive in admin mode, for example using a batch script as admin or using any app with elevated privilege.
- You have enabled User Account Control (UAC).
As we mentioned earlier, this happens because UAC handles the Administrators as standard users on unelevated processes. So, you can’t see the mapped drive on File explorer.
You can temporarily resolve this issue by restarting Windows Explorer. To do so,
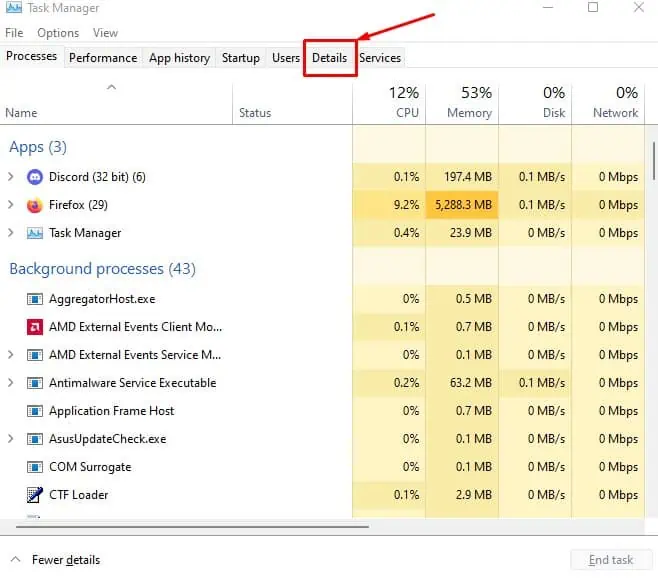
- Press Ctrl + Shift + Escape to open the Task Manager.
- Go to the Details tab.

- Right-click on
explorer.exeand select End task > End process.
- Select File from the menu bar and click on Run new task.

- Type
explorerand press Enter.
Tweak Registry Setting
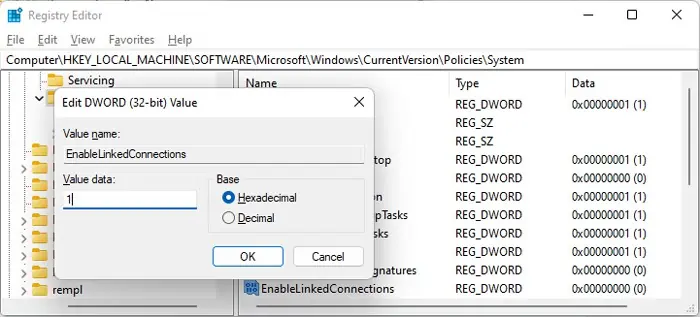
The above method is only a temporary solution. To resolve it permanently, you need to configure the EnableLinkedConnections registry entry. This entry forces your system to share the network connections among all users.
This method is also useful if you created the mapped drives using a standard access token (not elevated) and want to access it from elevated processes like CMD or some apps. However, keep in mind it can compromise the security of the user computers.
Regardless, here’s what you need to do:
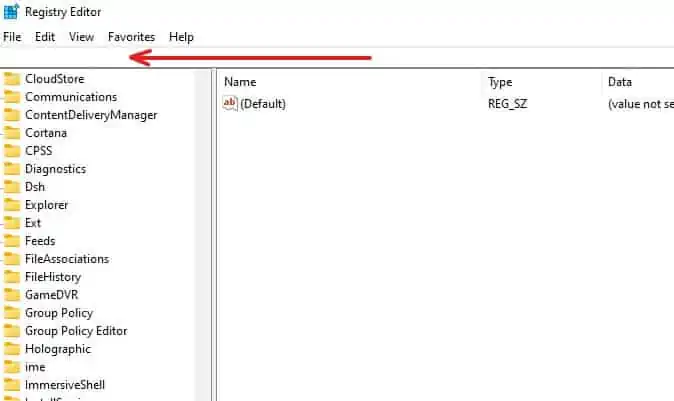
- Open Run and enter
regeditto launch the Registry Editor. - Navigate to
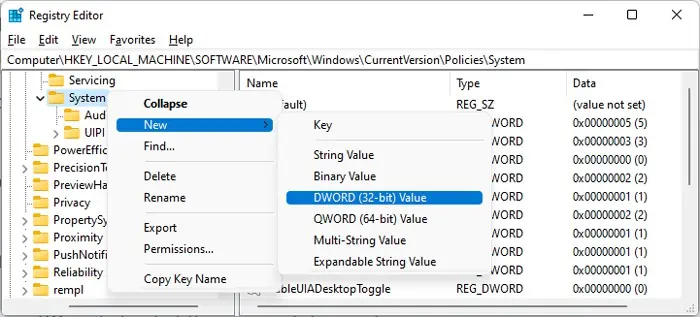
Computer\HKEY_LOCAL_MACHINE\SOFTWARE\Microsoft\Windows\CurrentVersion\Policies\System
- Check for EnableLinkedConnections and double-click on it.
- If it’s not there, right-click on System and select New > DWORD (32-bit) Value.

- Name it as
EnableLinkedConnectionsand double-click on it. - Set its Value data to 1 and click OK.

Restart your PC and check if the mapped drives show up.
Postpone Execution of Logon Scripts
Another method you can apply is using the logon scripts while also including a postpone script provided by Microsoft.
The script runs a task scheduler after a certain amount of time has passed since the user logged in. The task scheduler runs on elevated mode so it creates the mapped drive for elevated processes.
However, even before the scheduler runs, the logon script is automatically triggered right after logging in which makes the mapped drive available to standard users.
Here’s the complete process for the method:
- Open a text editor like notepad. You can enter
notepadon Run to open this text editor. - Copy and Paste the following script provided by Microsoft:
<job>
<script language="VBScript">
'---------------------------------------------------------
' This sample launches the application as interactive user.
'---------------------------------------------------------
' A constant that specifies a registration trigger.
const TriggerTypeRegistration = 7
' A constant that specifies an executable action.
const ActionTypeExecutable = 0
' A constant that specifies the flag in RegisterTaskDefinition.
const FlagTaskCreate = 2
' A constant that specifies an executable action.
const LogonTypeInteractive = 3
If WScript.Arguments.Length <> 1 Then
WScript.Echo "Usage: cscript launchapp.wsf <AppPath>"
WScript.Quit
End If
strAppPath = WScript.Arguments(0)
'********************************************************
' Create the TaskService object.
'********************************************************
Set service = CreateObject("Schedule.Service")
call service.Connect()
strTaskName = "Launch App As Interactive User"
'********************************************************
' Get a folder to create a task definition in.
'********************************************************
Dim rootFolder
Set rootFolder = service.GetFolder("\")
'Delete the task if already present
On Error Resume Next
call rootFolder.DeleteTask(strTaskName, 0)
Err.Clear
'********************************************************
' Create the new task
'********************************************************
Dim taskDefinition
Set taskDefinition = service.NewTask(0)
'********************************************************
' Create a registration trigger.
'********************************************************
Dim triggers
Set triggers = taskDefinition.Triggers
Dim trigger
Set trigger = triggers.Create(TriggerTypeRegistration)
'***********************************************************
' Create the action for the task to execute.
'***********************************************************
' Add an action to the task. The action executes the app.
Dim Action
Set Action = taskDefinition.Actions.Create( ActionTypeExecutable )
Action.Path = strAppPath
WScript.Echo "Task definition created. About to submit the task..."
'***********************************************************
' Register (create) the task.
'***********************************************************
call rootFolder.RegisterTaskDefinition( _
strTaskName, taskDefinition, FlagTaskCreate, _
,, LogonTypeInteractive)
WScript.Echo "Task submitted."
</script>
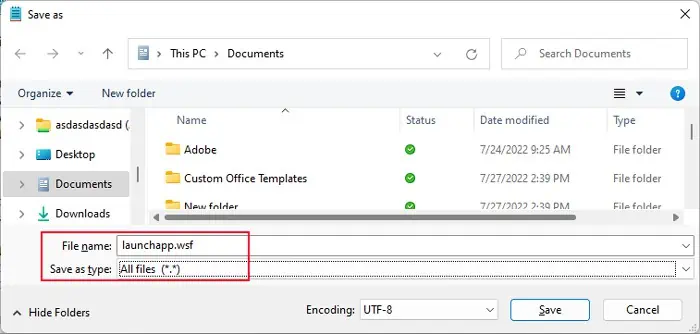
</job>- Go to File > Save as from the menu bar to save the file with another extension.
- Set the Save as type to All files and File name to
launchapp.wsf
- Save it on a network share.
- Then, create a logon script with
.batextension in the same way and save it to the network share. For example, you can create a logon.bat file with the following script:
net use Z: /delete
net use Z: "\\server\Any Server"- Now, open the Group Policy Management Console (GPMC).
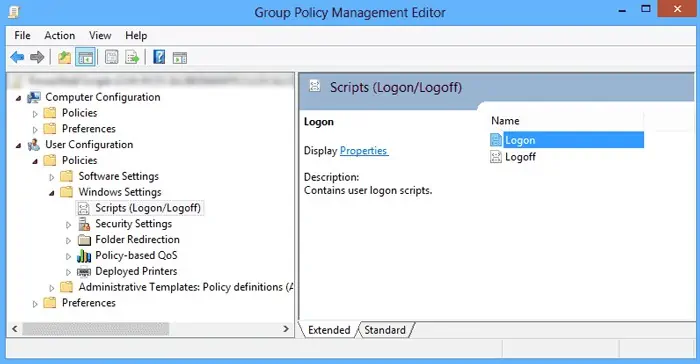
- Right-click on the GPO for which you want to create the mapped drive and select Edit.

- Expand User Configuration > Windows Settings > Scripts.
- Double-click on Logon and then select Add.

- Enter the full path of
launchapp.wsfon Script Name and the logon script on Script Parameters. - Click OK twice.
Resolve Drive Letter Issue
The mapped drive also doesn’t show if you haven’t properly removed another drive with the same drive letter. It can happen if you persistently reserved the drive letter for one mapped drive and remove it improperly. So its residual settings still remain causing conflicts with the new mapped drive.
There are two ways to resolve this issue. You can either change the mapped drive to a separate drive letter or you can delete the residual settings of the previous mapping.
To change the drive letter,
- Open the Group Policy Management Console.
- Right-click on the GPO for which you want to change the mapped drive letter and select Edit.
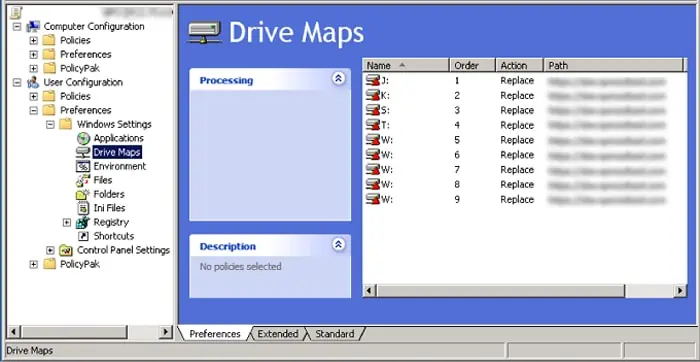
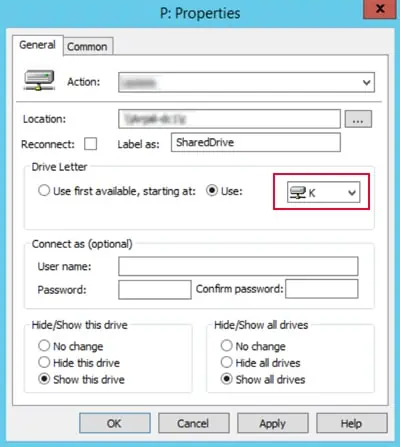
- Go to User Configuration > Preferences > Windows Settings > Drive Maps.

- Double-click on your mapped drive.
- Under Drive Letter, change the letter in the drop-down box to an absolutely new one.

- Click Apply and OK.
To delete residual settings,
- On the domain controller, create a Logon script using the above method with the following script while replacing the drive letter on
logon.bat:net use Z: /delete /persistent /y - You can directly use this script on Script Name. Then, click OK twice.
- Open Command Prompt and enter gpupdate /force.

- Restart all the computers in the domain to delete the network drive settings.
- Then, delete this logon script from the GPO.
Check Policies of the GPO
It is also possible that you created a logon script or policy to delete all mapped drives and forgot. Or you may have created more than one drive mapping policy that are overwriting each other.
So, you should go through all the policies for the GPO and remove such policies. The best way to set a group policy for mapping network drives is to tailor individual policies for separate OUs which combine all the mapped drive policies.
Check Item-level Targeting
It’s better to use Item-level targetting on the drive mapping to set conditions and improve organization. You can use the AND, OR, IS, and IS NOT operators to set the conditions.
If you set a wrong operator, for instance, using AND instead of OR, the mapped drive won’t be available to all users or all of the mapped drive may not be available.
You need to check your Item-level targeting settings to resolve this issue. To do so,
- Open the Group Policy Management Console.
- Right-click on the GPO you need select Edit.
- Go to User Configuration > Preferences > Windows Settings > Drive Maps.
- Double-click on your mapped drive.
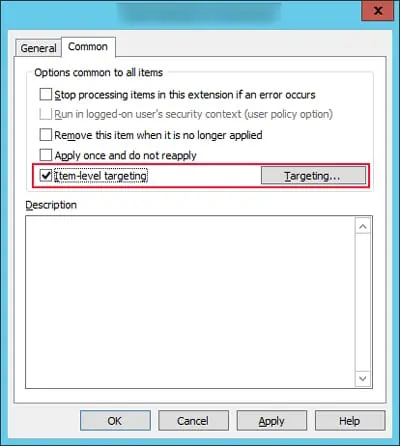
- Go to the Common tab and click on Targeting.

- Make sure the rules are correct and change them if necessary.
Create New Policy
You can also try creating a new policy, but not on the default domain. You should always create new GPOs and link them to the necessary targets while creating policies. Here’s how you can do so:
- Open the Group Policy Management Console.
- Right-click on the particular GPO and click Edit.
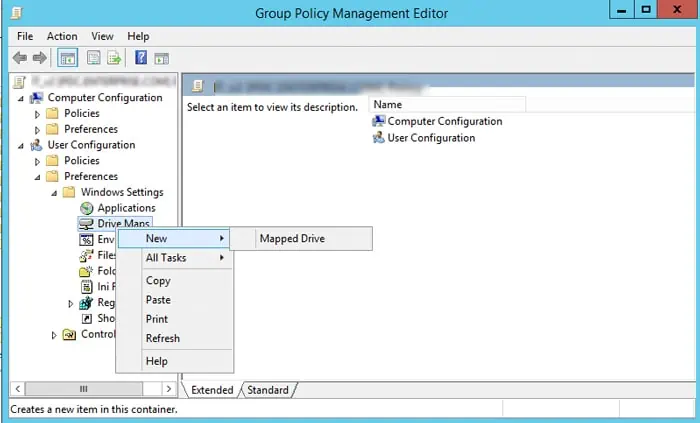
- Go to User Configuration > Preferences > Windows Settings > Drive Maps.
- Right-click on Drive Maps and select New > Mapped Drive.

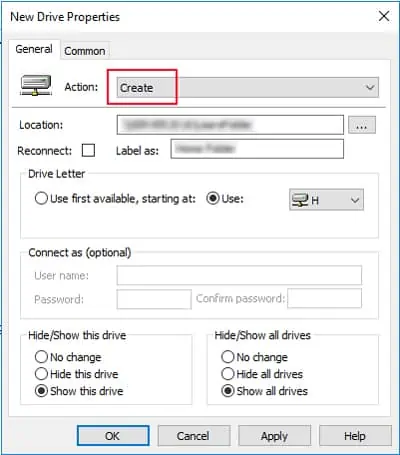
- You can set most settings according to your preference. However, make sure to set the Action option properly.
- If the drive letter is not assigned to any mapped drive and you want to create a new one, set it to Create.

- If the drive letter already exists and you want to replace it, set it to Replace.
- If the drive letter is not assigned to any mapped drive and you want to create a new one, set it to Create.
- Click Apply and OK.
Check Network Settings
You can also try setting automatic DNS if you can’t see a mapped drive linking to a network resource. If the DNS servers or IP configuration of your system conflicts with the source computer, you may nor see the drive.
To do so,
- Open Run and enter
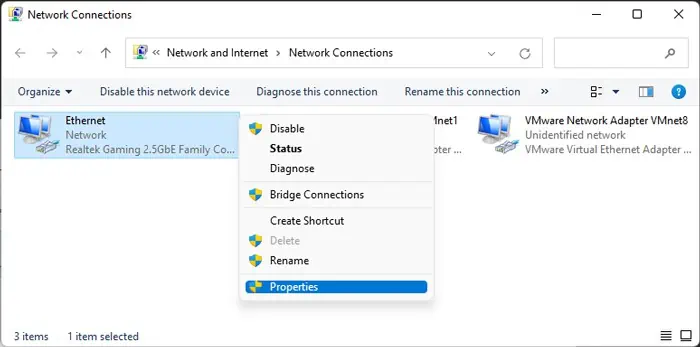
ncpa.cpl. - Right-click on your Internet adapter and select Properties.

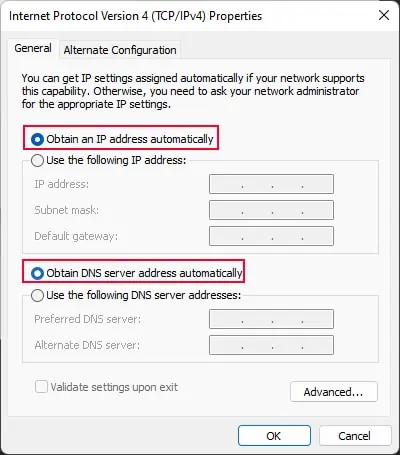
- Double-click on Internet Protocol Version 4 (TCP/IPv4).
- Check both Obtain an IP address automatically, and Obtain DNS server address automatically and click OK.

Then, you need to make sure that the advanced sharing settings allow sharing of the resources. Here’s how you can do so:
- Go to Run and enter
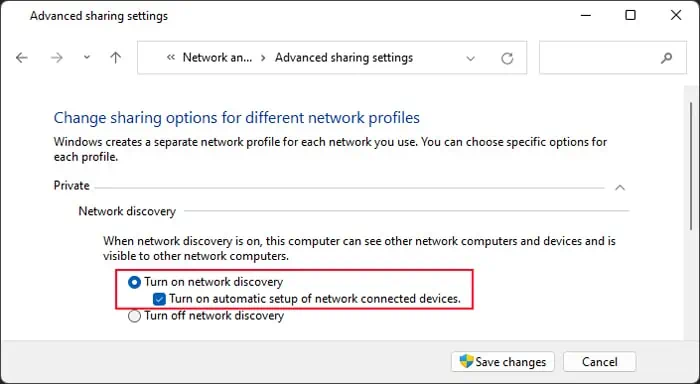
control /name Microsoft.NetworkAndSharingCenter /page Advanced - Expand Private and enable the following options:
- Turn on network discovery
- Turn on automatic setup of network connected devices

- Click on Save changes.
Enable SMB Protocol
Mapped drives use the Service Message Block (SMB) protocol, which is a network protocol that helps in file sharing. So you need to make sure to enable this protocol to prevent any issues with the mapped drives.
The latest Windows use SMB2 instead of the older SMB 1.0, so you need to check for it. Here’s how you can do so,
- Open Run.
- Type
powershelland press Ctrl + Shift + Enter to open the Elevated Windows PowerShell. - Enter the following command to check if SMB protocol is enabled:
Get-SmbServerConfiguration | Select EnableSMB2Protocol - If it’s not, enter:
Set-SmbServerConfiguration -EnableSMB2Protocol $true - Type
Yand press Enter to confirm.
However, if you are using any Windows earlier than Windows 10 version 1709 or Windows Server version 1709, you need to enable SMB 1.0. To do so,
- Open Run.
- Enter
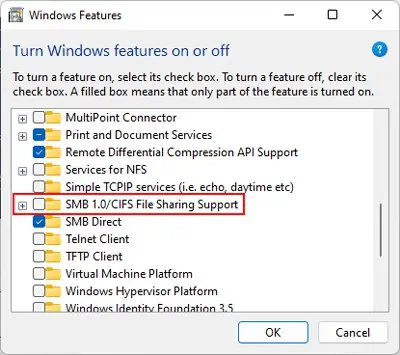
optionalfeaturesto open the Windows Features app. - Look for and tick SMB 1.0/CIFS File Sharing Support and click OK.

Update Windows
It is also possible that some buggy update is causing problems with your mapped drives. Microsoft will surely release the patches for such bugs, so you should install any updates as soon as they are available, especially cumulative updates.
If you started encountering this issue after a certain update and the previous solutions didn’t help, uninstall the latest update to roll back your system.
