The Outlook Personal Folder (.pst) file contains all your personal data like messages, emails, contacts, journals, and more. In case it ever gets corrupted, Outlook comes with a free repair tool you can use to recover your data.
The Inbox Repair Tool (Scanpst.exe
) scans the Outlook data files on your PC and repairs any errors. This tutorial will show you how to repair your Outlook PST file using the Inbox Repair Tool.
Table of Contents
How to Use Scanpst.exe to Repair Outlook Personal Folder File (.pst)
The Inbox Repair tool (Scanpst.exe
) itself is very straightforward to use, but you might encounter some other problems along the way. For instance, many users have had a hard time locating scanpst.exe
or their PST files. Follow the steps listed carefully, and you’ll be done with this in no time.
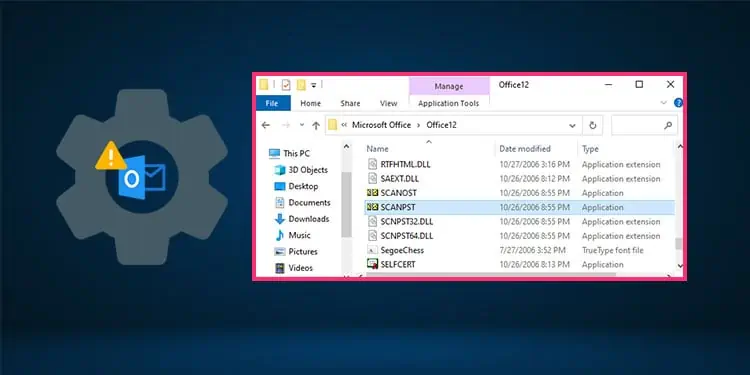
Locate the Inbox Repair Tool
Exit Outlook and browse the location from the list below according to your Outlook version.
- Outlook 2019:
C:\Program Files (x86)\Microsoft Office\root\Office16
- Outlook 2016:
C:\Program Files (x86)\Microsoft Office\root\Office16
- Outlook 2013:
C:\Program Files (x86)\Microsoft Office\Office15
- Outlook 2010:
C:\Program Files (x86)\Microsoft Office\Office14
- Outlook 2007:
C:\Program Files (x86)\Microsoft Office\Office12
If you don’t see your Outlook version on the list, you can find a detailed list on the Microsoft Troubleshoot Page.
Use the Inbox Repair Tool
- Launch
SCANPST.EXE
. - Select Browse to open the Outlook Data File (.pst) you want to scan. If you’re having difficulty locating your .pst file, please refer to the FAQ section at the bottom.
- Press Start to begin the scan.
- Click the Details tab if you want to see the results of the scan. Otherwise, make sure the Make Backup button is ticked before proceeding to the next step.
- Click on Repair to fix any errors that were found.
- Once the repair is complete, launch Outlook with the profile associated with the Outlook Data File you just repaired.
Things to Note
- Sometimes you’ll need to run the Inbox Repair Tool multiple times if the problem isn’t fixed on the first try.
- In some cases, the Inbox Repair Tool won’t be able to fix the problem, even after multiple tries. This happens if your PST file is too corrupted to repair.
Recover Repaired Items to a New .pst File
Next, you’ll create a new Personal Folder (.pst) file for your profile and move the recovered items there. The listed steps are for Outlook 2010 and later. For older versions, the steps may differ slightly. You can find detailed instructions for older versions on the Outlook Troubleshoot page.
First, turn on Folder List View by pressing CTRL+6. Press the arrows highlighted in the image above to expand the folder pane if necessary. The Lost and Found folder will contain the recovered data. Now, to create a new Personal Folders (.pst) file,
- Open the File tab from the Menu Bar and select Info.
- Click on Account Settings.
- Press Account Settings again from the dropdown menu.
- Switch to the Data Files tab.
- Press Add. This will launch the Create or Open Outlook Data File window.
- Enter a file name for your new Outlook Data (.pst) file, and then select OK.
- Your new Personal Folders (.pst) file will now show up below the old one on the Folder Pane. Drag the recovered items from the Lost and Found folder to your new PST file.
What to Do if You Didn’t Recover Your Data
If you were able to recover all your data successfully, that’s great! If not, you can try recovering once more using the backup file. If you followed the steps in our guide, you’ll have a backup of the original Personal Folders (.pst) file called originalfilename.bak
. This file will be located in the same folder as your original Personal Folders (.pst) file.
- Create a copy of the
originalfilename.bak
file and rename the copy to something else with a .pst extension. (otcopy.pst for example) - In Outlook, go to File > Open > Import and Export > Import from Another Program or File.
- Select Personal Folders File (.pst) as the file type to import from and click Next.
- Choose Do not import duplicates and click on Browse.
- Double-click the
otcopy.pst
file to open it and press Next. - Confirm the Include Subfolders box is checked.
- Select the Import items into the same folder button.
- Select your new Personal Folders (.pst) file created in Step 3.
- Press Finish.
Related Questions
What if I Can’t Find or Start the Inbox Repair Tool?
You may not be able to find Scanpst.exe
if MS Office is corrupted. This can be fixed by repairing MS Office through the control panel. If that doesn’t help either, you might have to try a complete uninstall.
- Navigate to Control Panel > Programs and Features.
- Right click on MS Office from the list and Select Modify/Repair/Change.
- Follow the steps on the screen to complete the procedure.
- Restart your PC and see if you can locate
Scanpst.exe
now.
If you are still unable to locate Scanpst.exe
, you’ll need to completely remove MS Office and reinstall it later. To do so,
- Navigate to Control Panel > Programs and Features once again.
- Select MS Office from the list and click on Uninstall.
- Follow the steps shown on the screen to remove MS Office from your PC.
- Restart your PC and reinstall MS Office. You can find the latest official version at Microsoft Downloads.
Where Is My .pst File Located?
By default, your PST file will be stored at: C:\Users\YourUsernameHere\Documents\OutlookFiles\Outlook.pst
If you’re using Outlook 2007 or an older version, this may slightly differ. In most versions, you can go to File > Account Settings > Data File Management and note the file path from there. Finally, you can also type .pst into the search bar and use Windows Search to locate any PST files.
How Do I Make a Backup Copy of My .pst File?
Your PST file will be something named along the lines of ‘Outlook Data File’ or ‘Personal Folder’ by default. This may differ if you have changed it before. If you want to backup multiple folders, you’ll have to do so separately for each one. Close Outlook before you start the backup process.
- Press Windows + R to launch Run.
- Type control and press Enter to open the Control Panel.
- Press the Mail icon.
- Click on Show Profiles.
- Select your profile and click on Properties.
- Switch to the Data Files tab.
- Select your PST folder and note its filename and location.
- Optional: Go to Settings > Compact Now if you want to reduce the size of the .pst file. Otherwise, skip this step.
- Press Close on the two windows to close the mail setup window.
- Navigate to the location from Step 7 just above and locate the file.
- Copy the file to another location and save it as a backup.
We recommend using Cloud Storage or a removable USB Drive / SSD as these are best for storing backups.
Does Scanpst.exe Only Repair PST Files? Can I Use It for Something Else?
Scanpst.exe
is commonly used to repair Personal Storage Table (PST) files but it can also be used to repair Offline Storage Table (OST) files. Files with .ost extension basically store data offline and make it possible to sync with Exchange Server once you have an internet connection.
Can I Use Third-party Recovery Software to Repair My PST File?
While you can use third-party recovery software to repair your PST files, we recommend that you try repairing with Scanpst.exe
first. The Inbox Repair Tool will successfully recover your data in most cases. If it doesn’t work after multiple tries, then you should give third-party recovery software a try.