Tech News Today
  • Hardware
    • Motherboards
    • CPUs
    • Graphic Cards
    • RAM
    • SSDs
    • Computer Cases
    • Monitors
    • Peripherals
    • Power Supply Unit
    • PC Builds
    • Computer Tips
  • Software
  • Operating System
    • Windows
    • Mac
    • Linux
  • Gaming
  • Mobile
  • Console
  • More
    • Internet
    • Networking
    • Security
    • Buyer’s Guide
    • Gadgets
    • Laptops
    • Reviews
    • How To
    • News
Facebook Twitter Instagram
Tech News Today
  • Hardware
    • Motherboards
    • CPUs
    • Graphic Cards
    • RAM
    • SSDs
    • Computer Cases
    • Monitors
    • Peripherals
    • Power Supply Unit
    • PC Builds
    • Computer Tips
  • Software
  • Operating System
    • Windows
    • Mac
    • Linux
  • Gaming
  • Mobile
  • Console
  • More
    • Internet
    • Networking
    • Security
    • Buyer’s Guide
    • Gadgets
    • Laptops
    • Reviews
    • How To
    • News
Tech News Today
Home»Windows»How to Use Snip & Sketch to Take Screenshots in Windows

How to Use Snip & Sketch to Take Screenshots in Windows

Abhishek SilwalBy Abhishek SilwalDecember 23, 2022
snip-and-sketch-shortcut

Microsoft introduced the screenshot tool, Snip & Sketch an improvement to Snipping Tool in Windows 10. You can use it to capture and edit screenshots with various options. In this article, we provide how you can perform all possible actions with this app.

Note: On Windows 11, Microsoft removed the previous program and renamed Snip & Sketch as Snipping Tool. So, for this system, you need to use the Snipping Tool instead.

Table of Contents

  • Opening Snip & Sketch
  • Taking Screenshots
  • Edit Screenshots with Snip & Sketch
    • Touch Write
    • Annotate
    • Erase
    • Ruler or Protractor
    • Crop
    • Magnify
    • Other Options

Opening Snip & Sketch

The usual method of opening Snip & Sketch is from the Start Menu. You can also search for it on the search bar.

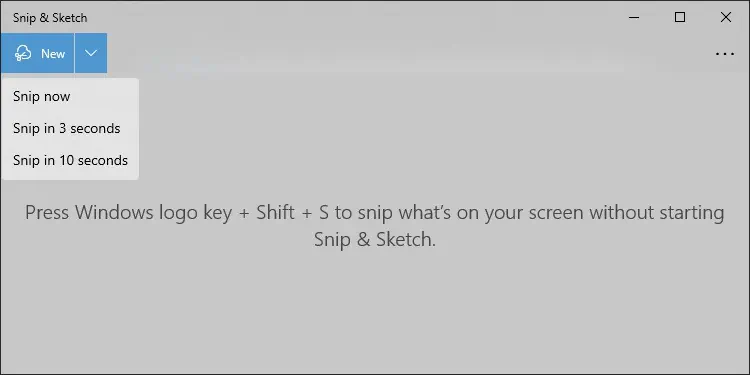
Clicking New on the app takes you to the snipping screen, where you can take your screenshots. The downwards arrow icon also shows the options to take a snip now or after 3 or 10 seconds.
snip sketch new

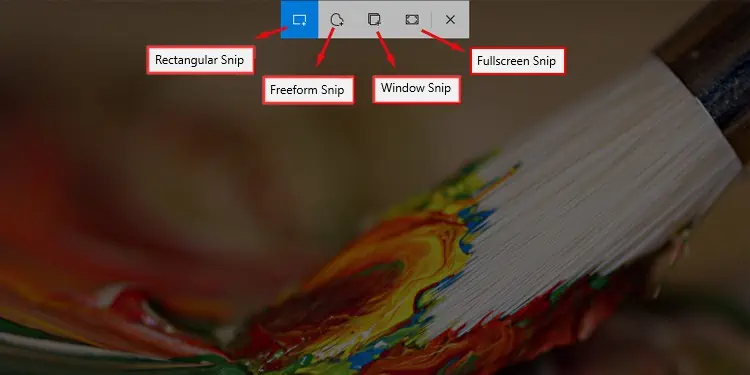
When you get to the snipping screen, the screen dims, and you can see the snipping toolbar on the top of your screen.

There are also a few shortcuts you can use to access the snipping screen directly without having to open the app, such as:

  • Pressing Win + Shift + S.
  • Using the Run command explorer ms-screenclip:
  • Clicking the Notification icon and selecting Screen snip or Expand > Screen Snip.
  • Pressing PrtScr or Print Screen button after enabling the Print Screen shortcut from Settings > Ease of Access/Accessibility > Keyboard.
Note: If you use such shortcuts, taking a screenshot only gives a notification. You need to click the notification to edit the image. To enable notifications, go to Settings > System > Notifications & actions and toggle on Snip & Sketch.

Taking Screenshots

snip modes

Snip & Sketch offers four screenshot modes. You can select the mode from the toolbar on the snipping screen and take your screenshots accordingly.

  • Rectangular Snip: This mode captures the image of a custom rectangular area. You need to click and drag your mouse to select the area along the diagonal of the rectangle.
  • Freeform Snip: Freeform snip captures the image of a custom irregular zone. You need to click and drag your mouse over the perimeter of the screenshot boundary.
  • Window Snip: In this mode, you can capture a single window. Click inside the window to take its screenshot.
  • Full-screen Snip: Fullscreen snip captures the entire screen image. Click anywhere except the toolbar to take the screenshot.

Edit Screenshots with Snip & Sketch

After taking a screenshot or clicking on the notification, Snip & Sketch takes you to the editing window. Here are the editing options that this program offers:

Touch Write

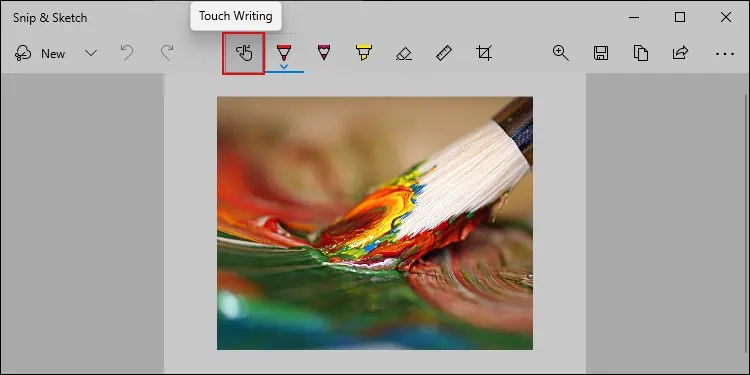
Touch Writing allows you to edit by using the touchscreen. You can press Alt + T or the hand icon to toggle Touch Writing.
touch writing

Annotate

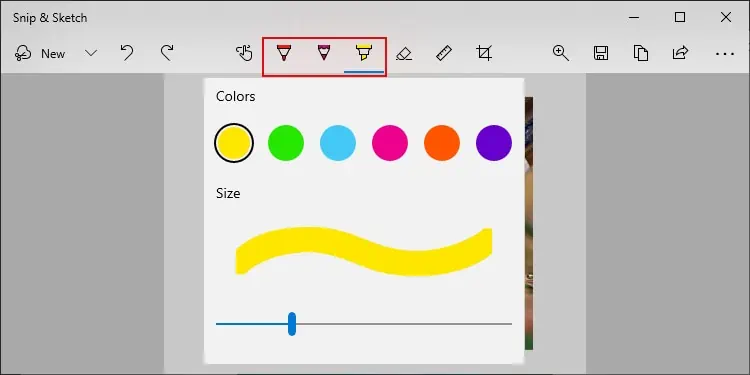
It is the option to write or mark on your screenshot. There are three tools you can use to annotate the image.

  • Ballpoint Pen (Alt + B)
  • Pencil (Alt + I)
  • Highlighter (Alt + H)

You can choose the color and size of the tools by right-clicking on the annotate icons.
annotate

Erase

The Eraser deletes the annotations you have made. You can use the corresponding icon or Alt + E shortcut to pick this tool. Right-clicking on the icon gives the option Erase all ink, which removes all annotations on the image.

Ruler or Protractor

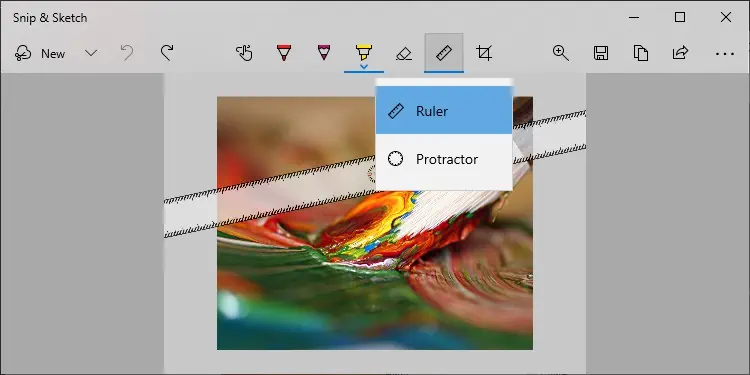
Clicking the Ruler or the protractor icon shows the corresponding tool on the window. You can select which tool to use by right-clicking on the icon.
ruler

You can use these tools to draw straight or circular lines using the annotation tools. Also, clicking on Ruler or Protractor again removes the tool.

To move the objects around the screenshot, you need to click and drag them. You can also change the Protractor’s size and Ruler’s orientation by using the mouse scroll wheel.

Note: You can increase the scroll sensitivity from your Settings. Go inside Settings > Devices > Mouse. The slider below Choose how many lines to scroll each time sets the sensitivity.

Crop

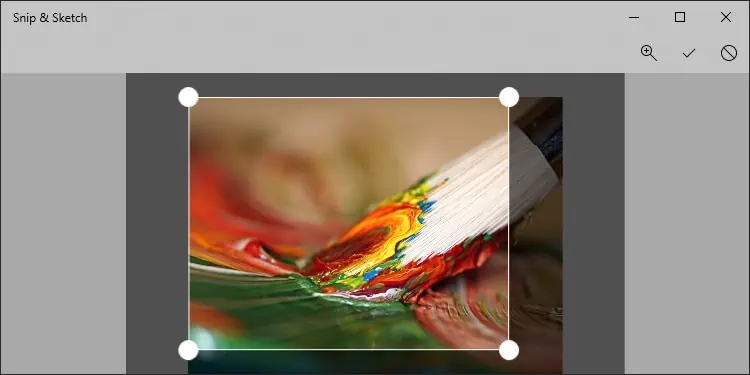
You can open the crop screen on the screenshot by pressing Alt + R or clicking on the Crop icon. You need to drag the corner circles to set the crop size. You can also click inside the crop area and drag it around to move it. Then press Enter to crop the image.
Crop

Magnify

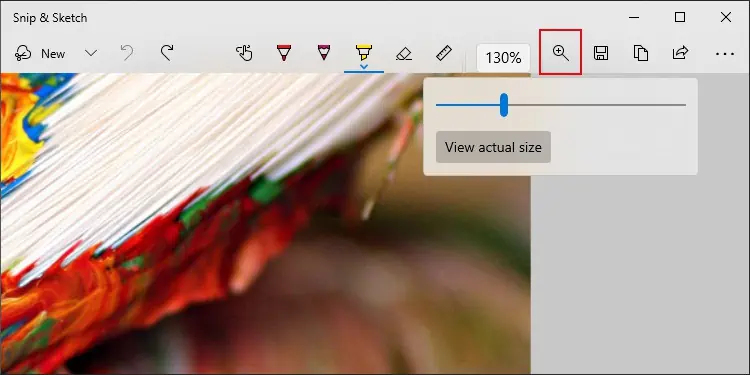
To magnify the screenshot, click on the Zoom icon or press the Alt + Z hotkey, and drag the slider. You can use either the scroll on the mouse or the vertical slider to navigate through the zoomed image vertically. However, to move it horizontally, you can only drag the horizontal slider.
zoom snip sketch

Other Options

There are also some other things you can do on the Snip and Sketch edit window, such as:

  • Undo (Ctrl + Z) and Redo (Ctrl + Y) modifications.
  • Save (Ctrl + S), Copy (Ctrl + C) or Share (Alt + A) the screenshot.
  • Open (Ctrl + O) any image to edit with Snip & Sketch.
  • Print (Ctrl + P) the image.

You can also access its Settings from the triple-dot icon. You can set the relevant settings to make using Snip & Sketch more convenient for you.
how-to
Abhishek Silwal
  • LinkedIn

Abhishek Silwal is an Electronics Engineer and a technical writer at TechNewsToday. He specializes in troubleshooting a wide range of computer-related issues. His educational background in Electronics Engineering has given him a solid foundation in understanding of computers. He is also proficient in several programming languages and has worked on various robotics projects. Even in his early days, he used to tinker with various computer components, both hardware, and software, to satiate his curiosity. This experience has given him a breadth of experience that goes beyond his educational qualification. Abhishek has been writing articles on dealing with varieties of technical issues and performing specific tasks, especially on a Windows machine. He strives to create comprehensive guides on fixing many system and hardware issues and help others solve their problems. You can contact him at abhisheksilwal@technewtoday.com

Related Posts

computer suddenly slow

Why is My Computer Suddenly Slow? 11 Ways to Fix It

March 31, 2023
scheduled task reboot

How to Create a Reboot Scheduled Task in Windows

March 31, 2023
slow computer startup

14 Ways to Fix Slow Computer Startup

March 26, 2023
boot loop

14 Ways to Fix Windows Boot Loop

March 19, 2023
how to change windows startup sound

How to Change Windows Startup Sound

March 17, 2023
scan disk windows 10

How to Scan Disk Windows

March 16, 2023
Add A Comment

Leave A Reply Cancel Reply

Latest Posts
what-does-collate-mean-on-a-printer

What Does Collate Mean on a Printer?

March 31, 2023
usb-vs-pcie-wifi

USB Vs PCIe Wi-Fi—Which One is Better?

March 31, 2023
how often to replace laptop

How Often Should You Replace a Laptop

March 29, 2023
You may also like
computer suddenly slow

Why is My Computer Suddenly Slow? 11 Ways to Fix It

March 31, 2023
HTTP-Error-431

How to Fix HTTP Error 431

March 31, 2023
scheduled task reboot

How to Create a Reboot Scheduled Task in Windows

March 31, 2023
Recommended
Cookie Clicker Garden Guide

Cookie Clicker Garden Guide to Unlocking Every Seed

September 26, 2021
monitor no signal

Computer Turns On But Monitor Says No Signal (9 Ways To Fix)

November 10, 2022
Facebook Twitter Pinterest
  • Home
  • About Us
  • Our Team
  • Editorial Guidelines
  • Privacy Policy
  • Affiliate Disclosure
© 2023 TechNewsToday, editor@technewstoday.com | Tech Central Pvt. Ltd.

Type above and press Enter to search. Press Esc to cancel.