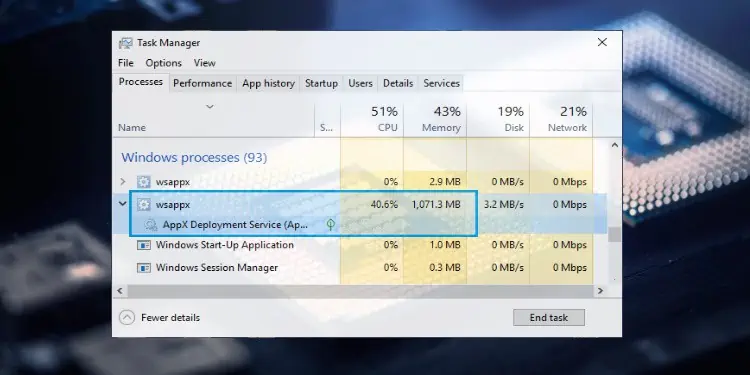
Wsappx is a Windows service process that handles the Microsoft Store. Normally it is always running in the background with minimal system resource utilization. However, when installing, updating, or removing an app from the Microsoft Store, it can have a high CPU and memory utilization.
When you are not directly engaging with the Microsoft Store, the Wsappx process should not be using any of your CPU or memory. If Wsappx is interfering with your device usage by high CPU utilization, we might have a fix for you. Please, continue reading.
What is the Role of Wsappx in Windows?
Traditionally, when you had to install an application or a program into windows, they came with their own individual installer. This changes with the apps installed from the Microsoft store where apps you selected are automatically handled by the store itself. The store handles the installation, updates, and removal of apps by using Wsappx process.
Thus. like mentioned above already, Wsappx is the service process in Windows that handles the Microsoft Store. To be more accurate, it populates two sub-processes – Client License Service (ClipSVC), which handles licensing and piracy protection for the store apps, and AppX Deployment Service (AppXSVC), which deploys apps.
When these two sub-processes are active and running, you will see Wsappx process usage increase in the task manager. If either of these sub-processes are disabled, apps will not “behave correctly,” according to Microsoft.
How to Fix Wsappx High CPU Usage?
Wsappx high CPU usage can be caused because of a few different reasons. Below, we present to you some of the different ideas that you can try as a fix of Wsappx high CPU usage.
Run a Virus Scan
If the Wsappx process has a high CPU utilization even when you are not engaging with the Microsoft store, the process may have been hijacked by a virus or malware. You can run an anti-virus scan to ensure this is not the case or to fix it if it is indeed the case.
- Press Win + R and type in
windowsdefender:to launch Windows Security. - Click on Virus & threat protection tile.
- Click on Quick scan.

- Scroll to Virus & threat protection updates and click on Protection updates.
- Click on Check for updates.
- Wait while Windows checks for updates and install any available updates.
Uninstall a Recently Installed App
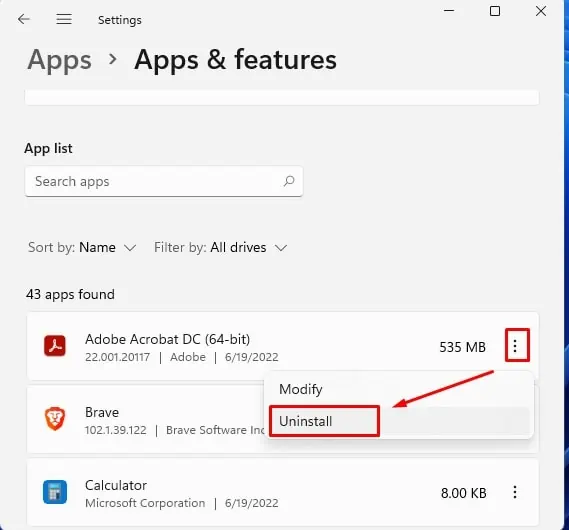
Sometimes the last application that you installed could be the culprit. To check if this is the case, try uninstalling that app.
- Press Win + I to launch Settings.
- Select Apps > Apps & features.
- Select the most recent app you installed, then click Uninstall.

Update Windows
Nobody knows why (no guarantee that this is a 100% accurate statement), but sometimes updating Windows can magically fix problems that you are having with … Windows. Wsappx is, indeed, part of Windows so trying Windows update is a worthwhile venture.
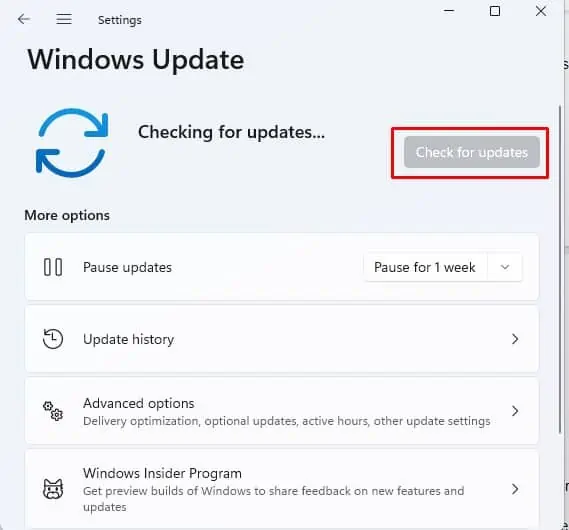
- Press Win + I and click on Windows Update tab on the left.
- Click Check for updates.

- Let Windows scan for any available updates, and install if any are found.
Check If Any Driver Needs Updating
Sometimes, Windows keeps attempting a driver update in the background, which can cause Wsappx to have a high CPU utilization. Although there is no direct relation between driver update and Wsappx, some users have found that manually updating device drivers can solve the problem. Thus, check if any drivers need update and manually update the driver yourself.
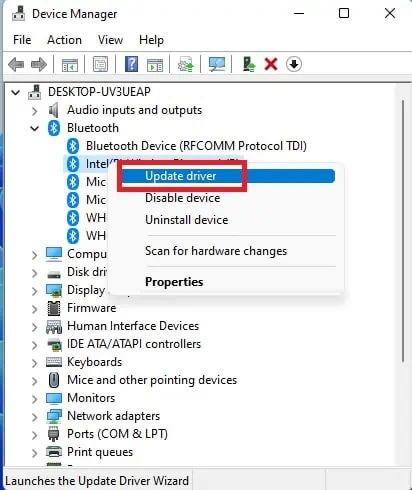
- Press Win + R and type in devmgmt.msc.
- Select the device that needs driver update, right-click on it and click Update.

- Select “Search automatically for drivers” if you want Windows to look for the best available drivers; select “Browse my computer for drivers” if you have an updated driver stored in your hard drive.
Disable Windows Store
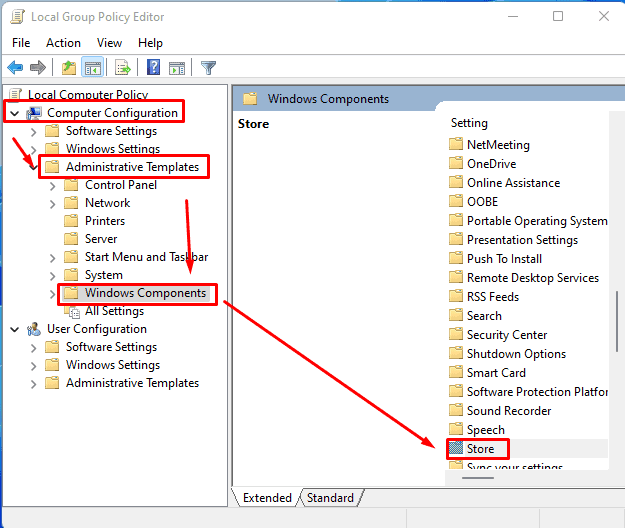
If your CPU usage is skyrocketing due to Wsappx process, you can try disabling the Microsoft Store. There are two methods of going about doing this. You could disable the store from the Local Group Policy Editor.
- Press Win + R and type in
gpedit.msc. - Select Computer Configuration > Administrative Templates
- Double click Windows Components then double click Store.

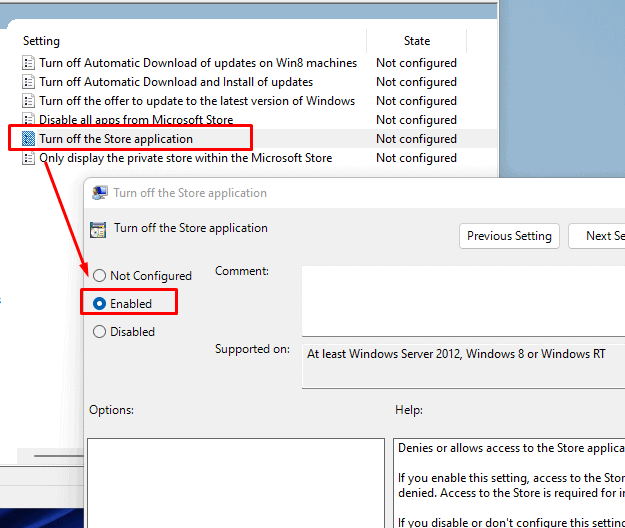
- Click on Turn off the store application and click Enabled. Click OK.

Disable Automatic Store App Updates
If Microsoft Store is set to update apps automatically, this can sometimes cause Wsappx process to load and utilize resources, including the CPU. If at the time, you are using a CPU-intensive application, your machine could stutter or lag. Therefore, disable automatic store app updates to avoid this issue.
- Press Start and type in Microsoft store. Select Microsoft Store.
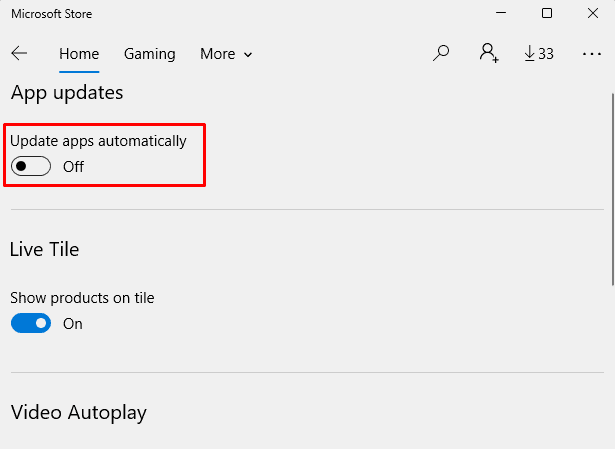
- Click on the ellipses button below the close button at the top-right corner and click on Settings.

- Toggle “Update apps automatically” button to Off.

This disables automatic app updates in the future and you will have to check and manually apply any app updates periodically. You can do so by going to Settings > Downloads and updates, and clicking on Get updates.
Disable Superfetch (ServiceHost: SysMain)
Superfetch is a feature of Windows that runs in the background and analyses RAM usage patterns of various applications. It learns what apps you often run then, over time, it marks these apps as “frequently used.” The point of superfetch is that once apps are marked as frequently used, they are loaded into unused portions of the memory quietly before the user has launched them, thus shortening the loading time significantly and giving the user a snappy experience.
In recent Windows versions, superfetch appears in the Task Manager as “ServiceHost: SysMain.” Some users have found that disabling superfetch reduced Wsappx CPU usage. You could also try and see if this helps with your problem. Please follow the steps below to disable Superfetch.
- Press Win + R and type in
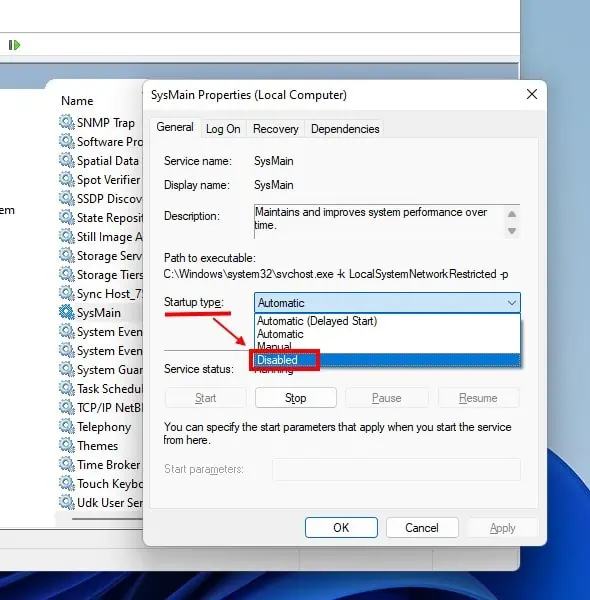
services.msc. - Scroll down to SysMain, right-click on it and select Properties.
- Click on the drop-down menu on Startup type and select Disabled.

- Restart the computer.
Frequently Asked Questions
Is Wsappx a Virus?
No, Wsappx is not a virus. It is a genuine, honest-to-god, hardworking Windows Service process. As is the case with other process, it is, however, possible for Wsappx process to be hijacked by a virus or a malware.
Can I End Wsappx?
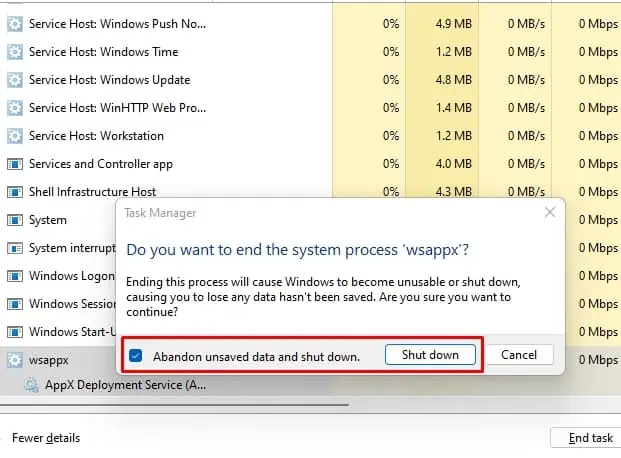
You can end the process from the Task Manager.
- Press Ctrl + Shift + Esc to launch the Task Manager.
- Scroll to Wsappx under Processes, right-click on it and select End Task.

- You will get a pop-up warning. Check on “Abandon unsaved data and shut down,” and click Shut down.
Is Wsappx Necessary?
Since Wsappx managed the Microsoft Store, it is essential for you to install, update, and remove any applications from the store. If it’s bothering you with constant high CPU and disk usages, you can either disable automatic apps update, or uninstall rarely used applications.
How Do I Turn Off Appx?
If you turn off AppXSvc, store applications will not be deployed and may not function properly. However, if you still want to go ahead and disable AppXSvc, you will need to edit the registry. Here’s how you’d do it:
- Press Win + R and type in regedit.
- Navigate to:
HKEY_LOCAL_MACHINE\SYSTEM\ControlSet001\Services\AppXSvc - On the right, double-click on Start dword and change it’s Value data to 4.

If you want to re-enable AppXSvc, change this value back to 3.

