Renaming files one by one might not take much time if there are only a few files. However, if you need to rename multiple miles, you definitely want to batch or bulk rename the files.
So we have created this article to help provide you with different methods to rename your files in bulk. They provide different options, so we advise you to go through all of them and pick one according to your preference.
Why Batch Rename Files?
There are many reasons why you may want to batch rename files, such as:
- Many files available on the internet have generic or indistinguishable filenames.
- The default filenames of photos or videos captured by cameras use the date and time to create names, which you may want to change.
- Organizing your files, for instance, renaming music files to listen to them in the order you prefer.
- Uploading or transferring multiple files on a platform with a different naming convention.
How to Batch Rename Files in Windows
There are a few ways to batch rename files in Windows. You can either use the limited GUI rename ability or use the Command-line Interfaces for more options. There are dedicated naming applications available on the internet, along with Microsoft’s own PowerRename utility.
People usually want to rename files in the following manner:
- Replacing or removing parts of a file.
- Changing extensions.
- Adding a sequence of numbers to the file.
- Changing case or capitalization.
- Naming files based on input from a text file.
So, we have explained how you can perform these tasks in detail in the following subsections:
Using File Explorer’s Rename Feature
The first method to batch rename files in Windows is the one most users are familiar with, i.e., using the File Explorer’s rename feature.
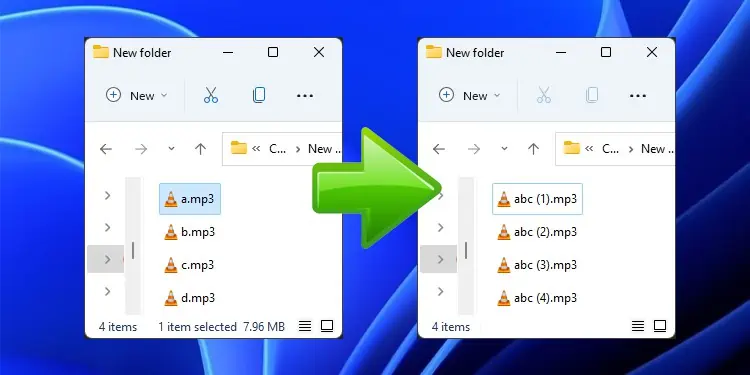
However, keep in mind that it provides very limited options on the names you can set. To explain more, all the renamed files will have the same file name along with ascending numbers inside parenthesis.
To rename the files,
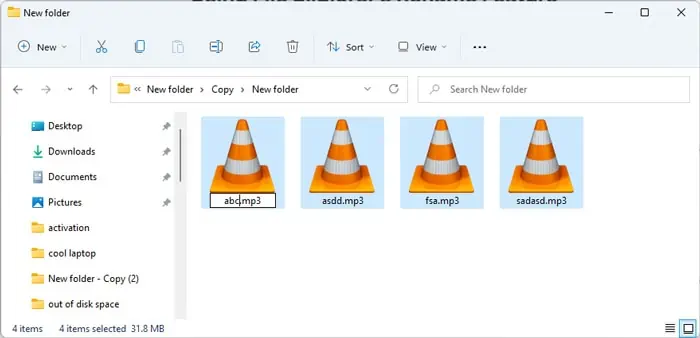
- Make sure all the files you want to rename are in the necessary order.
- Select all the files and right-click on the first item.
- Click Rename or Show more options > Rename.
- Type the new filename and press Enter.

Using PowerRename Feature of PowerToys
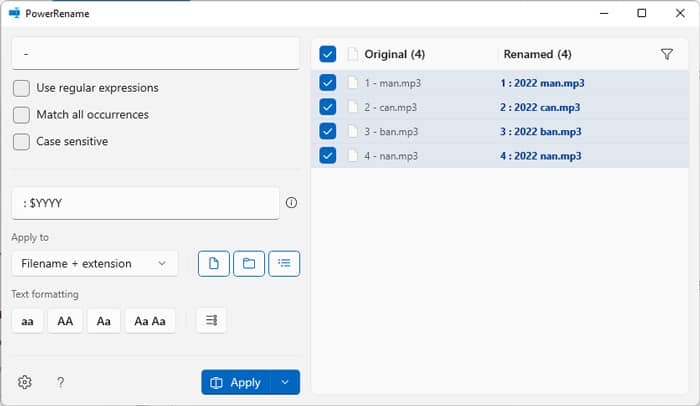
PowerToys is a Microsoft Developed Tool that you can use to perform varieties of extended functions on your Windows system. One of the utilities included in the PowerToys package is the PowerRename utility.
It helps bulk rename your files while providing advanced options for searching and replacing the name parts.
To use it to batch rename your file,
- Download and install PowerToys from Microsoft’s Platform.
- Open the File Explorer and navigate to the files you want to rename.
- Select all such files and choose PowerRename or Show more options > PowerRename.
- Select the options you want and click Apply.

There are many options you can use with this utility, such as:
- Searching and replacing characters on the filename.
- Changing the case style of the names.
- Adding sequential numbers to the end of the names.
- Adding date and time information in a different format to the names. (Click on the ‘i’ icon next to the Replace with the textbox)
- By enabling Use regular expressions, you can use specific wildcards on the Search for the textbox (click on the ‘i’ icon next to this box)
Using Command Prompt
You can also use the Command Prompt command ren or rename to batch rename files in Windows. The syntax for the command is, ren [<drive>:][<path>]<filename1> <filename2> where, the parameters in the brackets ([ ]) are optional.
There are more than one ways to rename files using this command. Moreover, you can also use such commands as a batch script for future uses.
First, open the Command Prompt and change your directory to the folder whose files you wish to rename. To do so,
- Open Run and enter
cmdto open Command Prompt. - Enter
cd /d <full path of the folder>while replacing the full path.
You can also open the folder in the File explorer and enter cmd on its address bar to open the Command Prompt directly at the working path.
Then, apply the steps below depending on how you want to rename the files.
Rename Extension
- To rename an extension, you can use the following command:
ren *.<ext 1> *.<ext 2>
You can replace <ext 1> and <ext 2> as per your need. For example,ren *.png *.jpg
- Similarly, to remove an extension. the command is
ren *.<ext> * - And, to add an extension, use ren
*. *.<ext>
Removing the Initial Characters
Many users think it’s a bug, however, you can remove the initial characters from the filenames in the following manner:
- The command is
ren “*.*” “<slashes>*.*”
For example, to remove the first three characters, the command isren “*.*” “///*.*” - Keep in mind that both the filenames must be enclosed in quotes.
- However, it doesn’t remove the ‘.’ icon and the truncating process stops after the point is reached no matter how many forward slashes you use. For example,
ren “*.*” “///////*.*”renamesabc.b.c.txtto.b.c.txt
Removing Parts of the Filename
It is possible to remove parts of a filename if the parts are separated by delimiters, such as space, tab, or a non-alphanumeric symbol. It helps you rename some of the portions separated by the delimiters as the new name.
In the filename abc_def xyz.txt, the underscore ‘_’, the space ‘ ’ and the point ‘.’ are the delimiters.
However, you can’t use the parts of the filename that are not separated by such delimiters as the new filename.
Let’s take an example of removing the parts on the filenames where the delimiter is an underscore “_”.
If there’s only one underscore, you can remove everything before the underscore by using the command below:
for /f "tokens=1,2,* delims=_" %F in ('dir /b "*_*"') do ren "%F_%G" "%G"
where,
- delims specifies the delimiter for this process, in this case, the underscore “_”.
- tokens specify which parts of the filename to assign new variables.
- In this case, where
tokens=1,2,*and the starting variable is %F, the command assigns the two parts of the filename to variables %F and %G respectively. - You can use other variables in place of F as well.
If there are multiple underscores, such as a_b_c.txt, to remove everything except the parts after the last underscore,
The command is,
for /f "tokens=1,2,3,* delims=_" %F in ('dir /b "*_*_*"') do ren "%F_%G_%H" "%H"
Here, tokens 1, 2, and 3 take the three portions of the filename separated by the two _ and set them to %F, %G, and %H in order. Then, it renames %F_%G_%H to %H only.
Similarly, you can rename it to other parts of the filenames, such as %F or %G (second part) by replacing the last part of the command. However, this removes the extension as well.
You can also specify multiple delimiters. For example, if we want to batch rename files in the form of a_b-c.txt to a.txt, we can enter
for /f "tokens=1,2,3,4,* delims=_-." %F in ('dir /b "*_*-*.*"') do ren "%F_%G-%H.%I" "%F.%I"
where %F, %G, %H, %I take a,b,c and txt respectively.
However, you should keep in mind that you can’t use the same name for multiple files. So if this method results in renaming more than one file to the same name, the command loop stops immediately.
Also, if you want to use the for-loop in a batch script, you need to replace the ‘%’ sign with two % signs. For instance, you need to replace the variable %F with %%F. For more information on using for-loop in Command Prompt, refer to the for Microsoft Documentation.
Appending Characters at Start or End
If you think that using the ‘*’ or the ‘?’ wildcards allows appending characters to the name, you would be incorrect. For instance, using ren *.mp3 ab*.mp3 does not rename file.mp3 to abfile.mo3, but to able.mp3. So you need a different method.
This method uses a similar command syntax as the above method. Usually, you can use it to append some characters at the start or the end of the filename. However, if there are other delimiters in the filename, you can also add characters to the start or the end of these delimiters.
Let’s use a simple example,
- To rename
a.txttofile a name.txt, the command isfor /f "tokens=1,2,* delims=." %F in ('dir /b "*.*"') do ren "%F.%G" "file %F name.%G"
- You can similarly add characters at only the start or only the end.
Together with the above method (using part of a filename), appending characters to the name offers high customization for batch renaming files in Windows.
Appending Sequential Numbers
The above method only allows adding the same sets of characters to the filenames. If you want to append sequential numbers to the files, you need to use a batch file. Follow the steps below to do so,
- Open Run and enter
notepadto open Notepad. - Enter the script given below while replacing the components as we have directed.
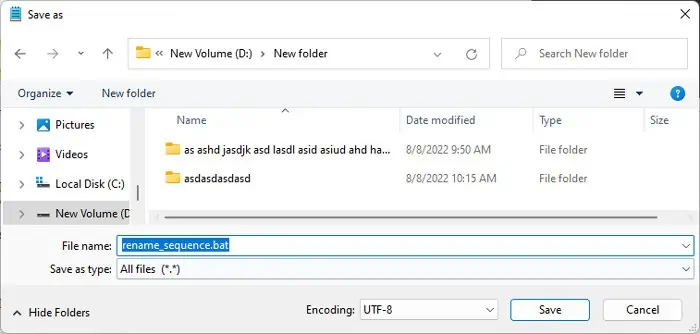
- Press Ctrl + Shift + S to Save As the file with different extension.
- Set the Save as type to All files and File name to any name you want with a
.batextension, e.g,rename_sequence.bat
- Move the batch file to the location of the files you wish to rename.
- Run the script by double-clicking on it.
setlocal enabledelayedexpansion
set /a Number=1

for /r %%F in (*.txt) do (
    ren "%%F" "%%~nF !Number!.txt"
    set /a Number+=1
)
endlocal
Here,
- You need to replace
.txtwith the extension of the files you wish to rename. Don’t use the wildcard * for the extension as you need to place the batch file in the same folder. So, if you use the wildcard, the command also includes the batch file while renaming the files. - The Number variable works as a counter starting from 1 that you append to the file. You can replace it with the starting number of your choice.
- The
%%~nF !Number!adds a space and the sequential number to the files. You can place!Number!anywhere in the new filename as your preference. %%~nFexpands %%F to the filename without the path and extension. If you just use,%%F, it will include the extension as well as the path of the files resulting in an error.- The command
setlocal enabledelayedexpansionallows using multiple commands on the for-loop. If you don’t enter it, the value of Number won’t change in the successive executions.
Together with the previous methods, you can take out some parts of the filename and add numbers to it for easier recognition and organization. For example, 11001.picfile.2022198.1211.png and 11001.picfile.2022198.1215.png to picfile 1.png and picfile 2.png
Moreover, if you want to use numbers with 0 at the start like 01, 02, 03, etc., you need to add conditions on the script, such as:
setlocal enabledelayedexpansion
set /a Number=1

for /r %%F in (*.txt) do (
    if !Number! lss 10 (
        ren "%%F" "%%~nF 0!Number!.txt"
    ) else (
        ren "%%F" "%%~nF !Number!.txt"
    )
    set /a Number+=1
)
endlocal
Similarly, for 001, 002, 003, etc., number format, use the else if branch to append 00 if less than 10 and append 0 if less than 100.
Taking Input From Text File
It is also possible to batch rename files by taking inputs from a text file. You also need to use a batch script for this method.
- First, create a text file with the new filenames in each line. In our example, the file is
filename.txt. - Make sure the files you wish to rename are in the correct order. Arbitrarily rename them if they aren’t.
- Use the steps from the above method to make the
.batfile with the script below (after making changes as necessary) and run it.
setlocal EnableDelayedExpansion

< filename.txt (
    for %%F in (*.mp3) do (
        set /P name=
        ren "%%F" "!name!.mp3"
    )
)
endlocal- Here, the
filename.txtincludes the name for all the files and you can change the extension.mp3to the one you need. - Also, if you are renaming
.txtfiles, you need to add a condition to avoid renaming thefilename.txtfile. The complete script is,
setlocal EnableDelayedExpansion

< filename.txt (
    for %%F in (*.txt) do (
        if NOT %%F==filename.txt (
            set /P name=
            ren "%%F" "!name!.txt"
        )
    )
)
endlocal
Convert to Uppercase or Lowercase
It is very easy to convert all letters to lowercase. The command is:
for /f "Tokens=*" %f in ('dir /l /b /a-d') do (ren "%f" "%f"),
where, the /l flag gives the directory’s files in lowercase, causing the ren command to use lowercase for all files. Windows Command line is not case-sensitive so it thinks both uppercase and lowercase are the same characters, making it possible to use this replacement.
However, the dir command does not have any flags for providing the filenames in uppercase. So you need to use the following batch script using the steps in the Adding Sequential Numbers method:
setlocal enableDelayedExpansion

for %%F in (*.mp3) do (
   set "name=%%~nF"
   for %%I in (A B C D E F G H I J K L M N O P Q R S T U V W X Y Z) do (
      set "name=!name:%%I=%%I!"
   )
    ren "%%f" "!name!%%~xF" >nul 2>&
)
endlocal
You should change .mp3 to the extension of your files.
This script doesn’t change the case of the extensions. However, if you also want to change the extensions to uppercase, replace:
name=%%~nFwithname=%%F!name!%%~xFwith!name!
Wildcard Behavior in Rename Command
As we mentioned earlier, the * and ? wildcards do not behave as you would normally think if you use them on both the source and the destination filenames
A superuser forum user dbenham has explained this behavior in detail in the forum. We recommend you check the forum page to get the complete information.
Using Windows PowerShell
Windows PowerShell is a very powerful Command-line Interface that provides more options and functionalities.
Similar to Command Prompt, first, type powershell on the address bar of the folder whose files you need to rename and press Enter. Or you can open Windows PowerShell in any other way and change to the directory.
After that, apply the methods below depending on how you want to batch rename the files.
Rename Extension
- The Windows PowerShell command to batch rename extension is:
Get-ChildItem *.<ext 1> | Rename-Item -NewName { $_.Name -replace ".<ext 1>",".<ext 2>" } - Similarly, you can put just
"."in place of".<ext 2>"to remove the extension. - To add an extension, use the command
Get-ChildItem *.<ext> | Rename-Item -NewName { $_.Name + ".<ext>" }
You can use the End-of-file (eof) character $ after the old extension to only allow the last instance of the extension to change. For example,
Get-ChildItem *.jpg | Rename-Item -NewName { $_.Name -replace ".jpg",".png" }changesa.jpg.jpgtoa.png.pngGet-ChildItem *.jpg | Rename-Item -NewName { $_.Name -replace ".jpg$",".png" }changesa.jpg.jpgtoa.jpg.png
There’s also another way to rename the extension, which uses the System.IO class. The syntax for this method is:
Get-ChildItem *.<old ext> | Rename-Item -NewName { [io.path]::ChangeExtension($_.Name, ".<new ext>")
You can also use the -Recurse flag for Get-ChildItem to allow the command to work on all the files in the working directory’s subfolders.
Removing or Replacing Specific Characters
Unlike Command Prompt, in PowerShell, you normally use the character replacing operator -replace to rename files. So, you can directly replace particular sets of adjacent characters with a new one or set the replacement to an empty value to remove the characters.
For example, to rename file 01.mp3 to Music01.mp3, you can use the command:
Get-ChildItem *.mp3 | Rename-Item -NewName { $_.Name -replace "file ","Music" }
Removing or Replacing Characters at Any Position
To replace characters at any position in Windows PowerShell, you can use the command:
Get-ChildItem *.<ext> | Rename-Item -NewName { $_.Name.SubString(<StartIndex>,<Length of Characters>) }
while replacing the following portions:
- <StartIndex> with the position you want to start for the new filename.
- <Length of Characters> with the length you want for the new filename.
For instance, Get-ChildItem *.mp3 | Rename-Item -NewName { $_.Name.substring(2,$_.Name.length-5) } renames abcdefgh.mp3 to cdefgh
A filename’s first position is zero, so the character of the new name starts from the third character. And the length is determined from the final position, which is 11 including the extension. So you are taking 11-5=6 characters to form the new name.
You need to take note of the extension length in this method. You can directly add the extension in the command to avoid having to change it again. To do so, the command for the example would be:
Get-ChildItem *.mp3 | Rename-Item -NewName { $_.Name.substring(2,$_.Name.length-5) + “.mp3” }
Appending Characters at the Start or the End
Appending the characters is more convenient with PowerShell than Command Prompt, specifically because you can use the ‘+’ operator to add the names and $_.Name value to get the original filename.
- The command is something like the following:
Get-ChildItem *.<ext> | Rename-Item -NewName { “Starting Appending Part” + $_.Name + “Ending Appending Part" } - However, to append on the end part of the name excluding the extension, you need to use the
$_.BaseNameand$_.Extensionvariables in the following manner:Get-ChildItem *.<ext> | Rename-Item -NewName { “Starting Appending Part” + $_.BaseName + “Ending Appending Part" + $_.Extension }
Appending Sequential Numbers
Similar to the above methods, it is much easier to append sequential numbers on PowerShell. Here’s how you can do so:
- On PowerShell, type
$i = 1and press Enter to set the counter value. You can change it to the number you want the sequence to start at. - Then, enter
Get-ChildItem *.<ext> | Foreach-Object {Rename-Item $_ -NewName ($_.BaseName + “ {0:D3}” + $_.Extension ) }
You can replace D3 with how many digits you want. For instance, {0:D3} appends the three-digit numbers: 001, 002, and so on.
You can also place the number anywhere on the name.
Taking Input From Text File
Taking input from a text file is slightly more complex, so the best way to do so using this Command Line is by creating a PowerShell script. Here’s how you can do so:
- Open Run and enter
notepad. - Copy and Paste the script below while changing the relevant components as we have directed.
- Press Ctrl + Shift + S.
- Set the Save as type to All files and File name to any name you want with a
.ps1extension, e.g,rename_from_text.ps1 - Move the batch file to the location of the files you wish to rename.
- Create another text file where each lines contains the new name for the files in order. Save it as a text file (
.txt) on the same location. In the example, we have usedfilename.txt - Run the PowerShell script by right-clicking on it and selecting Run with PowerShell.
$FilesToChange = Get-ChildItem *.mp3
$NameFile = Get-Content filename.txt
if($FilesToChange.FullName.Count -eq $NameFile.Count)
{
    for($i=0; $i -lt $NameFile.Count; $i++)
    {
        Rename-Item -Path $FilesToChange.FullName[$i] -NewName ($NameFile[$i]+".mp3")
    }
}Set-ExecutionPolicy -Scope CurrentUser -ExecutionPolicy RemoteSignedYou need to change .mp3 to the extension of your files and filename.txt to the text file with the list.
If you want to convert the names of text files, you need to add a condition to the script. The complete script is:
$FilesToChange = Get-ChildItem *.mp3
$NameFile = Get-Content filename.txt
$j=0
if($FilesToChange.FullName.Count -eq $NameFile.Count)
{
    for($i=0; $i -lt $NameFile.Count; $i++)
    {
        if ($FilesToChange.BaseName[$i]+$FilesToChange.Extension[$i] -eq "a.mp3")
        {
            continue
        }
        Rename-Item -Path $FilesToChange.FullName[$i] -NewName ($NameFile[$j]+".mp3")
        $j++
    }
}
Convert to Uppercase or Lowercase
Here are the commands you can use to change the case of your files:
- To Change All to Lowercase
Get-ChildItem | Rename-Item -NewName {$_.BaseName.ToLower() + $_.Extension.ToLower()}
- To Change All to Uppercase
Get-ChildItem | Rename-Item -NewName {$_.BaseName.ToUpper() + $_.Extension.ToUpper()} - To Change The Name Without Extension to Uppercase
Get-ChildItem | Rename-Item -NewName {$_.BaseName.ToUpper() + $_.Extension.ToLower()}
Using Third Party Tools
Many third-party tools like Bulk Rename Utility, File Renamer Basic, Advanced Renamer, etc., are available on the internet, which you can use to batch rename your files. These apps provide more customization and features compared to the PowerRename Utility.
You can download and use any one of them by following the tutorials from their official website.


