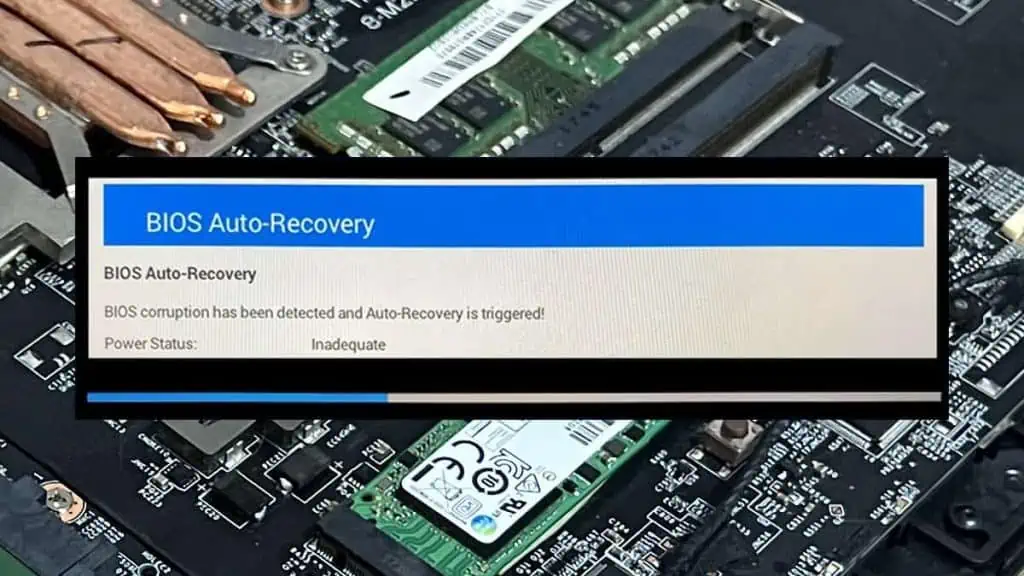
Tech News Today
  • Hardware
    • Motherboards
    • CPUs
    • Graphic Cards
    • RAM
    • SSDs
    • Computer Cases
    • Monitors
    • Peripherals
    • Power Supply Unit
    • PC Builds
    • Computer Tips
  • Software
  • Operating System
    • Windows
    • Mac
    • Linux
  • Gaming
  • Mobile
  • Console
  • More
    • Internet
    • Networking
    • Security
    • Buyer’s Guide
    • Gadgets
    • Laptops
    • Reviews
    • How To
    • News
Facebook Twitter Instagram
Tech News Today
  • Hardware
    • Motherboards
    • CPUs
    • Graphic Cards
    • RAM
    • SSDs
    • Computer Cases
    • Monitors
    • Peripherals
    • Power Supply Unit
    • PC Builds
    • Computer Tips
  • Software
  • Operating System
    • Windows
    • Mac
    • Linux
  • Gaming
  • Mobile
  • Console
  • More
    • Internet
    • Networking
    • Security
    • Buyer’s Guide
    • Gadgets
    • Laptops
    • Reviews
    • How To
    • News
Tech News Today
Home»Hardware»Motherboards»What Is BIOS Auto Recovery?

What Is BIOS Auto Recovery?

BibekBy BibekJune 21, 2022
bios auto recovery

The Basic Input Output System (BIOS) is a firmware that facilitates hardware initialization and performs POST (Power On Self Test) on your machine before the Operating System can take over. BIOS is critical to the booting process and if a BIOS image gets corrupted, your PC will not boot.

BIOS images can get corrupted due to a number of different reasons such as a failed BIOS upgrade, power outages, or even virus or rootkit attacks. In such an event, the system will attempt to recover the BIOS image stored either in a hidden partition or an external drive.

BIOS auto recovery is an automatic recovery process that occurs when the BIOS image integrity has failed during booting. Auto-recovery from either the HDD or an external USB drive is carried out. If this feature is disabled, you can start the auto-recovery process manually.

Table of Contents

  • Automatic BIOS Auto-Recovery
  • Manual BIOS Auto-Recovery
    • Reset the Embedded Controller
    • Reset the CMOS
    • Dell Desktops and Laptops
    • HP Desktops and Laptops
    • Acer Laptops
    • Lenovo Laptops
  • Hardware Replacement
    • Hardcore Method: Replace Your BIOS Chip
    • Safe Option: Replace your Motherboard

Automatic BIOS Auto-Recovery

A backup image of your BIOS firmware is stored in the primary HDD and if the BIOS firmware image integrity failure is detected during booting, a recovery process is automatically started. However, this option can be disabled from the BIOS itself, in which case the auto-recovery process is not started automatically.

You can also plug in a USB device with the BIOS firmware image before powering on your device, and the auto-recovery process will start automatically. This cannot be disabled from within the BIOS.

Manual BIOS Auto-Recovery

If the auto-recovery setting has been disabled from within the BIOS and you do not have a USB drive with BIOS firmware image available, then most likely you will be staring into a blank screen for all eternity unless you start a manual BIOS auto-recovery process. How you’d go about doing this depends upon the manufacturer of your device.

The first few fixes are General Methods to Attempt Auto-Recovery. You can try these methods regardless of the brand, make, and model of your machine. In fact, we suggest following these procedures first before moving on to the manufacturer-specific fixes.

Reset the Embedded Controller

If your device becomes unstable or you encountered problems during an update, resetting the embedded controller can sometimes fix the problem. To reset the embedded controller:

  1. Power down the system.
  2. Disconnect power cables from the outlet.
  3. Press and hold the power button for 10 seconds.

Some devices have a dedicated pin-hole for resetting the embedded controller. If that is the case, you should use that instead.

Reset the CMOS

CMOSBattery

Another try is to reset the CMOS. You can do so by removing and re-inserting the CMOS battery.

  1. Power off your PC. Make sure you are wearing an anti-static wristband.
  2. Open your device casing and find the CMOS battery in the motherboard.
  3. Remove the CMOS battery and wait 10-20 seconds.
  4. Put the battery back in, and reboot the computer.
Warning! Before opening the device casing, you should ground yourself to prevent damage due to static electricity. Use an anti-static wristband if you have one available.

Dell Desktops and Laptops

Some manufacturers provide specific instructions applicable to their own devices to start a BIOS auto-recovery process manually. These specific instructions work with their devices only.

DellBanner

Dell provides BIOS Recovery 2 (BR2) and BIOS Recovery 3 (BR3) tools to recover a corrupt BIOS. BR2 attempts to recover BIOS image from either the HDD or an external USB drive while BR3 adds a start-up check, that can be enabled in the BIOS to add an auto-recovery capability to the BIOS.

Please follow these steps to enable BIOS recovery on your dell devices:

  1. Power off the device.
  2. Press Ctrl + Esc and power on the device. Keep holding Ctrl + Esc until the recovery screen is displayed.
  3. Select Reset NVRAM and press Enter.
  4. Select Disabled and press Enter to save the current BIOS settings.
  5. Select Recover BIOS and press Enter.

HP Desktops and Laptops

HPBanner
  1. Turn off the computer and wait for 10 seconds.
  2. Press and hold Win + B keys while simultaneously pressing and holding the power button for 2-3 seconds. If you are recovering from a USB media, plug in the USB media before turning on the computer.
  3. Release the power button but continue holding Win + B keys until the display turns on. You will hear a series of beeps. This process might take up to 40 seconds.

A BIOS update screen will be displayed and the recovery process now begins automatically. If you do not get a BIOS update screen, you might need to contact your manufacturer or an authorized entity for additional support.

Acer Laptops

AcerBanner

You will need to create an Acer recovery media to restore your corrupted BIOS image. Please visit Acer’s official website on instructions on how to do this.

  1. Power off the computer and insert the USB device with recovery media into a USB slot.
  2. Power on the device and start tapping the F12 key.
    Follow the instructions on the screen.

Lenovo Laptops

LenovoBanner
  1. Power off the device.
  2. Remove battery. (If the device has a secondary battery, remove that as well.)
  3. Press and hold the power button for 20 – 30 seconds.
  4. Plug the battery back in.
  5. Try booting up the device.

Hardware Replacement

If you’ve tried everything above and you still have a corrupted BIOS image, then we’re afraid you might have to resort to replacing your hardware.

Hardcore Method: Replace Your BIOS Chip

Check whether your BIOS chip is slotted or soldered onto the motherboard. If your BIOS chip is soldered, then the difficulty of replacing it goes up exponentially and we will not recommend that you follow through. However, if your BIOS chip is slotted, you might be able to purchase and replace your BIOS chip, which should be cheaper than replacing the entire motherboard.

Open the casing of your device and ground yourself properly before continuing further.

Locate the BIOS chip on the motherboard and take note of the notches and layout. Take a picture, if you must.

Carefully remove the old BIOS chip.

Insert the new BIOS chip, making sure you align the notch and configuration of the old chip.

Safe Option: Replace your Motherboard

If hardware replacement is your only option, then the safer, albeit more expensive, alternative to replacing the BIOS chip is to replace the motherboard itself. This is especially true if you have no experience dealing with hardware maintenance and replacement, and doubly so if your BIOS chip is soldered to the motherboard.

Contact your manufacturer or authorized repair entity to get your device’s motherboard replaced.

Question
Bibek

I'm a tech writer, an engineer, and a beginner/cell phone photographer. I love riding motorcycles. I have a love/hate relationship with Dota 2. I like traveling and trying out new food. I also love MCU. Yep, I'm a nerdy person who has gone mainstream.

Related Posts

uefi firmware settings

How to Access or Use UEFI Firmware Settings in Windows

February 19, 2023
where is bios stored

Where is BIOS stored in Your Computer?

January 8, 2023
motherboard audio ports

Motherboard Audio Ports – A Complete Guide

November 23, 2022
asus beep codes

What Are All the Asus Beep Codes? What Do They Mean

November 4, 2022
what-motherboard-do-i-have

How to Know What Motherboard I Have

December 23, 2022
usb headers on motherboard

What are USB Headers on Motherboard? (Complete Guide)

October 11, 2022
Add A Comment

Leave A Reply Cancel Reply

Latest Posts
Memory-Compression

What is Memory Compression in Windows? Should You Enable or Disable It

March 1, 2023
dism-vs-sfc-vs-chdsk

DISM, SFC, CHKDSK: What’s the Difference

February 28, 2023
bios-settings-for-gaming

Best BIOS Settings for Gaming

February 16, 2023
You may also like
how-to-clean-hp-printer-rollers

How to Clean HP Printer Rollers

March 3, 2023
keyboard input lag

9 Ways to Fix Keyboard Input Lag

March 3, 2023
keyboard key is stuck

How to Fix a Stuck Key on a Keyboard

March 3, 2023
Recommended
Cookie Clicker Garden Guide

Cookie Clicker Garden Guide to Unlocking Every Seed

September 26, 2021
monitor no signal

Computer Turns On But Monitor Says No Signal (9 Ways To Fix)

November 10, 2022
Facebook Twitter Pinterest
  • Home
  • About Us
  • Our Team
  • Editorial Guidelines
  • Privacy Policy
  • Affiliate Disclosure
© 2023 TechNewsToday, editor@technewstoday.com | Tech Central Pvt. Ltd.

Type above and press Enter to search. Press Esc to cancel.