
BIOS Flashback is one of the safest ways to update your motherboard’s firmware. The feature is most reliable when experiencing POST (Power-On-Self-Test) failure or when you seek enhanced compatibility with new components.
You do not need to enter the UEFI utility or use a manufacturer-recommended application to utilize BIOS Flashback. In most cases, it even helps run a BIOS update without the installation of a processor or RAM.
In order to make use of BIOS Flashback, you need a USB flash drive containing the BIOS file. With the power cables connected, you can initiate the process by simply holding down the dedicated button.
Now, the respective version will be flashed onto the BIOS chip. After this, your presumably ‘bricked’ motherboard should come back to life!
Previously, BIOS flashback was primarily utilized as a fail-safe feature. But times have changed! Most hardware professionals today prefer it as a standard method to perform a firmware update.
Times When You Should Use BIOS Flashback
Well, USB BIOS Flashback might seem as if it takes more effort than the normal methods. Going to another computer, downloading the compatible version, coming back to the main device, and finally flashing!
These steps might feel overwhelming, especially for beginners. However, there are certain times when using BIOS Flashback is much more convenient.
For Adding Compatibility to Newer Components
One such scenario is when you’re assembling a new PC from scratch. Oftentimes, the processor or other parts might not be compatible with your motherboard.
You might wonder how to make the PC bootable without the installation of these vital components. The answer is USB BIOS Flashback!
However, some manufacturers might ask you to mount an older compatible CPU at the least.
That was exactly the case when I tried installing a new AMD processor on my ROG STRIX B550-I GAMING motherboard. So, always note such exceptions from your BIOS manual first.

For Recovery Purpose
Did you perform a BIOS update and the PC can’t even POST? You’ve probably reached this stage after an interruption in the middle of the update.
There’s no way you can enter the BIOS Setup page. In fact, in some cases, the motherboard won’t light up and the PC can’t turn on.
Don’t panic! Your board isn’t completely bricked. USB BIOS Flashback can come in handy even in this scenario.
Expert’s Tip: Apart from these reasons, it’s fine to go for BIOS Flashback as an alternative to the standard ways of updating BIOS. You can use it on a fully assembled PC as well. Just don’t turn on the system during the process.
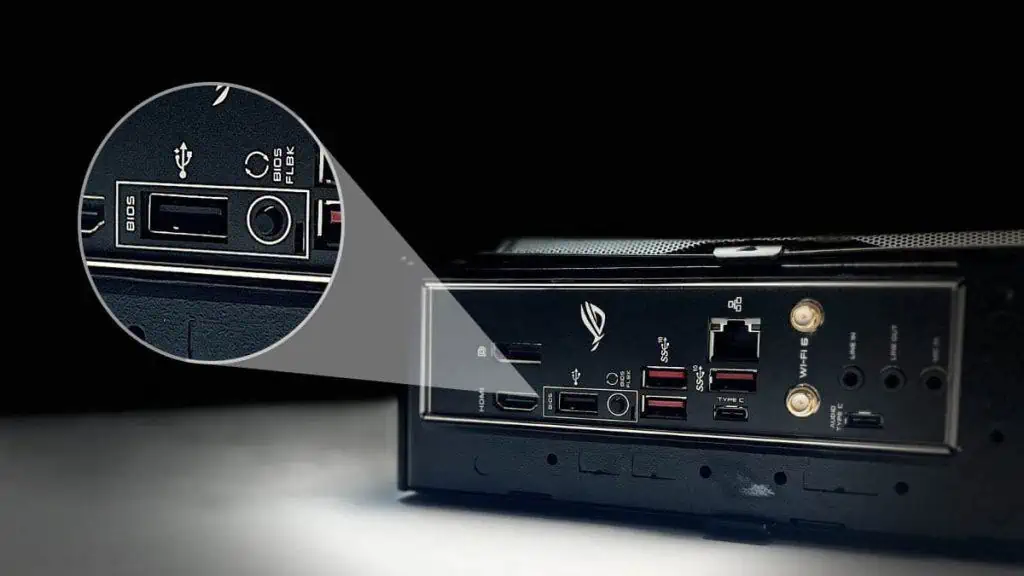
Locating USB BIOS Flashback Port

The BIOS Flashback port resides at the rear I/O panel alongside other motherboard ports. Here are its key elements:
- USB Type-A port: Usually marked or at least indicated by some relevant labels.
- BIOS Flashback Button: Press this to initiate the process.
- BIOS Flashback LED: Indicates the current status of the flash.
The picture above probably gave you a clear idea already. But exceptions are always there! Take a peek at the GIGABYTE TRX40 AORUS MASTER motherboard:

It integrates the Q-FLASH PLUS button. Despite a completely different nomenclature, its working mechanism remains identical. Also, it’s one of the preferred ways to update BIOS on Gigabyte motherboards.
But what if your motherboard has no mark for the BIOS Flashback port? That’s exactly the case with my ASRock’s X570 AQUA model:

If you’re in the same boat, the best thing to do is inspect the User or BIOS Manual. It should be available on your manufacturer’s official website. Search for your model and it’s there in the Support section.
In case you do not find any of the above elements, know that your motherboard doesn’t support BIOS Flashback. Don’t worry! Your model could integrate some other recovery features, like Dual BIOS, Auto Recovery, etc.
How to Use USB BIOS Flashback?
Enough talks already! Now that you have located the USB BIOS Flashback port and button, the process shouldn’t be strenuous.
As the steps vary slightly between manufacturers, it’s best to check your manual to ensure you’re doing it correctly. Still, we’ll give you a basic outline that should work for most motherboards.
Caution: BIOS updates are risky and can lead to potential boot issues. It’s a good idea to place your PC behind a UPS to ensure you don’t face any power-related interruption. Also, avoid disconnecting the USB drive or starting the PC when the process is ongoing.
Download the BIOS File

Finding the correct driver is absolutely important. You don’t want to try to update the BIOS with incompatible firmware. It won’t work for sure or even worse, you could end up with corrupted files.
For users experiencing boot issues, it’s essential to follow these steps on another working computer. Also, you need to know the current BIOS version.
The safest place to download BIOS updates is from the manufacturer’s website. Here are the general steps:
- Search for your motherboard model.
- Go to its Download section. You should find Drivers & Utilities, BIOS, BIOS & FIRMWARE, or similar tabs depending on the brand.
- Next, compare the current version and find out which update is guaranteed to fix your problem.
- Hit the Download button and the zip file should be saved on your PC.
Expert’s Tip: I suggest going for the latest BIOS version. But do have a thorough inspection of other revisions as well to check for any exceptions.
For instance, some latest firmware may be in ‘beta’. In such cases, it’s best to go for an older version, which is generally stable.
Prepare a USB Flash Drive
The next thing you need is a USB device formatted in FAT16/32. Note that other file systems (NTFS or exFAT) won’t let you update the BIOS.
Also, it’s a good idea to have no other documents on the device other than the ROM/CAP/BIN file. The file extension completely depends on what the manufacturer recommends:
- MSI:
.ROM - ASROCK:
.rom - ASUS:
.CAP - Gigabyte:
.BIN
You can check the BIOS version description or your user manual to identify what name should be used.
When I was updating ASUS BIOS, I didn’t have to go through any of such hassles. It came with the BIOSRename.exe utility that automatically did the job.

Here are the general steps that should work on any motherboard:
- First, extract the downloaded folder.
- Look for the BIOS renamer utility or simply change the name yourself (as stated in the description).
- Copy only the BIOS file to a FAT-32 formatted drive. Make sure it’s in the root directory.
- Now, safely eject and disconnect the USB device and go to the motherboard that requires a BIOS update.
Shut Down and Check Power Connections
The USB BIOS Flashback button won’t do anything while your computer is running. That said, ensure your system is completely powered off.
For users who are looking to enhance compatibility, I suggest using an older CPU. If your manufacturer states that you can update BIOS without the installation of a processor, you can move forward accordingly.

- First, unplug the PSU’s power cord.
- Remove all USB drives and other components (if stated in the manual).
- Keep in mind that the ATX and CPU power connectors should be plugged in. It’s completely fine to not have the RAM sticks.
- Then, reconnect the power cable.
Insert USB and Begin the BIOS Flash
Now, you’re ready to start the main process! As mentioned earlier, there should be some sort of indicator light to signify the flashback has begun successfully. Adhere to these instructions and you should be good to go:
- First, plug the flash drive into the marked USB-A port.

- Now, hold the BIOS Flashback button for 3-5 seconds.
- You should see the Flashback LED blink slowly for the first few times indicating the process has started.
- This is followed by continuous blinking for about 5 to 10 minutes.
- Your job is to just wait until the LED stops flashing. This is the indication that the update is complete.


Load the Optimized Defaults

It’s time to finalize the update. Once the BIOS update is complete, you’re likely going to encounter an AMIBIOS screen. It’s simply asking you to run the setup.
Just press F1 once you encounter a similar message as demonstrated above. You should now get into the UEFI Utility. Here’s what to do next:
- Navigate to the Exit section or a similar tab.
- Find and load the optimized defaults.
- Finally, save the changes before exiting the BIOS mode.
BIOS Flashback Failed or Didn’t Work?
Even after proceeding with the process thoroughly, mishaps can still occur. If you’re seeing a green or solid light after pressing the Flashback button, I suggest revisiting all the steps. You might have made some errors. Here are key points to note:
- Ensure you’ve downloaded the correct BIOS file.
- Did you use the ‘beta’ version? Possibly, this could have triggered the issue.
- Try with an older compatible version. Newer ones might still have bugs.
- Make sure your flash drive is formatted to FAT32.
- Some motherboards might not support USB 1.0 flash drives. Also, a few community users claim to face issues with USB 3.0. Since most manufacturers suggest using USB 2.0, I recommend the same.
- For some users, converting the flash drive to MBR (from GPT) has helped.
- Is the USB stick problematic? Reflash BIOS with another USB drive if available.
- Try the motherboard DVD (if available) as it should contain a stable version.
- Try clearing CMOS and repeat the process.
If nothing helped, you might want to go for some hard fixes. Here’s a complete guide on what you should do after the BIOS update fails.