
BIOS settings can get corrupted abruptly or after tinkering with some advanced options. If you’re experiencing system instabilities due to bad overclocking or after the addition of incompatible hardware components, restoring it to factory values often solves it.
Users who can access the BIOS interface should look for Load Optimized Defaults or similar indications. But if there’s no display at all or the earlier method doesn’t help, you need to clear CMOS. This involves using the CLEAR CMOS button, reseating the CMOS battery, or shorting the RTC pins with a jumper.
After working on a plethora of systems, our team has noticed variations regarding the location of the CMOS battery / clear CMOS button and even the number of RTC pins. Even though the general idea to reset BIOS remains identical, the exact process can differ depending on the motherboard.
Via UEFI/BIOS Utility
The first thing you should try is accessing the UEFI/Legacy BIOS Utility. Just hit Del, F2, or an appropriate key when your PC reaches the splash screen. In most systems, the dedicated one should be displayed right below the manufacturer logo.
Once you have entered the BIOS interface, there are two possible ways to quickly restore your motherboard’s firmware to default. Here’s a brief overview of the first method:

- Start by switching to the Advanced Mode. This involves pressing a dedicated key (like F6 or F7).
- Get to the Exit or Save & Exit tab. This varies based on the motherboard manufacturer.
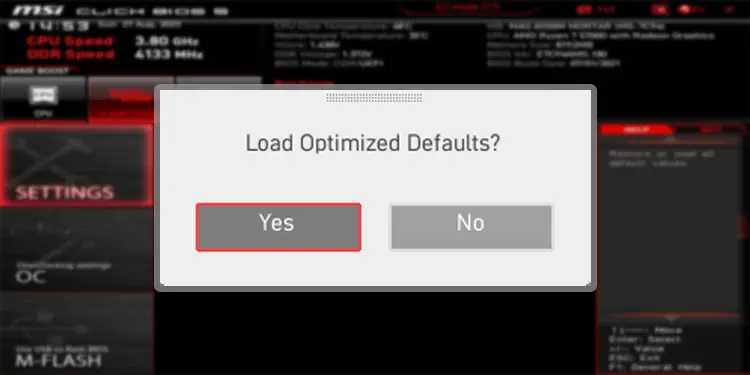
- Now, pick Load UEFI defaults / Load Optimized Defaults / Restore Defaults or similar indications.
- A dialogue box should pop up for confirmation. Hit Yes or OK as shown.
- Most users simply exit the BIOS which will discard the changes. Instead, you need to save and exit. Press the dedicated shortcut key or simply pick the appropriate option from the same tab.
- Another confirmation prompt should appear. Check the settings that are going to be restored. Then, press OK / Yes.
While the aforementioned steps are already simple, the second method involves utilizing a direct shortcut key to load the optimized defaults. This makes the resetting BIOS process a breeze.

However, the dedicated key differs for every motherboard brand and also varies for Legacy users. Some manufacturers have even included this within the EZ mode. Once you select the relevant option, the same dialogue box will pop up as discussed above.
Press the Clear CMOS Button
Resetting BIOS via the UEFI utility is quite straightforward. But what if your PC can’t even boot to BIOS? In such scenarios, clearing CMOS (Complementary Metal Oxide Semiconductor) values should suffice.
The dedicated NVRAM or RTC RAM chip holds all the low-level settings that power up the motherboard and start the POST (Power On Self Test). Once you press the dedicated CLEAR CMOS button, the power supply is temporarily interrupted which causes the chip to lose the stored BIOS configuration.
The button’s location can vary depending on the motherboard. When I tried clearing CMOS on Gigabyte’s TRX40 AORUS MASTER, it was present on the I/O shield. However, it was located as a ‘smart’ switch on ASRock’s X570 AQUA.
- Keeping the above thing in mind, first locate the CLEAR CMOS button. If you do not find it alongside the other I/O ports, look up the user manual to see if it’s present within the mainboard itself.

- Now, shut down your PC completely and ensure the power supply is also cut off.
- Then, press the dedicated button for a few seconds.
- Now, wait for a few minutes (as stated by the manufacturer) and start your computer.
- Once the BIOS shows up, load the optimized defaults and save the changes.


Reseat CMOS Battery
The CLEAR CMOS button is only available on newer motherboards (on both mid-end and high-end). However, you may not find it if you’re using an older system. In that case, consider removing the CMOS battery and reseating it.
Well, this is one of the traditional ways to reset BIOS and is still preferred by most professionals. In fact, this technique also works on most laptops if it possesses an on-board 3V battery.
Unlike the physical CMOS clear switch, you need to access the mainboard to find the coin-shaped cell. The exact location varies based on the manufacturer and the motherboard’s form factor.
For instance, in our Fatal1ty AB350 Gaming-ITX board, the CMOS battery is vertically mounted with a dedicated plug that fits in the dedicated header. So, instead of removing it, we can simply disconnect it for a certain time and this resets the system parameters.

- Start by identifying the battery type and location. Take assistance from your user manual if needed.
- Ensure your PC is powered down and the power supply is also disconnected.
- It’s a good idea to ground yourself before coming in contact with the motherboard. So, if you have an anti-static wrist wrap, make use of it or keep touching a grounded metal surface throughout the process.
- Now, open the PC case to access your mainboard. Push the dedicated metal clip/lock and this should pop the cell out of its compartment.
- Wait for 15 minutes to an hour (as your manufacturer recommends) before reseating the battery. By this time, the BIOS chip will be unable to hold the configuration as there won’t be any source to power it.
- Now that it has lost the previously stored values, factory settings should be loaded the next time you boot up.
- Once you’re able to access the BIOS, don’t forget to load the optimized defaults and save changes before exiting.
Short CMOS Jumper Pins
Another technique to clear CMOS data is short-circuiting the dedicated RTC pins using a jumper cap or a conductive metal object. I prefer using a flat-headed screwdriver and recommend the same.
However, it’s not advisable to short the pins after performing a BIOS update (make sure you boot up the system first before performing this). Also, ensure the PC is turned off before proceeding.
Most modern boards today come with 2 pins (VDD/VCC and VSS/GND). So, when we short them, we are basically creating a closed circuit with zero resistance to the current. This triggers the reset and the BIOS values are restored.
Don’t worry if this sounds too complex. The process is relatively straightforward and I’ll cover the general steps for both 2 pins and 3 pins:
- As mentioned earlier, make sure the system is turned off and the power supply cable is also unplugged.
- Press and hold the power button for 10 to 15 seconds. This should discharge the capacitors.
- Now, open the PC case and locate the dedicated header. If you’re finding it difficult, check the user manual. Look for CLR_CMOS, CLRTC, JBAT, CLEARCMOS, or similar labels.
- For 2-pins, take a metal object/screwdriver and touch both making direct contact. Keep holding it for about a minute and this should clear the RTC RAM.
- In case you have a 3-pin header, it should come with a jumper cap. Change its position from ‘default’ to ‘clear CMOS’. Wait for some time before you revert the configuration.
For example, if the jumper was seated in the 1-2 position, you need to switch it to 2-3. After a certain time, revert to 1-2. - Now, start your PC, get to BIOS, and load the default settings, as demonstrated previously.


Additional Tip: Clearing CMOS generally resets all the configuration, including the BIOS password. However, this hasn’t worked for some users, especially on laptops. I’ve covered a separate guide that covers all possible ways to reset both user and administrator passwords.
Final Words
Resetting BIOS or clearing CMOS is the first troubleshooting step you should take when facing any sort of system instabilities.
Although the process seems pretty straightforward, it differs slightly based on the model and manufacturer. Keeping this in mind, our team has prepared individual guides for the most popular motherboards: