
A memory stick with several corrupted memory addresses will likely result in random system/application crashes and frequent Blue Screen of death.
In situations like that, the first thing to do is check RAM health. Unfortunately, there is no utility to give you the exact health of your memory stick. What you can do is, test your RAM for memory address corruption.
You can do this using the Windows Memory Diagnostic Tool, from BIOS settings, or using a third-party application. Personally, I recommend using a freeware named MemTest86+ to test your memory module.
It is safe to say that the process is quite simple, as our team has extensively tested several memory modules. For this content, we have tested 8GB Corsair Vengeance DDR4 3000 and 16GB TridentZ Royal DDR4 3600 to guide you through the steps to check the RAM health of your system.
Test RAM Via Windows Memory Diagnostic Tool
First and foremost, I recommend using the Windows built-in utility Windows Memory Diagnostic tool, as this is available for all Windows users. It is also the easiest to run, and you do not require any installation.
To run the Windows Memory Diagnostic Tool,
- Press the Windows and R key simultaneously.
- Once the Run window opens, type
mdschedand press Enter to open Windows Memory Diagnostic.
- Click on Restart now and check for problems (recommended).
- The PC will now restart and start running several memory tests.


During the test, you can choose the type of test you want to perform. Press F1, and it will take you to the Windows Memory Diagnostic Tool options. Here, you can choose between three available options:
- Basic: Includes MATS+, INVC, and SCHCKR (cache enabled) tests
- Standard: Includes all Basic tests along with LRAND, Stride6 (cache enabled), CHCKR3, WMATS+, and WINVC.
- Extensive: Includes all Standard test along with MATS+ (cache disabled), Stride38, WStride-6, CHCKR4, WCHCKR3, ERAND, Stride6 (cache disabled) and CHCKR8.

Basic and Standard perform memory tests without disabling cache. These are quick tests to find faulty bits or poor contact and are performed without disabling the cache.
Running a memory test by enabling the cache may hide faults in memory modules. Further, the CPU cannot access the memory directly when you enable the cache. This might give inaccurate results.
So, if you want to test the memory, it is best that you run a memory test by disabling the cache. It will also take longer to complete.
Once the test is complete, you can use EventViewer to get the test result,
- Press the Windows + R key.
- Here type
eventvwrand press Enter. - On the left panel, double-click on Windows Logs and select System.
- Now, on the right panel, click on Find.
- Type
MemoryDiagnostics-Resultsand click on Find Next. - Close the Find dialog box. An event should be highlighted.
- Double-click this highlighted event.
- Here, you should see if the system detected any error during the memory diagnostic.


Test Memory Via the BIOS
Some laptop or pre-built desktop motherboard manufacturers like Dell or HP might include a feature to test RAM from within the BIOS as well.
If your system has this feature, you can use it to test the memory modules in your motherboard,
- First, boot into the BIOS by pressing the Delete key or the function keys.
- Navigate the BIOS and search for a settings category named Diagnostic or PC Hardware Diagnostic.
- If you cannot find this setting, it could be that your motherboard does not have this utility. In such a case, skip this and try the other solution.
- If you have this setting available, run the memory test.
- Depending on the motherboard manufacturer, you may be able to run a fast, quick, or extensive test. Run the extensive or extended test.
- The BIOS will give the option to Run the test once or loop the test until it runs into an error. Choose an option according to your requirements.
- Wait for the test to complete.
- After the test is completed, the device will display a PASSED or FAILED result on the screen.
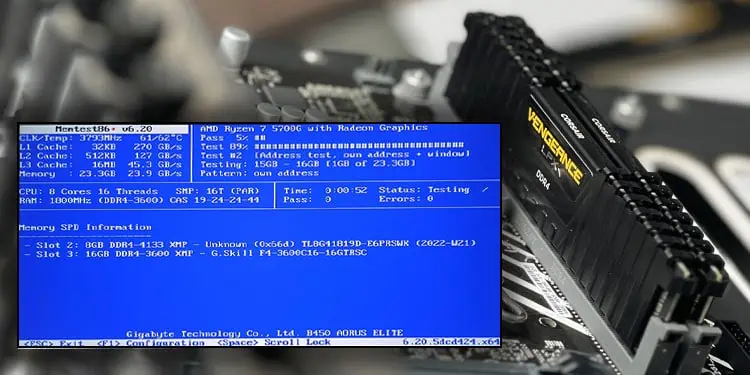
Via Memtest86+
If the system is constantly running into a blue screen error with random system crashes, and the Memory Diagnostic utility detects a hardware error, I recommend that you check the severity of the memory corruption using MemTest86+.
It is freeware that allows you to run more intensive tests than Windows Memory Diagnostic and the one provided by the BIOS. Since it runs an extensive test, Memtest86+ may take several hours to complete even one pass.
Running the MemTest86+ is quite simple, even if you are running it for the first time.
You first need to download the application and install it on a USB drive.
- Connect the USB drive to the PC.
- Download MemTest86+ and run the downloaded file.
- Click on I Agree.
- Click on the dropdown menu and select your USB drive.
- Check the checkbox if you want to format the USB Drive.
- Click on Create.
- Once the installation is complete, click on Next.
- Select Finish.


Now, you need to disable Secure Boot. MemTest86+ will not run on a motherboard that has secure boot enabled. Furthermore, MemTest86+ needs a UEFI BIOS to operate.
Once you disable Secure Boot, you need to change the boot order such that the system reads the USB drive first. Once done, exit the BIOS.
When changing the boot order, make sure that you connect the USB drive to one of the USB ports in the rear I/O panel and not in the front of the PC case.
Now, turn on the PC, and the MemTest86+ will do its job and check your memory module. The test might take several hours to complete depending on the number of memory stick and total RAM capacity.
If you have multiple memory stick or a high capacity RAM, I recommend that you test one memory stick at a time and leave it overnight.

The system will display a green PASS message if the memory module passes the test. If it does not, you will see multiple red failing memory addresses on the screen. This means the RAM is not “healthy”.
If you only see a few failed memory addresses, the memory module might still function. But, if the test reports numerous failed memory addresses and the system crashes constantly, it is best that you replace the memory modules.
Memory Test Failed?
Now, if the system fails all the memory tests mentioned above, replacing the corrupted memory is the best course of action.
But before doing that, there are a few other possibilities that could cause memory errors besides a corrupted memory address. In some cases, the system might also fail a memory test if it is using two different memory stick with variable RAM frequency and latency.
On a system that is just running on a single memory stick, there is no doubt that this single memory stick is a faulty one. Sometimes, cleaning your RAM slots and sticks can help, too. But to be certain, I recommend that you test using different memory slots to rule out the possibility of a faulty DIMM slot.
However, if your system has two or more memory sticks, you need to find the faulty one first before replacing it.
To find the faulty memory stick, run the test again using one RAM stick at a time. Perform the same test as above two or three times. Do the same for all the memory sticks connected to the motherboard until you find the corrupted memory module.