
DHCP (Dynamic Host Configuration Protocol) is one of the network protocols that dynamically assigns IP addresses to every device in a network. This ensures that there is no IP address conflict between two or more devices and hence fewer chances of network errors.
However, if you have installed multiple routers, we highly recommend disabling DHCP in one of them. After that, it’s necessary to set a static IP address, subnet mask and default gateway.
Enabling and disabling DHCP on Windows is possible from the built-in Settings, Control Panel, terminal, or even your router’s configuration interface.
How Does DHCP Work?
Before diving into the DHCP configuration, let’s get a brief insight into its working.
When a computer or any other device wants to connect to a network, it generates a request, which is picked by a DHCP server. Now, the server assigns a dynamic IP address to it and keeps monitoring its use.
Once the device is inactive, the DHCP server pulls back the IP and stores it in a pool of addresses. This will be reassigned to another device when it tries connecting to the network.
- DHCP Discovery: Broadcast packet sent by a DHCP client to the DHCP server
- DHCP Offer: An information message sent by the server to the client confirming that it has received the DHCP Discovery
- DHCP Request: Request message sent by the client device to a DHCP server (from many servers, only one is accepted) to get the offered IP
- DHCP Acknowledgement: IP settings sent by the DHCP server acknowledging the DHCP Request
How to Enable or Disable DHCP in Windows 11
In most Windows-based PCs, the DHCP server is enabled by default. Hence, these devices obtain IP addresses automatically. But there can be times when you want to use static IP addresses for better DNS support, reliable communication, bypassing firewalls, etc. To achieve this, you’ll need to first disable the DHCP server.
From Windows Settings App
The in-built Settings app on Windows lets you set various configurations, like System, Network, Gaming, Accessibility, and many more. Likewise, enabling and disabling DHCP is also possible here.
Enable DHCP
Firstly, let’s learn how to enable DHCP from the Windows 11 Settings:
- Use Windows + I shortcut to open the application.
- Go to Network & internet and choose your connection (Wi-Fi or Ethernet).

- Move to [Your Connection] Properties.
- Now, expand the Properties section and scroll down to find IP Assignment. Here, press the Edit button.
- Once the Edit network IP Settings dialogue box pops up, select Automatic (DHCP) and hit Save.
- Again, click on the Edit button from the DNS server assignment field.
- Choose Automatic (DHCP) again and tap Save.


Disable DHCP
If you’re planning to set a static IP address on Windows, the first thing to do is turn off DHCP. Kindly follow the below instructions on how you can do just that:
- Press the IP Assignment’s Edit button in the network properties window.
- To disable DHCP, expand the drop-down and select Manual.
- Now, toggle on IPv4 or IPv6.
- Input the valid IP Address, Subnet Mask, Preferred DNS, and Alternate DNS. Then, hit Save.
- Repeat the same process with DNS server assignment.


Via Network Connections
Network Connections is a dedicated section in Control Panel that lets you configure and manage all the adapters (Ethernet, Wi-Fi, Bluetooth, Virtual Private Network, Virtual Machine, etc.). In this section, you will learn how to tweak IPv4 or IPv6 to enable/disable the DHCP server.
Enable DHCP
As we know, DHCP means automatically assigning the IP addresses on your computer. So, you can use the Network Connections utility to configure this in order to enable DHCP:
- Use Windows + R to launch the Run utility. Here, execute the
ncpa.cplcommand to open the Network Connections window. - Right-click on your network connection (Wi-Fi or ethernet) and choose Properties.
- In the Networking tab, double-click the Internet Protocol Version 4 (TCP/IPv4).
- Once a new dialogue box launches, choose the following options – Obtain an IP address automatically and Obtain DNS server address automatically.
- Press the Ok button to save the changes.
- Repeat the same for Internet Protocol Version 6 (TCP/IPv6), and once that’s done, press Ok.


Disable DHCP
To disable DHCP on Windows, you’ll need to set your custom IP address, Subnet Mask, and Default Gateway:
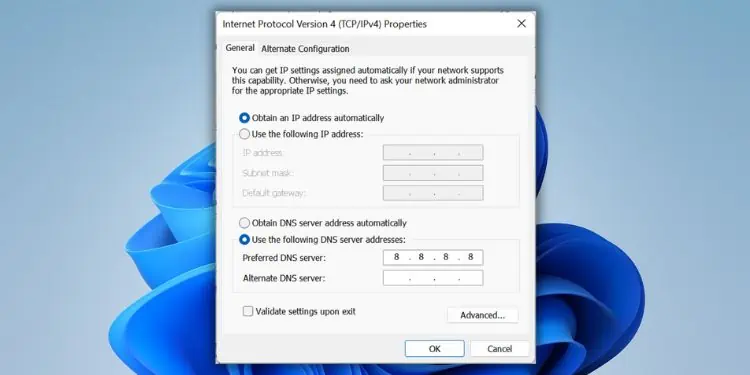
- Launch Internet Protocol Version 4 (TCP/IPv4) Properties from the network connection window.
- Select Use the following IP addresses. Then, set an appropriate IP address, Subnet Mask, and Default Gateway.
- Next, select Use the following DNS server addresses. Here, input preferred and alternate DNS servers.
- Hit the Ok buttons on both the properties windows.
- If you’ve set up IPv6, open Internet Protocol Version 6 (TCP/IPv6) Properties. Then, use static IP and DNS as shown below.


In Windows Terminal
Well, it’s possible to enable/disable DHCP via the Windows terminal if you prefer CLI over GUI. Before jumping into the dedicated command lines, we suggest checking whether this is turned on or off:
- Navigate to the start menu to search and launch Command Prompt or Powershell.
- Run the below command to list all the network adapters on your PC:
netsh interface ip show config - Here, check the DHCP enabled field to identify if DHCP is turned on or off. For example, we are connected to the network via Wi-Fi. So, we will check the Wi-Fi adapter as shown below.


Enable DHCP
If the DHCP enabled field states No, here’s how you can enable it:
- In the terminal, execute the following command:
netsh interface ip set address "Wi-Fi” dhcp - Now, run the below command and check the adapter to confirm that DHCP is now turned on:
netsh interface ip show config


Disable DHCP
If the DHCP enabled field shows Yes, here’s how you can disable it:
- Run the below command line in the terminal to set static IP addresses:
netsh interface ip set address "Wi-Fi" static [IP Address] [Subnet Mask] [Defaut Gateway] - Then, execute the following to set the primary DNS server:
netsh interface ip set dnsserver "Wi-Fi" static [Static Address]
If you get the “The configured DNS server is incorrect or does not exist” error, copy and paste the below command to set it without DNS validation:netsh interface ip set dnsserver "Wi-Fi" static 8.8.8.8 validate=no - Finally, run the following command and check the adapter section to confirm that DHCP is now disabled:
netsh interface ip show config


From Router Settings
The final method to configure DHCP settings is from your router’s configuration page. Indeed, this is much more reliable and even applies to all the other devices on your network. Below are the involved steps that should help you enable/disable DHCP on any router:
- Open any web browser and run your router’s address to open the Router Configuration page.
- Now, input the username and password. If you’re unsure about this, contact your ISP.
- Once you’re logged in, navigate to DHCP > DHCP Settings or a relevant field. This can be distinct for different manufacturers.
- In the DHCP server, select the Enable option. Then, save this setting, and the DHCP should turn on.
- To disable the DHCP server, select Disable. Then, input both the Start and End IP addresses. Now, save the setting, and this should do your work.

