
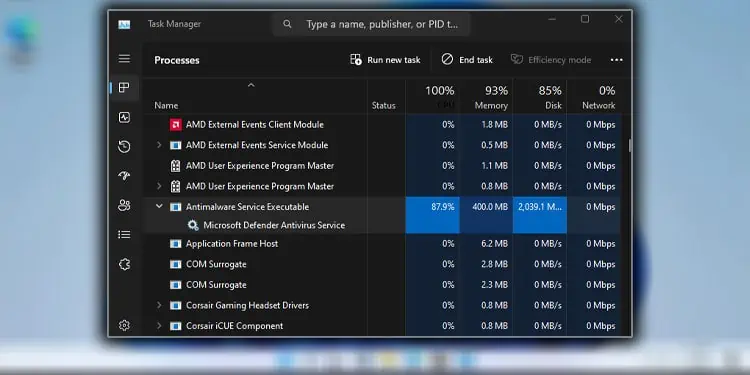
Antimalware Service Executable takes high system memory, especially when Windows Defender’s Virus & threat protection is running a scan. While it releases the memory once the scan completes, you may notice a significant drop in performance during this process.
Although you cannot end this task since it is a system process, you can stop the scan and release the memory. If Windows Defender is not performing any scan, features like Real-time protection or cloud-delivered protection might still cause the process to take high memory resources.
Disabling these features should, in theory, stop the high memory usage. If it does not resolve the issue, there are a few things you can try to fix the problem with high memory usage.
Before that, let’s know a little about this background process.
What is Antimalware Service Executable?
Antimalware Service Executable (MsMpEng.exe) is a system application that automatically runs on startup if you do not have any third-party antivirus application installed.

Once the system turns on, the Windows Defender antivirus will run a quick scan which can result in the Antimalware Service Executable consuming high resources for a couple of minutes.
If it is not running any scan, the background process should take about 150 MB to 200MB of memory resources. This number should not go higher than 300MB on idle conditions. If it is, we recommend that you start by checking Virus & threat protection.
Check Virus & Threat Protection
Windows Defender and its background process and services use a high CPU, memory, Disk, and CPU resources when it scans the PC. This number is even higher when it is running a full scan.
You can simply cancel the scanning process to lower memory, CPU, and disk resource usage.
- Press the Windows + R key.
- Type
windowsdefender:and press Enter.
- Click on Virus and threat protection.
- Click on Cancel if it is running a system scan.


Once you cancel the scan, check if Antimalware Service Executable uses lower system resources. This number should decrease gradually and after some time, Windows Defender’s CPU and Disk usage will be close to 0, and its memory usage should stay around 150 MB to 300 MB.
Disable Virus & Threat Protection Features
If the system is not running any scan, but the Antimalware background process is still using high memory usage, it might be using features included in Virus & Threat protection.
These features include locating and scanning new files on the system, providing protection to data in the cloud, and sending sample files to protect the system from potential threats.
You can disable them to lower system resources, but this will leave your system vulnerable.
- Open Windows Defender.
- Select Virus and Threat Protection.
- Under Virus & threat protection settings, click on Manage Settings.
- Turn off Real-time protection, Cloud-delivered protection, Automatic sample submission, and Tamper Protection.
- Now open the Task Manager and check if it lowers memory usage.


Even if you turn off Real Time protection, Windows automatically enables it when you restart the system. However, you can permanently disable Real-time protection.
Before you can disable Real-time protection permanently, make sure that Tamper Protection is disabled.
- Open Run.
- Type
gpedit.mscand press Enter. - Navigate to Computer Configuration > Administrative Templates > Windows Components > Microsoft Defender Antivirus.
- Click on Real-time Protection.
- In the left panel, double-click on Turn off real-time protection.
- Check Enabled.
- Select Apply then OK.
- To Enable Real-time protection, you can simply enable Tamper Protection.


Update Windows
MsMpEng.exe (Microsoft Malware Protection Engine) had a significant performance issue where it uses unreasonably high computation when the Real-time protection feature is active. This simultaneously causes high system resource usage, especially when using browsers like Firefox.
Fortunately, Microsoft pushed a patch update that fixed the mpengine.dll file in Security Intelligence update version 1.387.695.0 on April 4, 2023. You can install this update to fix the issue with Antimalware service executable high memory usage.
- Press Windows + I and select Windows Update.
- Click on Check for Updates or Install Updates.
- Restart your PC once the installation is complete.
- Open Task Manager and check if the high memory usage issue is fixed.

Add Exclusion
Users in numerous online forums have also reported that adding the MsMpEng.exe file to the exclusion list in Windows Defender fixed the issue for them. To add Microsoft Malware Protection Engine to exclusion,
- Open Windows Defender and click on Virus and threat protection.
- Under Virus and threat protection settings, click on Manage Settings.
- Scroll down and click on Add or Remove exclusions.
- Click on Add an Exclusion and select File.
- Navigate to
C:\Program Files\Windows Defender. - Select
MsMpEng.exeand press Open. - Now, check if the Antimalware service is still causing the high memory issue.


Change Scheduled Scan Properties
Your system can automatically start the Windows Defender scan if the process is scheduled to run via the Task Scheduler. On top of that, Windows runs the scan with the highest priority. This enables Windows Defender services and background processes to use higher system resources.
Tweaking Defender’s task scheduler properties allows the user to control when the system runs Windows Defender scheduled scan and even lower its priorities.
- Open Run.
- Type
taskschd.mscand press Enter. - On the left panel, navigate to Task Scheduler Library > Microsoft > Windows.
- Click on Windows Defender.
- On the middle panel, double-click on Windows Defender Scheduled Scan.
- In the General tab, uncheck Run with the highest privileges.
- Go to Conditions, and uncheck Start the task only if the computer is on AC power.
- Go to the Settings tab and uncheck everything.
- Finally, go to the Triggers tab and click on New.
- Here, you can set a preferred date and time to run the scheduled scan. I recommend that you scan the PC at least once a week.
- Once you set the triggers, click on OK.
- Again, select OK.
- Restart your PC and check the memory usage.


Disable Virus & Threat Protection
Finally, if none of the solutions work, you can try disabling the entire Virus and threat protection. When you disable Virus and threat protection, it will not use any background process or defender services such as the Antivirus Service.
- Press the Windows + R key.
- Type
regeditand press Enter. - Navigate to
HKEY_LOCAL_MACHINE\SOFTWARE\Policies\Microsoft\Windows Defender - On the right panel, right-click and select New.
- Click on DWORD (32-Bit) Value.
- Name it
DisableAntiSpyware. - Double-click on it and set the Value Data to 1.
- Click OK.
- Restart your PC and open Windows Defender.
- Check if the Antimalware Service Executable still runs.


Disabling the Virus and Threat Protection makes your entire system vulnerable to malware attacks. So make sure that you install a separate antivirus application once you disable Windows Defender.
If you are installing a third-party application, the OS will automatically disable Virus and Threat protection feature and use the installed antivirus application.