
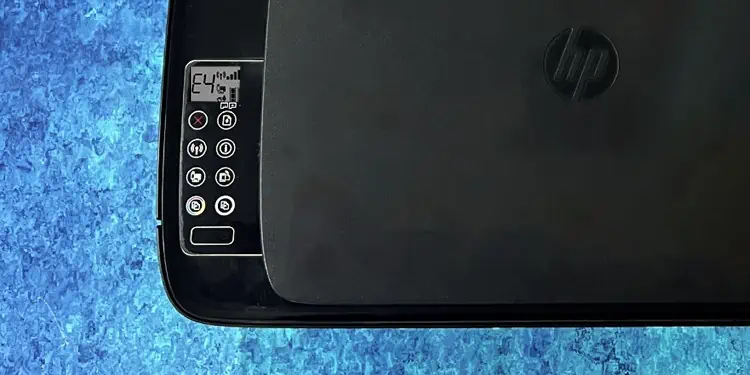
If your HP printer shows an E4 error message, it indicates that there is a paper jam on the printer. Generally, the letters E and 4 will blink alternatively on the display panel to mark the paper jam.
The paper jam may occur either in the input tray, output tray, carriage area, or in the paper path of the printer. While the stuck pieces of paper are mostly responsible for causing paper jams, foreign bodies like dust and debris may also contribute to the issue.
However, you may sometimes get a false paper jam, meaning that an E4 message appears on the screen even though there is no actual paper jam in the printer.
Check Input Tray for Paper Jams
The input tray is where you insert blank pages on the printer for printing. If you are getting an E4 error message, first check if there are any paper jams there.
- Pull up the input tray.

- Flip the input tray shield towards you.
- Gently remove all the papers from the input tray. Please use both your hands to remove the paper. Trying to pull the papers randomly will tear them, and you may further run into problems clearing the paper jams.
- Take a flashlight and see if there are any papers stuck there and remove them.
- You may use a blower to wipe out any foreign materials present there.
- Close the input tray shield.
- Now locate the Resume button and press it. See if the error goes away. If not, move to the next step below.


Check Output Tray for Paper Jams
You get the printouts from the output tray of your printer. Papers stuck in the output tray can also lead to an E4 error. So, consider removing jammed papers from there too.
- Push the output tray inside the printer.
- Using both your hands, calmly remove the papers from the tray.
- Further, inspect the output tray for any stuck and torn papers. You may need a flashlight to check it.
- Use a blower to clear any foreign objects.
- After you verify everything is cleared from the output tray, press the Resume button.
- Now check if the E4 error still appears on the display panel of your printer.


Check Carriage Area for Paper Jams
Next, you should also check if there are any paper jams in the carriage area. The carriage is the casing that holds the ink cartridges and helps spray ink onto the paper during the printing process. You should open the front access door to check the carriage area.
- Shut down your printer and remove its power cable from the electrical supply. Also, unplug the USB cable.
- Hold the output tray and push it inside.
- Now open the front access door.
- Also, use the lock on the cartridge door and open it.
- Hold the carriage assembly by its base and move it to the left or right depending upon the position.
- Check for any stuck papers and gently remove them. Use a blower to blow any dirt inside.
- Further, slide the carriage gently to the left and right to ensure it is moving freely.
- Close the cartridge door.
- Close the access door.
- Draw the output tray towards you.
- Power on the printer and see if the issue exists.


Check Bottom of the Printer for Paper Jams
The paper path on your HP Deskjet and Ink Tank series printer lies at the bottom of the printer. It is another most probable area for paper jams. You may need a friend’s help to clear paper jams from the paper path.
- Turn off your printer and remove the power cable and USB cable from the printer.
- Push down the input tray and push the output tray inside the printer.
- Ask your friend to hold the lid of the scanner assembly and turn the printer such that the bottom of the printer is clearly visible.
- Open the cleanout door by unlocking the tabs.
- See if there are any jammed or torn papers and remove them.
- Close the cleanout door with the help of tabs.
- Now, turn the printer and place it normally on the surface.
- Open the front access door.
- Use the lock on the cartridge door and open it.
- Check for stuck papers and remove them.
- Close both the cartridge door and the front access door.
- Turn on the printer and try printing. Check if you still face an E4 error.


Clean the Rollers
When your printer is showing an E4 error message, there are also chances that the torn pieces of paper have stuck in the rollers of your printer, preventing other papers from efficiently passing through the paper path. You can try cleaning the rollers and see if the error goes away.
- Power on your printer.
- Remove papers from the input tray if there are any.
- Keep pressing the Power button.
- While you are still holding the power button, push the Cancel button consecutively for 3 times.
- Then push the Copy Color button consecutively for 7 times.
- Let the Power button go off.
- The printer will start cleaning the rollers making certain noises. Wait till the printer is completely quiet.
- Check if the issue exists.


Reset the Printer
Removing the jammed papers and cleaning the rollers should solve the E4 error on your HP printer. However, if you are still facing the issue, the printer might be showing a false paper jam. In such cases, you can try resetting your printer.
- First, let’s do a soft reset.
- Unplug your printer from the power supply.
- Keep pressing random buttons on the button panel.
- Wait about a minute and turn on the printer.
- If you are still facing the E4 error, let’s do a factory reset. Remember that all your customized printing preferences will be reset to factory defaults after a factory reset.
- With the printer turned on and connected via USB cable, open HP Smart on your PC.
- Click the Printer Settings menu on the home screen.
- Click Advanced Settings.
- Choose the Settings tab on the next screen and click Restore Defaults > Restore Factory Defaults.
- Click the Restore Factory Defaults button.
- Once the reset is complete, see if the error goes away.


