
Gigabyte’s BIOS UI has seen multiple updates in the last few years. Naturally, this has led to some confusion when users need to locate certain settings like TPM.
On Intel boards, you can enable PTT from the Trusted Computing tab.
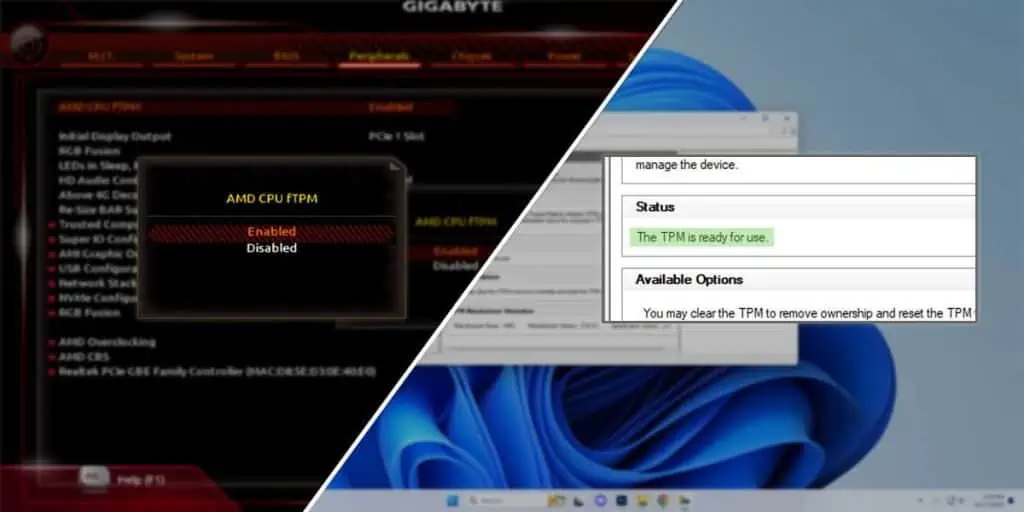
On AMD boards, you can configure fTPM from the Peripherals tab.
Once you enable TPM, you should verify that it’s ready for use in Windows. I’ll provide step-by-step instructions for this entire process in this article.
Enter the Gigabyte BIOS

Turn on your PC and repeatedly press Del or F2 to access the BIOS setup utility.
Sometimes, the BIOS key may not work due to features like Fast Boot. In that case, use another method like WinRE or Gigabyte’s app to boot to the Gigabyte BIOS.
Enable TPM in the BIOS
In the BIOS, use your mouse or press the key shown on the screen to switch to Advanced Mode. This will be the F2 key on most Gigabyte systems.
On Gigabyte boards with Intel processors,
- Go to Settings > Miscellaneous.
- Set Intel Platform Trust Technology (PTT) to Enabled.

- Go to Trusted Computing and ensure Security Device Support is Enabled.
- Press F10 to save the changes and exit the BIOS.


On Gigabyte boards with AMD processors,
- In the Peripherals tab, set AMD CPU fTPM to Enabled.
- Go to Trusted Computing 2.0 and ensure Security Device Support is Enabled.
- Finally, press F10 to save the changes and restart.


You can also set the TPM device version or manage advanced settings like PCR Bank and Platform Hierarchy from the BIOS. But those are usually best left to default. As for resetting TPM, I recommend doing it from Windows instead of the BIOS.
Check TPM Status In Windows
After you exit the BIOS and restart, the PC should reboot to Windows. Press Win + R and enter tpm.msc to open the TPM Management Console.
The TPM status should be “The TPM is ready for use.” This confirms that you successfully enabled TPM.

Or, if you’re trying to install Windows 11, you shouldn’t encounter any TPM-related errors anymore.
In rare cases, users get the This PC can’t run Windows 11 error despite enabling TPM. Or, you might see a Compatible TPM not found error in the TPM Management Console.
This can happen because the installed TPM module is not compatible with the board, among other reasons. Refer to this guide on troubleshooting a TPM device that’s not detected to resolve such problems.