Tech News Today
  • Hardware
    • Motherboards
    • CPUs
    • Graphic Cards
    • RAM
    • SSDs
    • Computer Cases
    • Monitors
    • Peripherals
    • Power Supply Unit
    • PC Builds
    • Computer Tips
  • Software
  • Operating System
    • Windows
    • Mac
    • Linux
  • Gaming
  • Mobile
  • Console
  • More
    • Internet
    • Networking
    • Security
    • Buyer’s Guide
    • Gadgets
    • Laptops
    • Reviews
    • How To
    • News
Facebook Twitter Instagram
Tech News Today
  • Hardware
    • Motherboards
    • CPUs
    • Graphic Cards
    • RAM
    • SSDs
    • Computer Cases
    • Monitors
    • Peripherals
    • Power Supply Unit
    • PC Builds
    • Computer Tips
  • Software
  • Operating System
    • Windows
    • Mac
    • Linux
  • Gaming
  • Mobile
  • Console
  • More
    • Internet
    • Networking
    • Security
    • Buyer’s Guide
    • Gadgets
    • Laptops
    • Reviews
    • How To
    • News
Tech News Today
Home » Windows

How To Bypass Secure Boot To Install Windows 11

Anup ThapaBy Anup ThapaMay 26, 2022
windows 11 bypass secure boot

One of the main reasons users are not upgrading to Windows 11 is the system requirements, particularly the CPU, TPM, and Secure Boot requirements.

Talking about secure boot specifically, most modern devices are secure boot capable. You don’t necessarily need to enable secure boot to install Windows 11, although it is good practice to use this feature. However, some users still face issues with the Secure Boot check, even on supported devices.

So, in this article, we’ve detailed how you can bypass the secure boot, TPM, and CPU requirements and install Windows 11.

Disclaimer: Microsoft does not recommend installing Windows 11 on devices that don’t meet the minimum requirements. Doing so will put you at risk of compatibility issues, and you’re not guaranteed to receive updates in the future. If you are comfortable with this, you can follow the steps in this guide to bypass the requirement checks and install Windows 11.

Table of Contents

  • How to Bypass the Secure Boot Requirement?
    • Registry Bypass Method
    • Using Rufus
  • How to Bypass the TPM and CPU Checks?
    • Registry Bypass Method
    • Replace Appraiser File
  • Related Questions
    • Can I Install Windows 11 Without TPM and Secure Boot?
    • How to Enable TPM?
    • How to Disable Secure Boot?

How to Bypass the Secure Boot Requirement?

If you’re upgrading using Windows Update or the Windows 11 Installation Assistant, we recommend using the registry method. Otherwise, you can use Rufus to create a Windows 11 installation media that automatically bypasses the TPM, Secure Boot, and RAM requirements.

Registry Bypass Method

You can create registry keys to disable the secure boot check during the installation. We recommend backing up the registry before doing so.

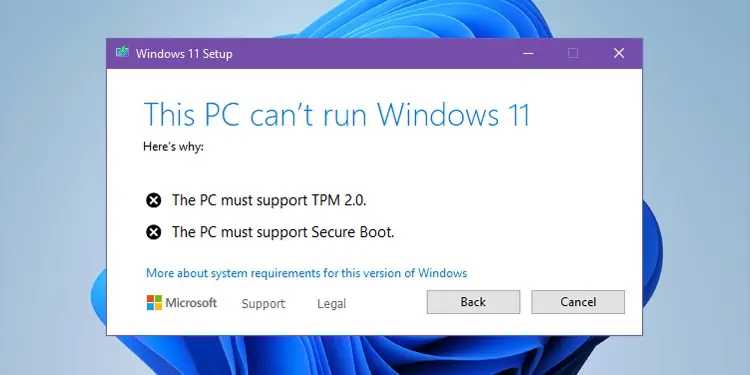
  1. Start the Windows 11 installation with your preferred method.
  2. Once you get to the This PC can’t run Windows 11 screen, press Win + R, type regedit, and press Enter to open the registry editor.
  3. Alternatively, press Shift + F10. In the command prompt window, type regedit and press Enter.
  4. Navigate to: Computer\HKEY_LOCAL_MACHINE\SYSTEM\Setup
  5. Right-click the Setup key and select New > Key.
    labconfig-registry-key
  6. Name the new key LabConfig.
  7. Select LabConfig. In the right window, right-click and select New > DWORD (32-bit Value).
  8. Name the value BypassSecureBootCheck.
  9. Double-click on BypassSecureBootCheck, change the Value data to 1, and press OK.
    bypass-secure-boot-check
  10. Optional: You can create BypassTPMCheck and BypassRAMCheck values and set the value to 1, as shown in Steps 7 – 9, to bypass TPM and RAM checks as well.
  11. Exit the registry editor and command prompt. You should be able to proceed with the Windows 11 installation now.

Using Rufus

Here are the steps to bypass the secure boot requirement using Rufus:

  1. Launch Rufus. If you don’t already have it, download a recent stable version first.
  2. Download the Windows 11 ISO if you haven’t already.
  3. Insert the USB (min. 8 GB) and select it in Rufus.
  4. Press the SELECT button and browse the Windows 11 ISO.
  5. Under Image Option, select Extended Windows 11 Installation (no TPM/no Secure Boot/8GB- RAM).
    rufus-select-image-options
  6. Select the partition scheme (GPT) and target system (UEFI non CSM).
  7. The format options section is optional. You can use the default choices or modify them as you prefer.
  8. Once you’re ready, press the Start button.
    start-rufus
  9. After the bootable media is created, you can use it to install Windows 11 without any problems.
Note: You may need to disable Secure Boot temporarily when using the Rufus method.

How to Bypass the TPM and CPU Checks?

The secure boot requirement can be a hindrance, but ultimately most modern devices support it. The TPM, and especially the CPU requirements, are the real barriers for most users who want to upgrade to Windows 11.

Fortunately, Microsoft has acknowledged this issue and presented a solution themselves. We’ve also provided a second way to bypass these checks below if the first method doesn’t work.

Registry Bypass Method

We recommend backing up the registry before proceeding with the steps listed below:

  1. Press Win + R, type regedit, and press Enter.
  2. Navigate to: Computer\HKEY_LOCAL_MACHINE\SYSTEM\Setup\MoSetup
  3. In the right pane, right-click and select New > DWORD (32-bit Value).
  4. Name it AllowUpgradesWithUnsupportedTPMOrCPU, set the value to 1, and press OK.
    allow-upgrades-with-unsupported-tpm-or-cpu
  5. Exit the registry editor and try installing Windows 11 now. You should be able to proceed without any issues.

Replace Appraiser File

When installing Windows, an appraiser service checks whether your system meets the minimum requirements or not. By replacing the appraiserres.dll file with the one from Windows 10, you can bypass the requirement checks. Here are the steps to do so:

  1. Download a Windows 10 and Windows 11 ISO, then disconnect your PC from the internet.
  2. Right-click the Windows 10 ISO and select Mount. This will mount it as a DVD drive.
    mount-iso
  3. Navigate to the sources folder inside the drive and copy the appraiserres.dll file.
  4. Mount the Windows 11 ISO next.
  5. Locate the appraiserres.dll file inside the Windows 11 drive and rename it to something like appraiserres1.dll.
    appraiserres-dll
  6. Paste the file from Step 3 here.
  7. Launch the setup.exe file. In the setup wizard, click on Change how Windows/Setup downloads updates and select Not right now.
    change-how-windows-downloads-updates
  8. Follow the on-screen instructions and proceed with the setup as usual.

Related Questions

Can I Install Windows 11 Without TPM and Secure Boot?

Secure Boot and TPM 2.0 are minimum requirements to install Windows 11 through conventional means. But there are ways to bypass these requirements, as we’ve discussed in the article above.

How to Enable TPM?

You can enable it via the BIOS Setup Utility and modify TPM-related settings via the TPM MMC. Here are the steps to do so:

  1. Restart your PC and press the BIOS Key. This key may be F2, F10, F12, Del, or something similar depending on your motherboard manufacturer.
  2. Look for a section labeled Advanced, Security, or Trusted Computing.
  3. In this section, look for the TPM, Security Device, AMD fTPM switch, Intel Platform Trust Technology (PTT), or similar option.
    tpm-bios
  4. Enable this option to enable TPM. Press the save and exit button as shown on the screen.
  5. After your PC reboots, press Win + R, type tpm.msc, and press Enter. You can modify the TPM settings from this console.
    tpm-mmc

How to Disable Secure Boot?

You can disable secure boot via the UEFI Settings interface. Here are the steps to do so:

  1. Hold Shift and restart the PC to boot into winRE.
  2. Select Troubleshoot > Advanced Options > UEFI Firmware Settings > Restart.
  3. In the UEFI Settings, look for the Secure Boot option and disable it.
    secure-boot-bios
  4. Press the button shown on the screen to save the changes and exit.
how-to
Anup Thapa
  • Instagram
  • LinkedIn

Anup Thapa primarily covers Windows systems, networking, and computer hardware at TechNewsToday. Anup has been writing professionally for almost 5 years, and tinkering with PCs for much longer. His love for all things tech started when he got his first PC over 15 years ago. It was a Pentium IV system running Windows XP on a single 256 MB stick. He spent his formative years glued to this PC, troubleshooting any hardware or software problems he encountered by himself. Professionally, Anup has had brief forays into a variety of fields from coding and hardware installation to writing. In doing so, he's worked with people of different backgrounds and skill levels, from average joes to industry leaders and experts. This has given him not just a versatile skill set, but also a unique perspective for writing that enables him to concisely communicate complex information and solve his reader's problems efficiently. You can reach out to him at anup@technewstoday.com.

Related Posts

how to download and use rufus

How to Download and Use Rufus

September 28, 2023
how to turn off hardware acceleration

How to Turn Off Hardware Acceleration

September 27, 2023
what happens if you turn off your computer during an update

What Happens if You Turn Off Your Computer During an Update?

September 18, 2023
How to Disable Integrated Graphics

How to Disable Integrated Graphics?

September 16, 2023
System Restore Stuck

How To Fix Windows Stuck on System Restore

September 16, 2023
startup-repair-couldn't-repair-your-pc

How To Fix “Startup Repair Couldn’t Repair Your PC”

September 13, 2023
View 3 Comments

3 Comments

  1. JohnIL on October 8, 2022 1:37 am

    Rufus is a good option if you’re trying to shoehorn Win 11 onto an unsupported PC. Mine are all supported but I don’t use TPM 2.0 or Secure boot. I did enable both to install Windows 11, but then disabled them after install. Actually, after trying Windows 11 for a few days, I went back to Win 10 on a couple PC’s. I was not impressed with Windows 11 at all, but still use it on my gaming PC just for some of those new gaming features. Otherwise, Windows 10 works just fine, no hurry to go back to Windows 11.

    Reply
  2. vikram on November 1, 2022 7:55 am

    none of the methods worked for me.
    i have secured boot disabled in BIOS and I do not have BIOS password

    Reply
    • Anup on November 2, 2022 10:42 am

      Hi Vikram,
      Could you please elaborate on which part of the installation process you’re getting stuck at? We’ve used these methods to install Windows 11 on numerous systems, so with more details on your specific issue, we should be able to get things working for you as well.

      Reply

Leave A Reply Cancel Reply

Latest Posts
how to clean RAM

How to Clean RAM? Step-By-Step Guide

October 2, 2023
motherboard form factors

Motherboard Types: ATX, Micro ATX, and Mini ITX Explained

September 28, 2023
how to download and use rufus

How to Download and Use Rufus

September 28, 2023
You may also like
printer-not-printing

How to Fix a Printer That’s Not Printing

September 26, 2023
Share Location With Friends and Family

Share Location With Friends and Family (iPhone and Android)

September 18, 2023
how-to-print-without-a-printer

How to Print Without a Printer

September 18, 2023
Recommended
Cookie Clicker Garden Guide

Cookie Clicker Garden Guide to Unlocking Every Seed

September 26, 2021
monitor no signal

Computer Turns On But Monitor Says No Signal (9 Ways To Fix)

November 10, 2022
Facebook Twitter Pinterest
  • Home
  • About Us
  • Our Team
  • Editorial Guidelines
  • Privacy Policy
  • Affiliate Disclosure
© 2023 TechNewsToday, editor@technewstoday.com | Tech Central Pvt. Ltd.

Type above and press Enter to search. Press Esc to cancel.