While you can format an SSD using the Secure Erase tool on BIOS, it is not possible to do the same for a hard drive. But you can still format a hard disk drive without having to boot into your Windows system.
To format a hard drive from a pre-OS environment like BIOS, use the Command Prompt Utility in the Advanced Startup. You can also format a drive during the Windows setup process.
For both methods, the exact process to format a single hard drive partition is somewhat different from formatting one with multiple partitions.
In the latter case, it’s better to wipe all of its partitions and format it as a single volume. Then, you can partition the hard drive as you need later on.
Here, I’ll be explaining how to perform both types of formats using both methods.
Using Advanced Startup Command Prompt
The easiest way of formatting a hard drive from the pre-Windows environment is to use the Command Prompt from the Advanced Startup or Windows Recovery Environment (WinRE).
One way you can get to this environment is through a bootable Windows USB. After creating this USB drive and connecting it to your PC,
- Boot using the USB drive. You may have to get to your BIOS and change the boot order to do so.
- Pick your language and keyboard settings. On the Install screen, select Repair your computer.

- On the WinRE, go to Troubleshoot > Advanced Options > Command Prompt.


Then, use one of the following methods to format the drive through Command Prompt depending on your need.
To Format a Single Partition
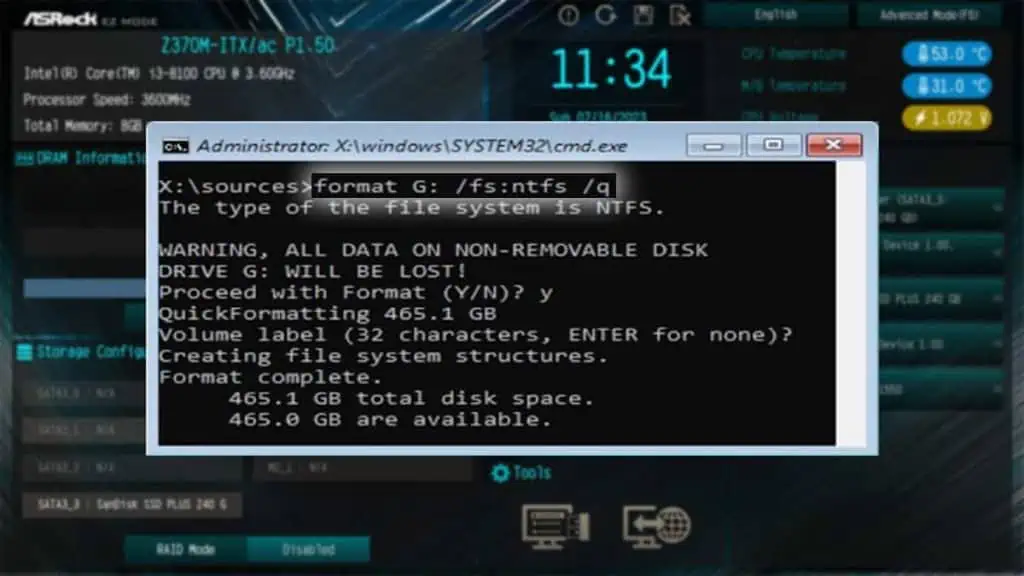
- On the command prompt, type the following commands and press Enter to check the partition’s drive letter:
diskpartlist volume(check the volume name or size to determine the letter you need)exit
- You can also look up the contents of a partition if you aren’t sure which one you need. For example,
dir D:lists out theD:volume’s contents. - Then, format the partition using the command
format G: /fs:ntfs /qwhile replacing the following:G:with your drive letter.ntfswith the file system you need, for instance,fat32orexfat/qperforms a quick format. You can remove it and simply useformat G: /fs:ntfsif you want to securely erase all data during the format.
- Type
yand press Enter to confirm your choice. - Then type the new volume label and press Enter to begin the format. You can press Enter without typing anything if you don’t want to give it a label.
- Type
exitand press Enter to get out of Command Prompt.


To Format a Hard Drive with Multiple Partitions

Type the following commands on the Command Prompt and press Enter after each:
diskpartlist disk(check your hard drive’s disk number)select disk #(replace # with the above disk number)clean(you can also useclean allto securely erase all data)create partition primaryformat fs=ntfs quick(replacentfswith your desired file system, you can omitquickif you want a secure format)exit
Enter exit again to get out of Command Prompt and then restart your PC.
Using Windows Installation Process
You can also format a hard drive while installing/reinstalling Windows on your computer. You don’t actually have to go through the installation and can opt out after formatting the hard drive.
This method is especially useful if you want to format your drive and install a new Operating System (OS) at the same time.
First, get to the Windows Installation step on the Windows Setup. To do so,
- Create a Bootable Windows drive and boot using it.
- Set the language and keyboard preferences.
- On the Install screen, select Install now.
- Select I don’t have a product key and select your Windows build.
- Accept the license agreements if prompted and click Next.
- Click on Custom: Install Windows only (advanced).


Then, use the steps below depending on whether you need to format a single partition or a hard drive with multiple partitions.
To Format a Single Partition

- Select the partition you wish to format from the list by checking its size and drive number.
- Click on Format and then confirm with OK.
If the option is grayed out (usually for external drives), delete the volume. Then create a new volume with the unallocated space similar to the method below.
To Format a Hard Drive with Multiple Partitions

- Look for the hard drive you wish to format. You will see all the partitions that belong to this drive with the same drive number.
- Select each volume inside this drive and click Delete > OK.
- Now, select the Unallocated Space of the drive and click New > Apply > OK.
- Then, you can go through the Windows installation by selecting the drive and clicking Next or exit the OS installation by clicking on the Close (x) icon.