Close Menu
Tech News Today
  • Hardware
    • Motherboards
    • CPUs
    • Graphic Cards
    • RAM
    • SSDs
    • Computer Cases
    • Monitors
    • Peripherals
    • Power Supply Unit
    • PC Builds
    • Computer Tips
  • Software
  • Operating System
    • Windows
    • Mac
    • Linux
  • Gaming
  • Mobile
  • Console
  • More
    • Internet
    • Networking
    • Security
    • Buyer’s Guide
    • Gadgets
    • Laptops
    • Reviews
    • How To
    • News
Facebook X (Twitter) Instagram
Tech News Today
  • Hardware
    • Motherboards
    • CPUs
    • Graphic Cards
    • RAM
    • SSDs
    • Computer Cases
    • Monitors
    • Peripherals
    • Power Supply Unit
    • PC Builds
    • Computer Tips
  • Software
  • Operating System
    • Windows
    • Mac
    • Linux
  • Gaming
  • Mobile
  • Console
  • More
    • Internet
    • Networking
    • Security
    • Buyer’s Guide
    • Gadgets
    • Laptops
    • Reviews
    • How To
    • News
Tech News Today
Home » Storage

How to Format SSD From BIOS

Anup ThapaBy Anup ThapaSeptember 28, 2023
how to format ssd from bios

Formatting the SSD from the BIOS is much more secure compared to the usual OS-based formatting methods. 

This is because BIOS-based formatting uses Secure Erase. This feature issues a Secure Erase ATA instruction to reset the SSD to a completely clean state.

Assuming your motherboard supports it, you can use the Secure Erase feature from the Advanced or Tools section of the BIOS.

Why Should You Use Secure Erase

SSDs use techniques like wear leveling and overprovisioning to improve their lifespan. The overprovisioned blocks (~10% of the total) aren’t usually affected by normal format methods. This means it is possible to recover data from such blocks, even after a complete format.

If you’re only formatting your SSD to free up space, you can use any method you prefer. But if you plan to sell the SSD, it’s important to ensure that the data is completely wiped. You wouldn’t want it to be recovered without your knowledge later.

The Secure Erase feature in the BIOS works well for such purposes.

But it also has a bunch of caveats. Here are the most important ones to keep in mind:

  1. Connect the SSD to your system through a SATA or NVMe interface. Don’t use a USB cable or RAID card.
  2. With the latter interfaces, Secure Erase normally doesn’t detect the SSD.
  3. Even if it is detected, don’t erase the SSD through those interfaces. This can potentially brick your SSD.
  4. Not all BIOSes support Secure Erase. I tested four different boards for this article (MSI MAG B550M Mortar, ASUS ROG Strix B450-F Gaming, Gigabyte B450 AORUS ELITE, and ASRock X370 Taichi). The first two supported it while the latter two didn’t.
  5. Secure Erase isn’t usually labeled on the specs page or the manual. So, you must explore your BIOS to check if this feature is supported.
  6. Most modern SSDs are compatible with Secure Erase. But you should still verify this as an incompatible SSD will likely get bricked. You can visit your system manufacturer’s support site to check the list of compatible SSDs.
  7. And finally, don’t forget to backup any important data elsewhere before you start.

Enter the BIOS

I’m assuming you’ve already installed the SSD on your PC. Switch on or restart the system and press the BIOS Setup key shown on the screen. This will be the Del key on most systems.

msi mag mortar board post screen

If it doesn’t work for you, you can refer to our BIOS access guide. It explains how to enter the BIOS on different systems in detail.

Load the Secure Erase Utility

In the BIOS Setup Utility, you should first ensure you’re in Advanced Mode. The key to switch (F7 in my case) should be labeled at the top or bottom of the screen.

msi bios secure erase plus

Explore the Boot, Advanced, Tools, and similar tabs in Advanced Mode. Basically, look through sections containing storage-related options to locate the Secure Erase utility.

secure erase unlock frozen ssd

Once you find it, accept the prompt to unfreeze the SSD and load the utility.

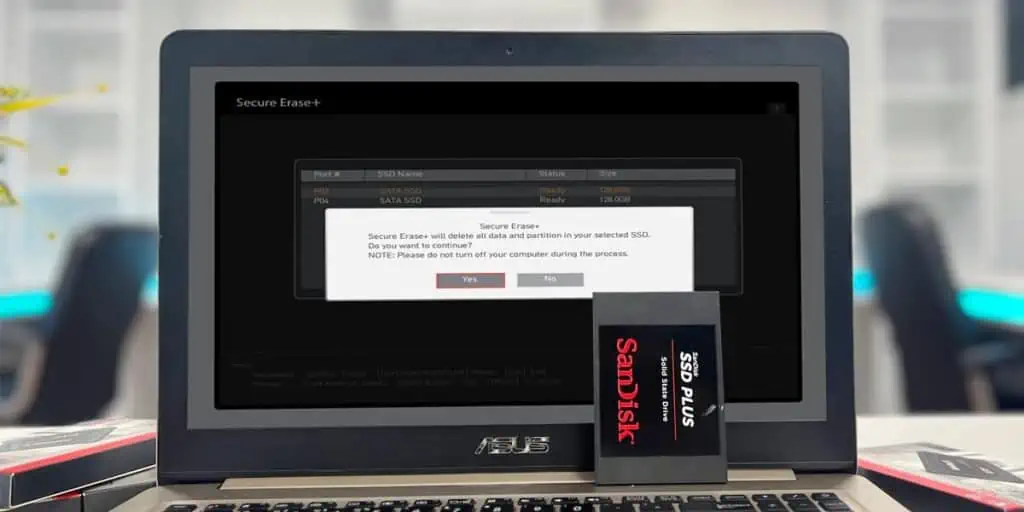
Format SSD with Secure Erase

The actual format process is extremely straightforward.

  1. Identify the SSD to erase through it’s name, size, or connected port.
  2. Select it and accept the prompt to erase the SSD.
    delete-ssd-data-secure-erase
  3. Once the process completes, your PC will restart.

Using Secure Erase Outside the BIOS

If want to wipe your SSD without using the BIOS Secure Erase utility, you have a few options. Tools like diskpart, dd, or DBAN are popular.

For Secure Erase-based methods, you’ve got OEM utilities like Samsung SSD Magician or Western Digital Dashboard. And you’ve got CLI tools like hdparm.

All of these have their own limitations. The main potential drawback is that you could permanently password-lock your device. This happens (pretty often) because users don’t set a drive password beforehand. 

My point here is that you should thoroughly research whichever method you plan to use and follow the proper steps. It’s no fun losing your perfectly fine SSD because you forgot to perform some obscure step.

bios format SSD
Anup Thapa
  • Instagram
  • LinkedIn

Anup Thapa primarily covers Windows systems, networking, and computer hardware at TechNewsToday. Anup has written professionally for over 5 years, and tinkered with PCs for much longer. His love for all things tech started when he got his first PC over 15 years ago. It was a Pentium IV system running Windows XP on a single 256 MB stick. He spent his formative years glued to this PC, troubleshooting any hardware or software problems he encountered by himself. Professionally, Anup has had brief forays into a variety of fields from coding and hardware installation to writing. In doing so, he's worked with people of different backgrounds and skill levels, from average joes to industry leaders and experts. This has given him not just a versatile skill set, but also a unique perspective for writing that enables him to concisely communicate complex information and solve his reader's problems efficiently. You can reach out to him at anup@technewstoday.com.

Related Posts

computer died

Computer Died? Here’s What You Should Do Next

December 1, 2023
how-to-share-a-printer

How to Share a Printer on Network (Step-by-Step Guide)

November 28, 2023
how to clean mechanical keyboard

How to Clean Mechanical Keyboard in 7 Steps

November 24, 2023
one keyboard two computers

How To Control Two Computers With One Keyboard/Mouse

November 21, 2023
cpu fan header

CPU Fan Header: Connecting Properly to Motherboard

October 18, 2023
hard drive clicking

Why is My Hard Drive Clicking? How to Fix It?

October 18, 2023
Add A Comment

Leave A Reply Cancel Reply

Latest Posts
scanning and repairing drive stuck

Windows Stuck in Scanning and Repairing Drive Screen? 4 Easy Fixes

December 4, 2023
computer died

Computer Died? Here’s What You Should Do Next

December 1, 2023
how-to-share-a-printer

How to Share a Printer on Network (Step-by-Step Guide)

November 28, 2023
You may also like
printer-not-printing

How to Fix a Printer That’s Not Printing

September 26, 2023
Share Location With Friends and Family

Share Location With Friends and Family (iPhone and Android)

September 18, 2023
how-to-print-without-a-printer

How to Print Without a Printer

September 18, 2023
Recommended
Cookie Clicker Garden Guide

Cookie Clicker Garden Guide to Unlocking Every Seed

September 26, 2021
monitor no signal

Computer Turns On But Monitor Says No Signal (9 Ways To Fix)

November 10, 2022
Facebook X (Twitter) Pinterest
  • Home
  • About Us
  • Our Team
  • Editorial Guidelines
  • Privacy Policy
  • Affiliate Disclosure
© 2023 TechNewsToday, editor@technewstoday.com | Tech Central Pvt. Ltd.

Type above and press Enter to search. Press Esc to cancel.