
Most mid-range and higher motherboards support the BIOS Flashback feature. This allows you to update the BIOS without the CPU or any other components.
Using BIOS Flashback is very simple:
- Prepare a FAT32 USB drive with the desired BIOS file.
- Connect this USB drive to the BIOS Flashback port.
- Press the Flash BIOS button and wait 5 minutes or so.
It is crucial that you get a few things right, though. This includes verifying that your board doesn’t need a CPU for BIOS Flashback. Or, getting the correct BIOS version for your board.
Verify BIOS Flashback Support
For starters, your motherboard must have a BIOS Flashback port. Different manufacturers name this port like so:
- ASUS – USB BIOS Flashback
- MSI – Flash BIOS
- Gigabyte – Q-Flash Plus
- ASRock – BIOS Flashback
Besides this obvious requirement, here are some more things to keep in mind:
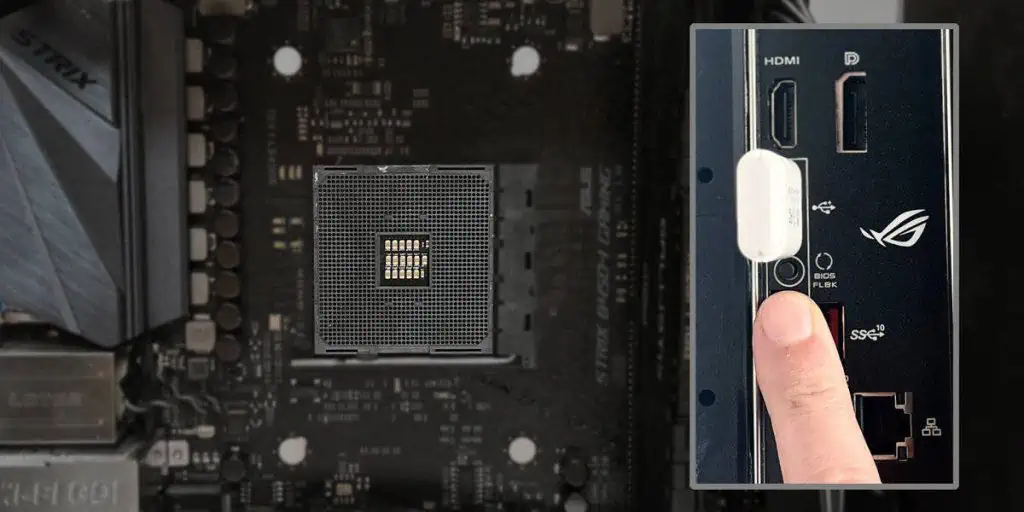
- Sometimes, the Flashback port won’t be physically labeled (like with our ASRock X570 AQUA). It’ll only be indicated in the manual.

- Some boards don’t support BIOS Flashback without a compatible CPU. This was the case with our ASUS ROG STRIX B550-I GAMING board.
- Generally, the 24-pin ATX connector is the only necessary power source. But some boards (e.g., Gigabyte’s AORUS lineup) require you to connect the 8-pin CPU connector as well.
- Check your user manual to verify all of these requirements for your motherboard before proceeding.


I’ll update the BIOS without a CPU on my MSI MAG B550M MORTAR system to demonstrate the rest of the process.
Note: If you need a compatible AMD CPU to use BIOS Flashback, check if you’re eligible for their CPU loaner program. This way, you won’t have to spend extra on a repair center visit or the like.
Download the Correct BIOS File
On another system, go to your motherboard’s support page. Keep the following points in mind when downloading the BIOS file from there:
- Ensure you’re on the page for the correct motherboard revision.
- Ideally, you should know your current BIOS version before updating. Manufacturers like ASUS and ASRock keep a sticker on the motherboard to indicate the factory BIOS version.
- Go to the Drivers & Downloads section. You’ll find the BIOS files there. The latest stable BIOS version is usually the best option.
- Check all the changelogs starting from your current BIOS version to the one you want to flash now. The description often contains important info and instructions (e.g., whether incremental updates are necessary).
- Finally, download the BIOS file and extract the archive.


Move BIOS File to USB
For BIOS Flashback, you need to rename the BIOS file as specified by your manufacturer. Only the extension is consistent among different brands:
- MSI:
.ROM - ASUS:
.CAP - Gigabyte:
.BIN - ASRock:
.rom
The full name depends on the brand and board model. For instance, you need to rename the file to MSI.ROM for most MSI boards.

But ASUS provides a Rename utility, so each file will be named differently.
As there’s a lot of variation, I recommend you check the user manual and the BIOS Flashback guide from your board manufacturer.
After renaming the file, format a USB drive to FAT32 and move the file there.
Use BIOS Flashback
Connect the USB drive to the BIOS Flashback port on your motherboard’s I/O Panel.
- As I mentioned earlier, the 24-pin power connector is mandatory. The 8-pin CPU connector may be necessary depending on the board. Refer to the first section if you’re unsure about this.
- Ideally, you should also have a power backup like a UPS to ensure that the BIOS update isn’t interrupted.
- Besides these, the other hardware is irrelevant.

Now, to use BIOS Flashback, simply press the adjacent button for around 5 seconds.

The Flashback LED should start blinking. If your USB drive has an LED, it’ll do the same. This will continue for around 5-10 minutes.
Once the Flashback LED stops blinking, the BIOS update is complete.
What If the BIOS Update Fails
When the BIOS update fails via standard methods, your board can’t boot at all due to a NO POST issue. BIOS Flashback is commonly used to recover your board in such situations.
As long as you follow the proper procedure (FAT32 USB, correct BIOS file and name, etc., it should complete smoothly. But if the BIOS Flashback fails despite this, try these quick fixes:
- Flash a different BIOS version. This is especially important if you tried to flash a beta version earlier.
- Convert the USB drive to MBR.
- Try another USB drive. Ideally, the second drive should be a different USB version (e.g., USB 2.0 instead of 3.0).
- Clear the CMOS and try flashing the BIOS again.
If these don’t help, check out our guide on recovering from a failed BIOS update. It details advanced methods like reprogramming the BIOS and replacing the BIOS chip.