
Upgrading your RAM is one of the easiest ways to improve your system’s speed and multitasking capabilities. But before you run off to buy new RAM sticks, it pays to do some compatibility research.
You’ll want to ensure your motherboard has open DIMM slots and supports the RAM’s rated speed, latency, and form factor.
In a nutshell, upgrading your RAM involves picking compatible RAM and motherboard models. Physically install the RAM by accessing the DIMM slots and securely seat each stick. After that, enable the proper XMP profile in BIOS settings.
Recently, our team upgraded RAM on two different motherboards (Gigabyte B450 Arous Elite and Asus ROG Strix B450-F Gaming).
During the process, we ran into a few complications with locks on memory slots. Additionally, other components like the CPU or GPU were in the way of the RAM slot. To ensure that you do not run into any issues, here is a detailed guide on everything you need to know when upgrading RAM.
Prerequisites
First off, you cannot install any RAM onto the motherboard. The motherboard may only be compatible with a certain type of memory stick. And you should also know the maximum RAM capacity and DDR type/version supported by your system.
Once you have the correct memory type that the motherboard supports, all you need is a screwdriver.
Make sure you ground yourself before making contact with any components inside the PC to prevent any short circuits.
Unplug Power Cable And Discharge the Capacitors

Simply turning off the PC and beginning the upgrade process will also work. However, I recommend that you unplug the power cable from both the PSU and the wall outlet to avoid any electrical mishaps.
Furthermore, once you remove the PSU cable from the PC, it is also best that you discharge the capacitors in the motherboard. To discharge the capacitor, press and hold the power button on the CPU case for 10 to 15 seconds.
Remove the Side Panel Screws And the Side Panel

On Desktop PCs, removing the side panel gives you full access to the motherboard. And with this, you can install RAM, GPU, or even the CPU.
To remove the side panel on a PC case, first lay the PC case flat on a surface with the left side panel facing up. Now, take a screwdriver and remove any screws that connect the left side panel to the PC.
PC Case may also come with thumbscrews. So you can easily remove them from the case without a screwdriver.

Once you have removed all the screws that hold the side panel to the case, slide it out of the case to access the motherboard.
Find RAM Slots and Remove Any Obstacle

Now that you have complete access to the motherboard, check the memory slot and see if it is accessible.
The slots that are closest to the CPU are your memory slots. If you cannot find them, check the motherboard’s user manual. Memory slots are usually denoted by DIMM.
Once you have the exact location of the DIMM slot, check if you can access it. If you do not see any memory slot or have a hard time accessing it, your aftermarket cooler or vertically mounted graphics card might be blocking it.

In such cases, you need to remove these components first. You can refer to the user manual of the component that is blocking RAM in order to remove it.
Choosing DIMM Slot

You will need to install the RAM in the correct slot if you want to run the system in dual-channel mode. The memory will run on single-channel mode if you insert them in random slots.
Mini-ITX motherboards have 2 DIMM slots however, sizes greater than micro-ATX usually have 4 memory slots. But, a motherboard with 8 or even 16 slots is also not unheard of.
For a motherboard with two memory slots, you can simply use both memory slots and the system will automatically run on dual channel mode.
For a motherboard with four DIMM slots, you need to use slots 2 and 4 or alternate slots to run in dual channels. You can also check if the DIMM slots are color coded. Memory slots with the same color run in dual-channel mode.
If you are uncertain about the memory slot, you can always refer to the motherboard’s user manual.
Unclip RAM slot

Before you insert, you first need to unclip the plastic lock on either side of the memory slot. You can do this by slightly pressing the lock outwards. In some motherboards, these plastic locks will only unclip on one side of the RAM slot.
So, make sure the type of RAM slot the motherboard has, or you might break the memory slot.
Note: Since you are upgrading memory, make sure that you clean the memory slot before you insert a new memory module
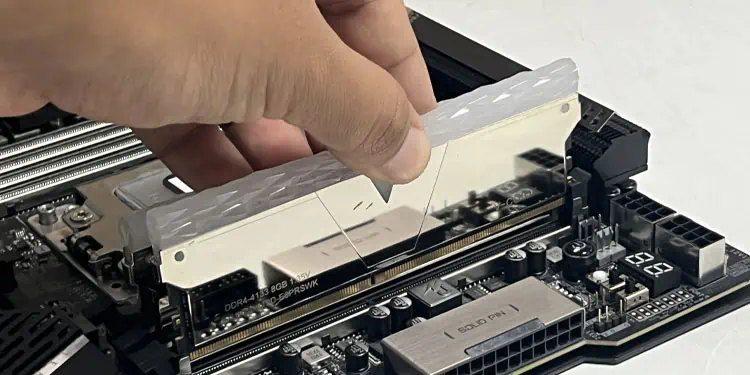
Insert RAM
Now that you have prepared the memory slot, it is now time for the most important task, inserting the RAM.
- Align the notches on the RAM slot with the notches on the memory stick.
- Once aligned, press both sides with equal pressure.

- You should hear two clicks, one side and the other.

Re-connect Components
Now, that you have inserted a new pair of memory modules, you can install anything you previously removed. But first, make sure that you clean the removed components like the CPU cooler and the GPU.
If you have removed the CPU cooler or the GPU, I recommend you clean the heatsink and fans. This will drastically lower the system temperature.
Once cleaned, make sure to clean off the thermal paste residue from the CPU and the base of the cooler and re-apply the thermal paste before you reassemble.
Once you have reconnected all the internal PC components, it is now time to insert the side panel.
- Slide the side panel back into the PC case and make sure that the screw holes on the side panel align with the screw holes in the PC case.
- Using the screws, secure the side panel back to the case.
- Now, reconnect the PSU.
Check Upgraded RAM Via BIOS
Congratulations! You have successfully upgraded your RAM. Now it is time to see if the system detected the new RAM that you just added to the system. You can do this via the BIOS.
BIOS, or the Basic Input Output System, displays all the hardware and its settings connected to the motherboard. And you can use it to see if the system detected the memory.
- Turn on the PC.
- Repeatedly press the BIOS key, usually delete key, to boot into BIOS
- The BIOS key could also be one of the function keys, depending on the system. You can refer to the internet to determine the BIOS key for your system.
- Once you are in the BIOS, search for memory settings.
- Here, check the total memory.
