Tech News Today
  • Hardware
    • Motherboards
    • CPUs
    • Graphic Cards
    • RAM
    • SSDs
    • Computer Cases
    • Monitors
    • Peripherals
    • Power Supply Unit
    • PC Builds
    • Computer Tips
  • Software
  • Operating System
    • Windows
    • Mac
    • Linux
  • Gaming
  • Mobile
  • Console
  • More
    • Internet
    • Networking
    • Security
    • Buyer’s Guide
    • Gadgets
    • Laptops
    • Reviews
    • How To
    • News
Facebook Twitter Instagram
Tech News Today
  • Hardware
    • Motherboards
    • CPUs
    • Graphic Cards
    • RAM
    • SSDs
    • Computer Cases
    • Monitors
    • Peripherals
    • Power Supply Unit
    • PC Builds
    • Computer Tips
  • Software
  • Operating System
    • Windows
    • Mac
    • Linux
  • Gaming
  • Mobile
  • Console
  • More
    • Internet
    • Networking
    • Security
    • Buyer’s Guide
    • Gadgets
    • Laptops
    • Reviews
    • How To
    • News
Tech News Today
Home»Windows»How to Disable “Open File Security Warning” in Windows?

How to Disable “Open File Security Warning” in Windows?

NizzBy NizzDecember 14, 2022
open-file-security-warning

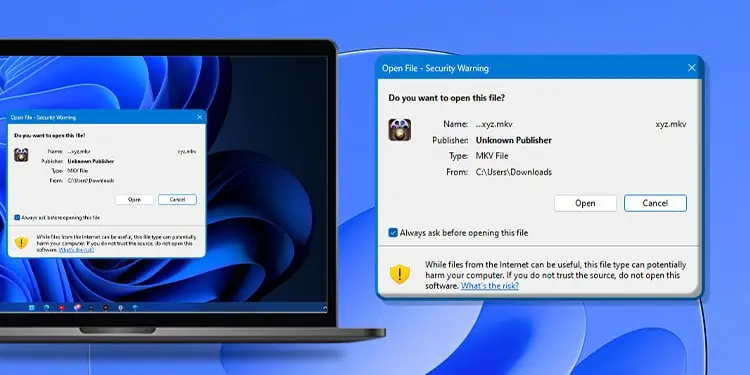
‘Open file – Security Warning’ warning prompt is shown when users try to open an untrusted file downloaded from the internet. But how would Windows know if the opening file is a security threat? 

It keeps a list of malicious and risky files in a database, and checks if the properties of the opening file falls within the list. Windows also maintains databases of widely used safe files, and if the opening file doesn’t align with the list, it is flagged as a threat.

At times you would be prompted with the warning message, even if you’re aware that there’s no security risk within a file. You can also disable the prompt from appearing. However, we would only recommend disabling this prompt temporarily and only if you’re dealing with a fully trusted file.  

How to Turn Off “Open File Security Warning” Prompt?

open-file-security-warning

While confirming the prompt, you can untick the Always ask before opening this file check box. It should at least avoid the prompt from appearing when opening that specific file in the future. 

But completely skipping that step would require changes in security settings.

Run App/Files without Prompts

If that doesn’t work for you, you can try to disable the warning prompt and open any applications/files (flagged as unsafe) flawlessly. But keep in mind, applying this fix is an added security risk for your computer.

Note: Consider going with it only if you’re completely aware of the safety of the file you’re trying to open.
  1. Press Windows + R to open Run.
    to-open-Run.
  2. Type inetcpl.cpl to open Internet Properties.
    command-to-open-Internet-Properties
  3. Go to the Security tab.
    Go-to-the-Security-tab.
  4. Click on the Custom Level Button.
    Click-on-the-Custom-Level-Button.
  5. Scroll to Launching applications and unsafe files. You can just type if you didn’t find it.
    Scroll-to-Launching-applications-and-unsafe-files.
  6. Select Enabled (not secured)
    Select-Enabled-(not-secured-)
  7. Click on the OK button. 

Your app/file should now open without any issue. After you’re done opening a specific app/file, don’t forget to change the setting to its default state. To do so, follow the same steps but choose the Prompt (recommended) radio option on the 6th step.

Turn Off Windows Defender Smartscreen

Windows Defender SmartScreen has its own protection policy and procedure independent of the above-mentioned internet security settings. It checks the downloaded file against a list of trusted files to confirm if it’s safe. And if the downloaded isn’t in the list of trusted files, it would prompt the very security warning. 

To avoid the prompt, you can disable the SmartScreen protection temporarily from Windows Defender settings. 

  1. Press Windows Key + I for Settings app.
    to-open-Settings-app.
  2. Go to Privacy & security > Windows Security
    Go-to-Privacy-&-security--Windows-Security
  3. Click on App & browser control
    Click-on-App-&-browser-control
  4. Then, click Reputation-based protection
    click-Reputation-based-protection
  5. Toggle Off buttons under Check apps and files and also Smart Screen for Microsoft Edge.
    Toggle-Off-buttons-under-Check-apps-and-files-and-also-Smart-Screen-for-Microsoft-Edge

You can turn on the feature after accomplishing your task. 

how-to
Nizz

Nizz is a self-learning web developer and a keen follower of all things tech. He has always been fascinated by the latest gadgets and innovations, and loves to keep up with the latest trends.

Related Posts

how to delete win backup files

How to Delete Backup Files on Windows

January 29, 2023
how to reset password on hp laptop

How to Reset Password on HP Laptop

January 29, 2023
Reset BIOS password

4 Ways to Reset BIOS Password

January 28, 2023
how to make windows 11 look like windows 10

How to Make Windows 11 Look Like Windows 10

January 25, 2023
how to find hidden folder in laptop

How to Find Hidden Folder in Laptop

January 24, 2023
mouse not showing in chrome

Mouse Not Showing in Chrome? Here’s How to Fix It

January 25, 2023
Add A Comment

Leave A Reply Cancel Reply

Latest Posts
how long does a cmos battery last

How Long Does a CMOS Battery Last

January 25, 2023
thunderbolt vs usb c

Thunderbolt Vs USB C: What’s the Difference

January 25, 2023
how to find hidden folder in laptop

How to Find Hidden Folder in Laptop

January 24, 2023
You may also like
how-to-connect-headphones-to-tv

5 Ways to Connect Headphones to TV

January 29, 2023
connect-airpods-to-samsung-tv

How to Connect AirPods to Samsung TV? (Step-by-Step Guide)

January 29, 2023
AIO Pump Not Working

AIO Pump Not Working? Here’s How to Fix It

January 29, 2023
Recommended
Cookie Clicker Garden Guide

Cookie Clicker Garden Guide to Unlocking Every Seed

September 26, 2021
monitor no signal

Computer Turns On But Monitor Says No Signal (9 Ways To Fix)

November 10, 2022
Facebook Twitter Pinterest
  • Home
  • About Us
  • Our Team
  • Editorial Guidelines
  • Privacy Policy
  • Affiliate Disclosure
© 2023 TechNewsToday.

Type above and press Enter to search. Press Esc to cancel.