The power button in your PC is not merely to power up your PC. You can also press it while your PC is on to perform certain tasks, such as shutdown or restart. Many users set such functions, but you can also set it to do nothing if you’re afraid of pressing it unintentionally.
It’s very easy to change the setting for the power button action. Regardless of the method you use, it takes less than a minute. Laptop users can also change the setting for each power mode (plugged in or on battery).
So, let’s move on to the possible methods for this process on a Windows 11 PC.
How to Change the Keyboard Power Button Settings
This section deals with changing your system’s action if you press your keyboard’s power button. If you want to change the options for the power button on the GUI (e.g., Start Menu), head over to the next section.
There are many ways to change the power button settings. These methods have different precedence. So read carefully and pick one according to your preference.
Through Power Options
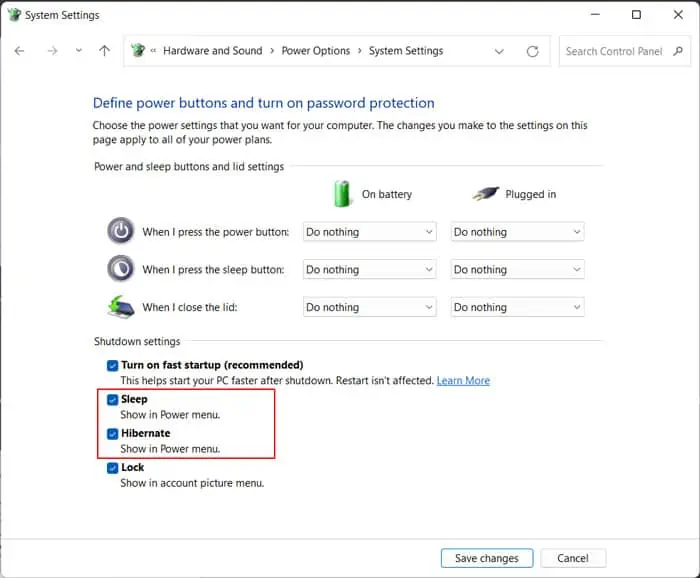
This is the default method of changing the power button settings using the GUI. Power Options is a Control Panel feature that configures all power settings. You can either change the power button actions for all power plans or a specific one.
For All Power Plans
Here are the steps for this method:
- Press Win + R to open Run.
- Type
powercfg.cpland press Enter. It will load Power Options. - Click Choose what power buttons do.
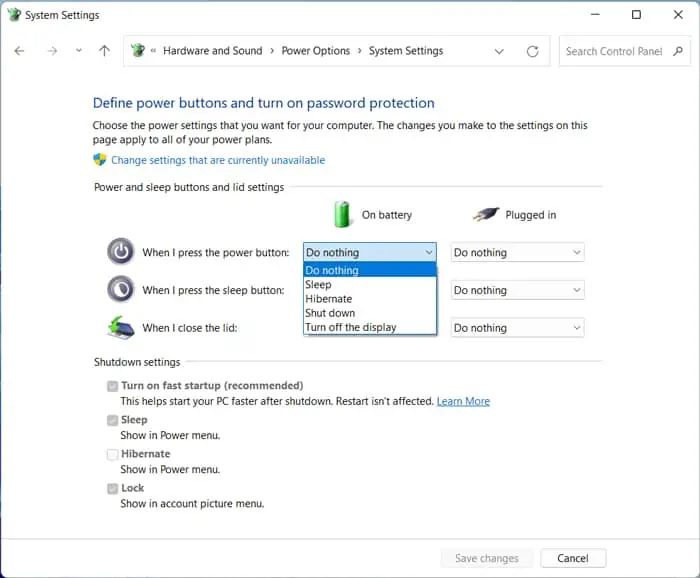
- Click on the drop-down boxes next to When I press the power button.

- Select the option you want.
- Click Save Changes.
For Specific Power Plan
Follow the steps below to change power button settings for a specific plan:
- Open Power Options.
- Click on Change plan settings for your power plan.
- Select Change advanced power settings.
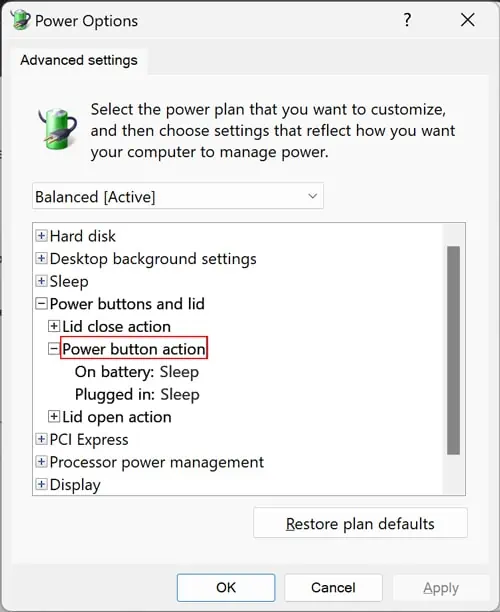
- Expand Power buttons and lid > Power button action.

- Click the drop-down boxes for On battery and Plugged in, and set the option you want.
- Click Apply and Ok.
If you can’t see the Power buttons and lid option, open Command Prompt as admin and enter the following command:
REG ADD HKLM\SYSTEM\CurrentControlSet\Control\Power\PowerSettingsf971e89-eebd-4455-a8de-9e59040e7347ca83367-6e45-459f-a27b-476b1d01c936 /v Attributes /t REG_DWORD /d 2 /f
Using Group Policy Editor
Another way to change power button actions is by changing its policy settings. Such policies take precedence over the Power Options settings. To change the power button policies,
- Open Run and enter
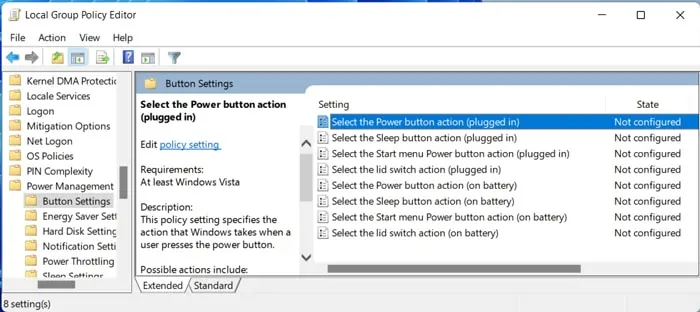
gpedit.mscto open the Local Group Policy Editor. - Go to Computer Configuration > Administrative Templates > System > Power Management > Button Settings.
- Double-click on Select the Power button action (plugged in).

- Check Enabled and set Power Button Action to your preference.
- Click Apply and Ok.
- Apply the same process for Select the Power button action (on battery).
With Registry Editor
You can also change the Power Button Settings in the registry configuration. You can do so by using the Registry Editor. First, back up your registry and then, follow the steps below:
- Launch Run and enter
regedit. It directs you to the Registry Editor. - Navigate to
Computer\HKEY_LOCAL_MACHINE\SOFTWARE\Policies\Microsoft\ - Right-click on Microsoft and select New > Key.
- Set its name to Power.
- Create a new key
PowerSettingsinside Power. - Create new key
7648EFA3-DD9C-4E3E-B566-50F929386280inside PowerSettings and go inside this key. - Right-click on an empty area and select New > DWORD (32-bit) Value.
- Set its name it
ACSettingIndex. - Create another DWORD value and name it as
DCSettingIndex. - Double-click on the entries to set their Value data to any of the following options:
- Take no action = 0
- Sleep = 1
- Hibernate = 2
- Shut down = 3
ACSettingIndex specifies the power button action for the plugged-in mode. And the other entry determines the action for the on battery power mode.
You don’t need to create the keys and entries if they already exist. Simply change their values.
Using Command-line Interface
If you’re familiar with the CLI, you might find it easier to use it to change such settings. You can change the power button settings for the current or any specific power plan. Pick one according to your need.
For the Current Power Plan
Here are the steps to change power button actions for your current power plan using a CLI:
- Open the Command Prompt or Windows PowerShell.
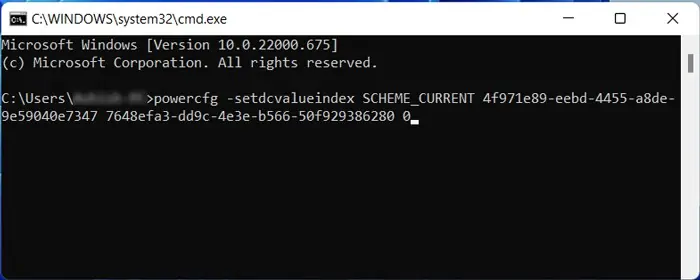
- Enter the following commands:
powercfg -setdcvalueindex SCHEME_CURRENT 4f971e89-eebd-4455-a8de-9e59040e7347 7648efa3-dd9c-4e3e-b566-50f929386280 “Option Index”powercfg -setacvalueindex SCHEME_CURRENT 4f971e89-eebd-4455-a8de-9e59040e7347 7648efa3-dd9c-4e3e-b566-50f929386280 “Option Index”- Make sure to replace “Option Index” with a value as follows:
- Do nothing – 0
- Sleep – 1
- Hibernate – 2
- Shutdown – 3
- Turn off display – 4

- Type
powercfg -SetActive SCHEME_CURRENTand press Enter.
For a Specific Power Plan
You need to know the GUID of a power plan to change its setting. The complete process of altering power button settings is as follows:
- Open the Command Prompt or Windows PowerShell.
- Enter
powercfg /land note the GUID number for the plan you want. - Enter the same commands as the above method while replacing SCHEME_CURRENT with the GUID number.
How to Change the GUI Power Button Options
If you want to change the GUI Power Menu options rather than the power key settings, this is the section for you. The power menu always contains Restart and Shut down. But you can choose if you want to show the Hibernate or Sleep options.
There are many ways of doing so, such as:
Through Power Options
Using the Power Options is always the usual method of making any changes to your power settings. Here’s what you need to do to change the power menu options:
- Open Run and enter
powercfg.cpl. - Click Choose what power buttons do.
- Select Change settings that are currently unavailable.
- Under Shutdown settings, check/uncheck Sleep and Hibernate for the Power Button menu.

- Click Save Changes.
With CLI
You can also enable or disable the two options using the Command-line Interface. Follow the instructions below to use the Command Prompt for this purpose:
- Press Win + R to open Run.
- Type
cmdand press Ctrl + Shift + Enter to open the elevated Command Prompt. - Enter the following options to change the hibernate/sleep options in the Power menu:
Enable Hibernate: powercfg /hibernate onDisable Hibernate: powercfg /hibernate offEnable Sleep: powercfg /sleep onDisable Sleep: powercfg /sleep off
Using Group Policy Editor
Another way to change the power menu options is through their policy settings. To do so,
- Enter
gpedit.mscon Run. - Head over to Computer Configuration > Administrative Templates > Windows Components > File Explorer.
- Double-click on Show hibernate in the power options menu or Show sleep in the power options menu.
- Check Enabled or Disabled according to your preference and click Ok.
With Registry Editor
You can also go to the Registry Editor and change the entries corresponding to the options. Follow the directions below to do so:
- Enter
regediton Run. - Go to
Computer\HKEY_LOCAL_MACHINE\SOFTWARE\Microsoft\Windows\CurrentVersion\Explorer\FlyoutMenuSettings - Set ShowHibernateOption and ShowSleepOption to 1 to enable and 0 to disable them.
If you don’t see FlyoutMenuSetting, create the key. Then, create the two DWORD entries as we mentioned above and set their value accordingly.

